
The VMware Fling labs is one of my favourite things, as it brings some awesome new tech straight from VMware R&D. Some of these flings flow to the product cycles (remember the HTML5 client, now default in vCenter?). And they did it again!
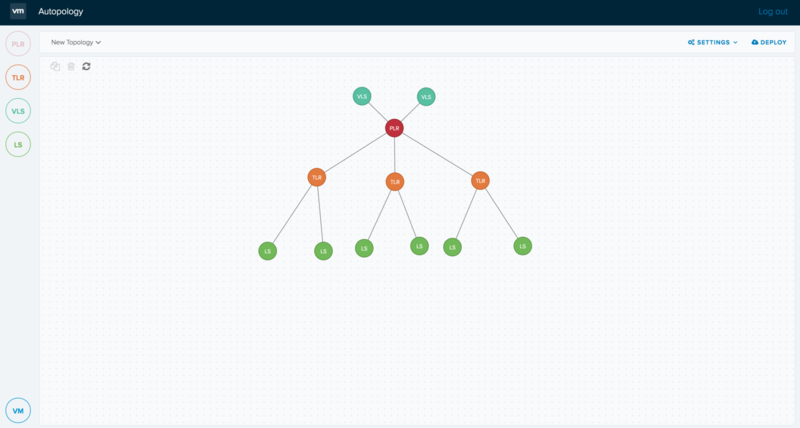
Ever since I’ve seen an internal session about this product, I’ve been anxiously waiting for it to be released (one way or another). Autopology just dropped on the Flings website. Autopology is a translator between your network drawings and the real-life configuration. It is a what-you-see-is-what-you-get editor where you can create drawings of a network topology and then push the configuration for that to NSX. Logical switches, routers, edhe
Currently it only supports NSX-T(ransformers), so it’s not for everyone. I have high hopes that this is just the first step and that it will eventually land in the native NSX interface. In the mean time, if you have NSX-T running and want to try it out, download it and provide feedback for the team!
From the Fling page:
What Autopology Offers
- Drag and drop interface to create logical networks so that the customers can design topologies tuned to their environments
- Single click replication of sections of topologies
- Ability to view the drawn network for future reference
- Ability to easily navigate to NSX Manager interface to further customize the logical entities as and when needed
- Ability to attach multiple VMs to logical entities. VMs could be residing on ESX or KVM hypervisors
Benefits
- One cohesive view to design logical networks as opposed to filling out tedious forms across multiple views
- Intelligent defaults help bypass advanced configuration for network objects
- Rapid scaling of logical networks
- Inventory of workloads across multiple hypervisors
- Combine compute and network in a single view
Running it on CentOS/Redhat
The installation guide mentions that an Ubuntu server is necessary to run this, but you can also run it on a CentOS (or Redhat, if you want to get fancy) server. The only thing that differs from the original installation guide are the packages that you need to install:
yum install python-pip libvirt-python openssl-devel python-devel libffi-devel gcc
Screenshot
Leave a Reply