Sorry, you actually can’t configure two Netflow targets in vSphere. 😉
HOWEVER! There’s a way around this limitation. Currently, the VDS only supports one Netflow target IP address to send NetFlow to. This limitation can cause some issues when you want to employ multiple Netflow collectors, for instance an existing Network Management System (NMS) and do a vRealize Network Insight Assessment.
What is Netflow?
I’m not going to explain Netflow in depth, but just to set the stage here’s a small summary. Netflow is a protocol that allows you to collect information about what traffic flows are going through your network. Usually it’s enabled on your physical switches so that you can collect all network traffic going through your network. Since the conception of virtualization, the best source of Netflow has since moved from the physical switch to the virtual switch and the vSphere Distributed Switch has had support for Netflow quite some time. It’s as easy as configuring a Netflow target IP address and the VDS makes sure all ESXi hosts will report to that IP address about the network flows they are seeing coming from the virtual machines.
For more information; check Wikipedia.
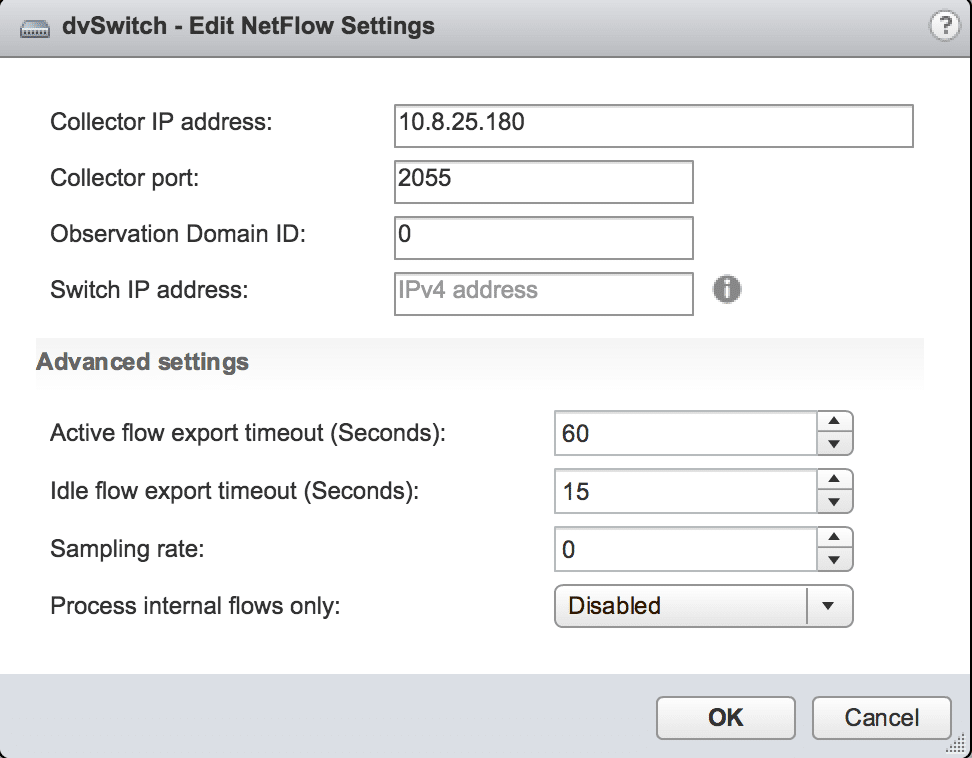
Fig. 1
vRealize Network Insight Assessment
The vRealize Network Insight (vRNI) Assessment is a functionality within vRNI which allows you to chart network data traffic inside your network. VMware and her partners have packaged this functionality into a (usually free) service to get a sense of what’s going through your network and see where it can be optimized. The output gives all kinds of awesome and informational data/charts, which you can use for a whole bunch of different use-cases.
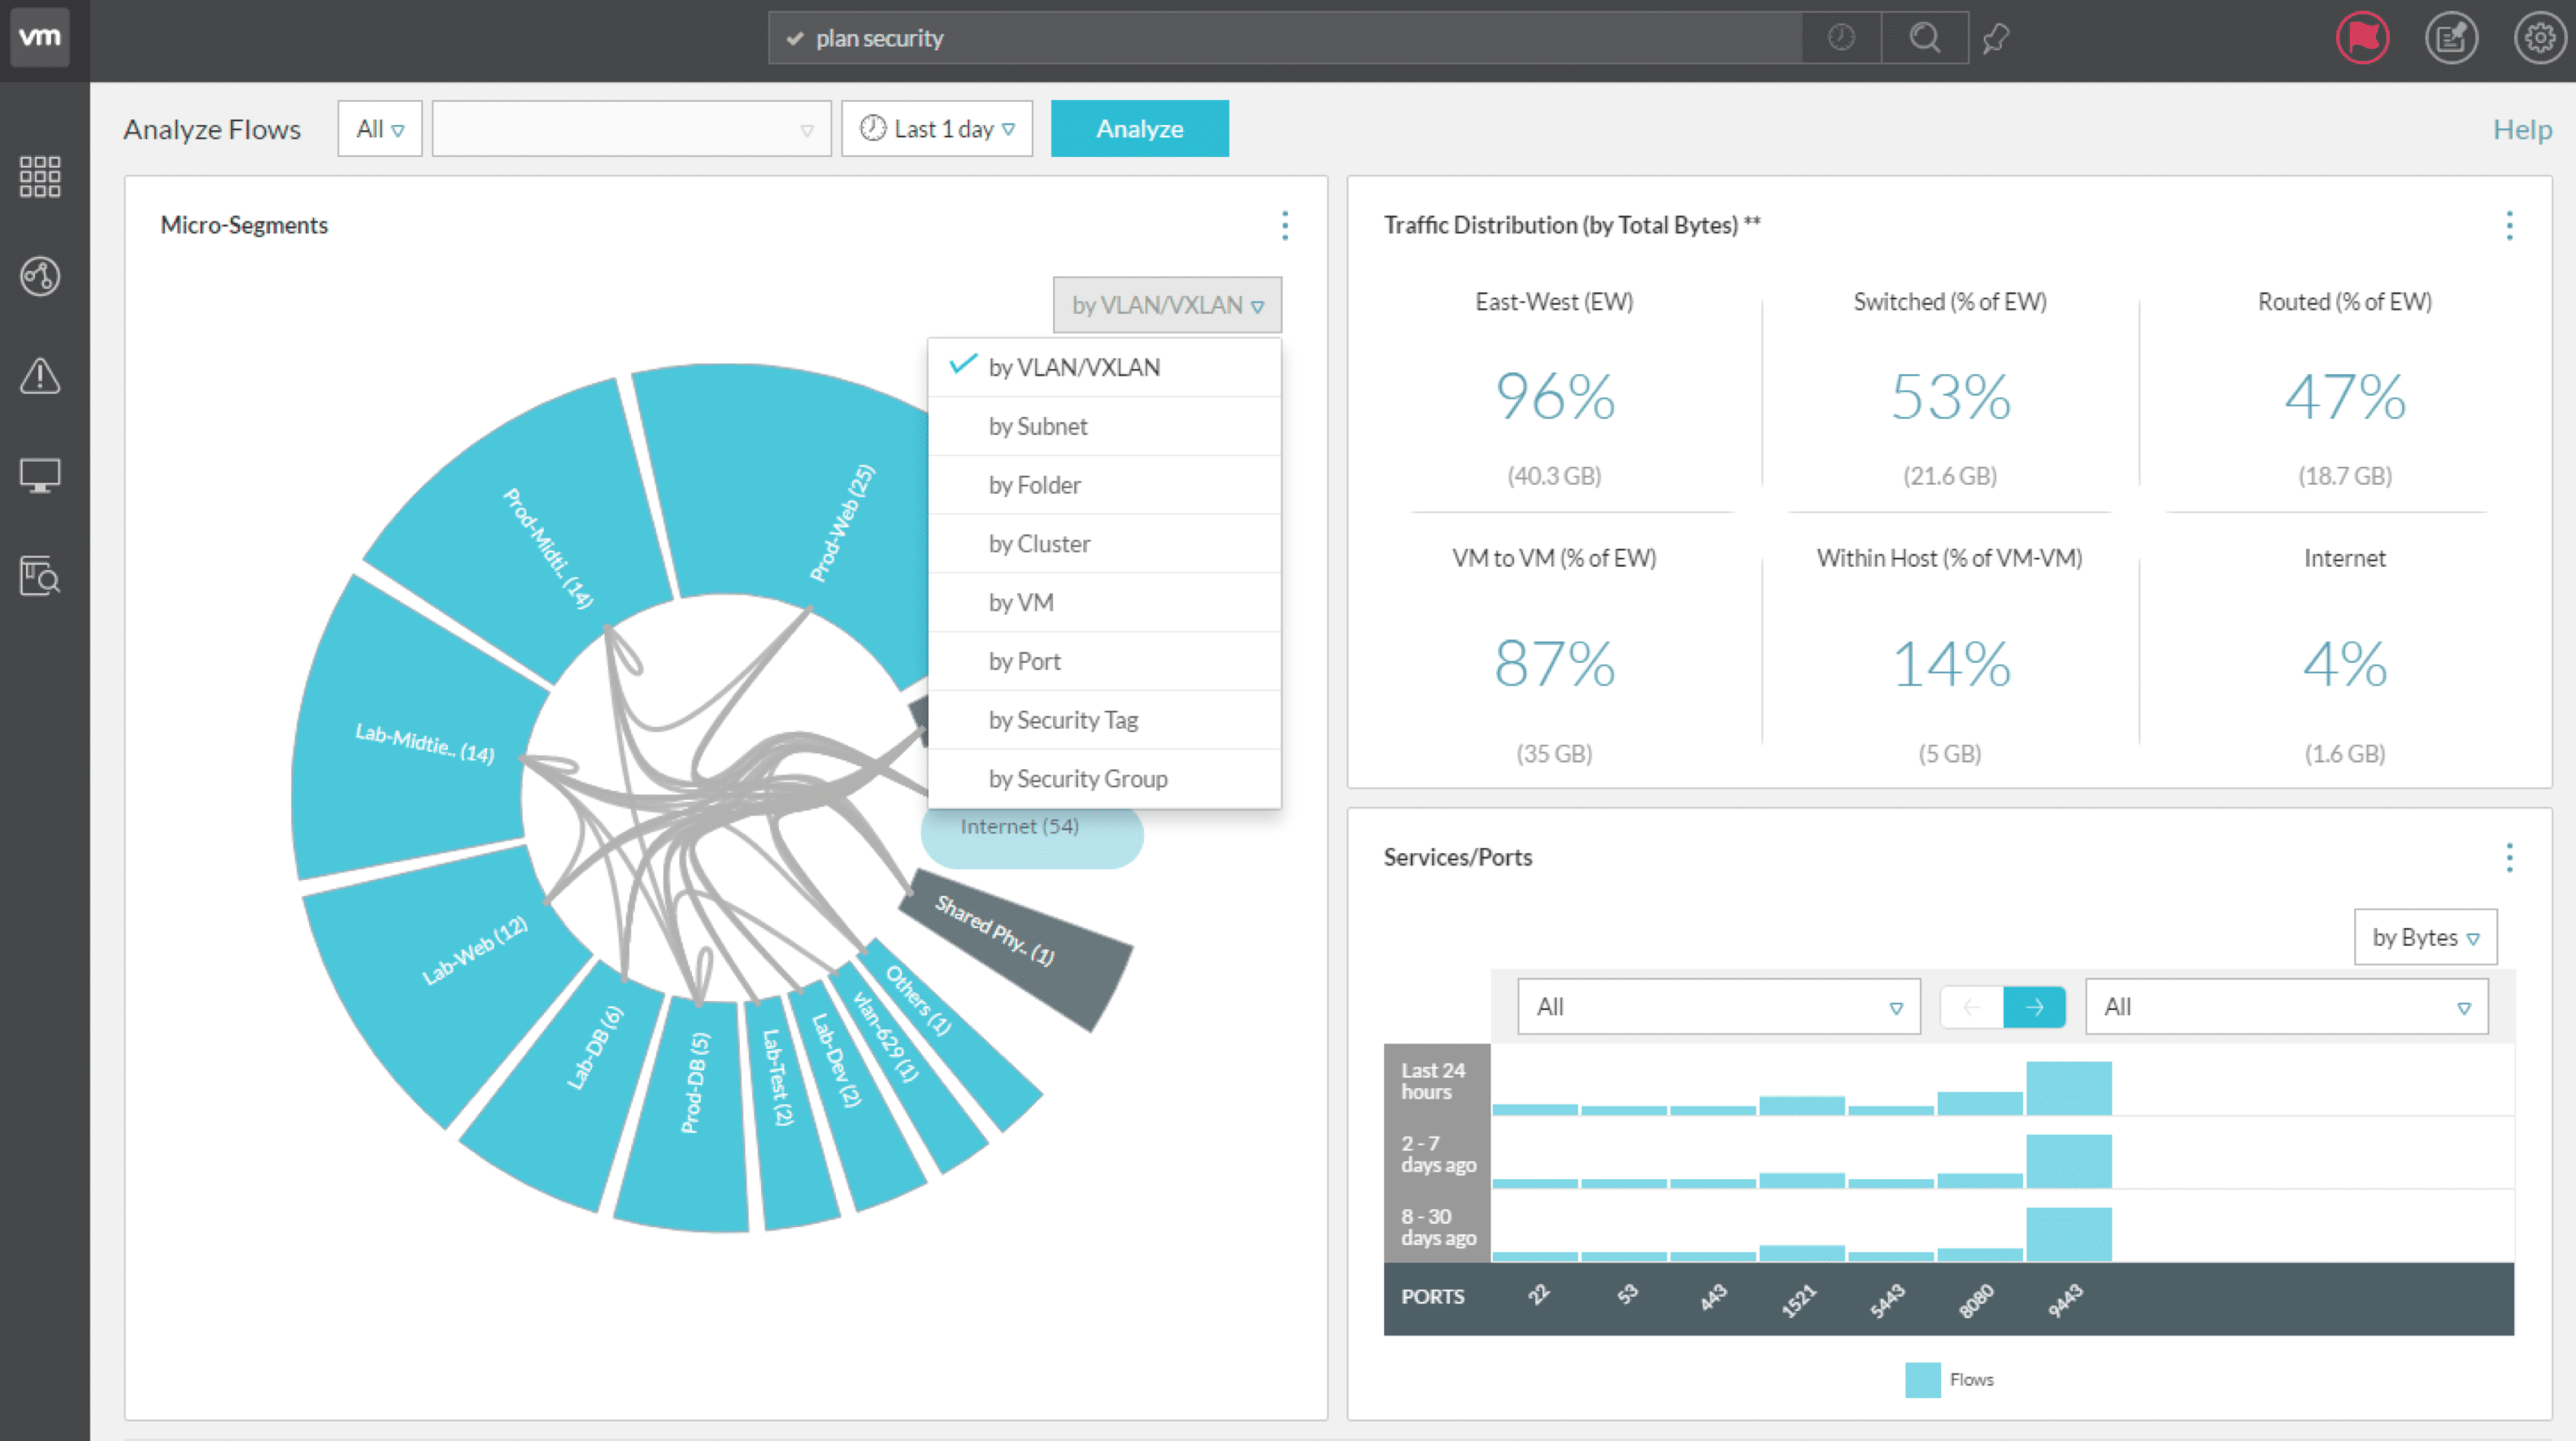
Fig. 2
So, what’s the problem?
Alright, so now that the stage is set, let’s move on to the problem. In the vSphere Distributed Switch, you can only configure one netflow target IP address (as you can see in Figure 1). So what if you want to do a vRNI Assessment while you already have a network monitoring system in place which uses Netflow to monitor your network? You’re not going to stop monitoring your network just to do an assessment, right?
We need a way to multiplex the Netflow data to multiple targets. Inherently, ESXi currently cannot do this. There needs to be something in between the ESXi hosts and the targets. You can go about this a few ways, some complicated; like putting a netflow collector in between and configuring that to forward flows to the other targets when it receives the flows. This method can easily reformat flow data so that vRNI does not understand the format anymore. The VDS sends a specific format, called IPFIX. While most collectors understand all formats, they usually send out the format of older versions. vRNI only understands IPFIX at this time.
On to the easy way: create a UDP multiplexer. Netflow flow data is sent in UDP. A multiplexer is a simple service that listens on a port to receive traffic and forwards that traffic untouched to other services.
Samplicator to the rescue
Samplicator is one of those multiplexers and I’m going to show you how to install and configure it to handle netflow data from the VDS. This is the most lightweight and quick installed service I’ve found so far. All you need is a small Linux server (I’m going to assume CentOS/Redhat in the following examples) in your environment which a couple of KBps of network bandwidth to spare. I haven’t found a working samplicator package, so we’re going to compile it from source.
Prerequisites
We need to get a few packages in place to support the installation:
[root@localhost ~]# yum install gcc autoconf automake wget unzip
Download & unzip Samplicator
[root@localhost ~]# wget https://github.com/sleinen/samplicator/archive/master.zip
--2017-07-27 14:47:08--  https://github.com/sleinen/samplicator/archive/master.zip
...snip...
2017-07-27 14:47:09 (200 KB/s) - ‘master.zip’ saved [44311]

[root@localhost ~]# unzip master.zip
Archive:  master.zip
63d550aa69c9f34de0e0e8c766a85e0e9e14502f
   creating: samplicator-master/
...snip...
  inflating: samplicator-master/samplicator.service
[root@localhost ~]#
Compile & Install Samplicator
To compile and install samplicator, execute the steps below. It should be done in a under 3 minutes.
[root@localhost ~]# cd samplicator-master
[root@localhost samplicator-master]# ./autogen.sh
configure.ac:3: installing './install-sh'
configure.ac:3: installing './missing'
Makefile.am: installing './depcomp'
[root@localhost samplicator-master]# ./configure
checking for a BSD-compatible install... /usr/bin/install -c
...snip...
config.status: executing depfiles commands
[root@localhost samplicator-master]# make
make  all-am
...snip...
gcc  -g -O2   -o samplicate samplicate.o rawsend.o read_config.o inet.o  -lnsl
make[1]: Leaving directory `/root/samplicator-master'
[root@localhost samplicator-master]# make install
make[1]: Entering directory `/root/samplicator-master'
...snip...
make[1]: Leaving directory `/root/samplicator-master'
Note: Possible C99 mode error
If you get a compile error saying something like this “error: ‘for’ loop initial declarations are only allowed in C99 mode” – apply a quick patch to make some adjustments in the code which will make it compile:
[root@localhost samplicator-master]# wget https://lostdomain.org/wp-content/uploads/2017/07/samplicator-fix-c99-mode-error.patch_.txt
[root@localhost samplicator-master]# patch < samplicator-fix-c99-mode-error.patch_.txt
Now that you have Samplicator installed, you can move on to the configuration and running it.
Configuring & Running Samplicator
Two steps left; create a small configuration file with the netflow sources and the netflow targets defined. Basically you need to put all your ESXi hosts in here and point them to the target IP addresses you want to forward the flows too. If you have a dedicated IP subnet for the management of your ESXi hosts you do can put the entire subnet as a single line in the configuration. I have my ESXi hosts in the same subnet as the Samplication server and the other netflow targets, so I have specified the individual ESXi hosts.
Create a file called /etc/samplicator.conf with this layout:
source-ip-address-or-subnet/prefix: target-ip-1/port target-ip-2/port ..etc..
Mine looks like this:
10.8.20.11/32: 10.8.20.22/2055 10.8.20.16/2055
10.8.20.12/32: 10.8.20.22/2055 10.8.20.16/2055
10.8.20.13/32: 10.8.20.22/2055 10.8.20.16/2055
The first column are the ESXi hosts (10.8.20.11, .12 & .13) and the second and third column are vRealize Network Insight and another netflow collector.
After creating the configuration file, you can start Samplicator with a simple command:
[root@localhost ~]# samplicate -S -c /etc/samplicator.conf -p 2055 -d 1
received 1388 bytes from 10.8.20.13:12055
Not matching 10.8.20.11/255.255.255.255
Not matching 10.8.20.12/255.255.255.255
  sent to 10.8.20.22:2055
  sent to 10.8.20.16:2055
received 584 bytes from 10.8.20.13:12055
Not matching 10.8.20.11/255.255.255.255
Not matching 10.8.20.12/255.255.255.255
ˆC
Don’t forget to configure the new Collector IP Address under the Netflow settings on your VDS. Once you’ve done that and started Samplicator, you should see debugging information going by stating that Samplicator is receiving data and forwarding that data. Use CTRL+C to get out of the command.
Create a Service
You can let the samplicate command running in a screen, but it’s easier to create a service for it so you can be sure it’s always running. It’ll also come back if you restart the Linux server it’s running on.
Let’s use the example service definition that’s in the downloaded zip to set this up. We only need to adjust the executed command a little bit to conform to our installation:
[root@localhost samplicator-master]# perl -pi -e 's|ExecStart=/opt/samplicator/bin/samplicate -S -c /opt/samplicator/etc/samplicator.conf -p 162 -d 0 -f|ExecStart=/usr/local/bin/samplicate -S -c /etc/samplicator.conf -p 2055 -d 0 -f|g' samplicator.service
[root@localhost samplicator-master]# cp samplicator.service /etc/systemd/system/samplicator.service
[root@localhost samplicator-master]# systemctl daemon-reload
[root@localhost samplicator-master]# systemctl start samplicator.service
This was the last step! You should be able to see the data flowing into your targets.
Conclusion
Until the vSphere Distributed Switch can handle multiple Netflow targets, you can definitely get data flows to multiple targets using an UDP multiplexer. Hope this helps!
March 19, 2018 at 23:56
”
”
I don’t agree, read
https://www.virtuallyghetto.com/2013/10/automate-migration-from-virtual.html
March 21, 2018 at 11:36
What is it that you don’t agree with? I don’t see the connection between Williams post and this one.