VMware Cloud on AWS has a few different connectivity options: Direct Connect, Policy-based VPN, and Routed-VPN.
In my experience, most people seem to pick Direct Connect and Policy-based VPN first, before even thinking about Routed-VPN. But, as with most things in life, you’ll find that one use case for that option you’d never use otherwise. 😉
I had to build a routed-VPN from VMware Cloud on AWS to a VyOS router recently, and it had some options to take into account and took a while to figure out. This post goes into the configuration on both sides. Mostly on the VyOS side, as the VMC side is pretty straight forward. BGP is used to establish a routed connection.
Before you begin, make sure you have a VMConAWS SDDC (duh), and a running VyOS appliance, with an internal and internet-facing interface.
VMware Cloud on AWS VPN Config
The VPN configuration in VMC is straightforward. Navigate to the Network -> VPN -> Route Based page. Here’s a screenshot of the fields you need.
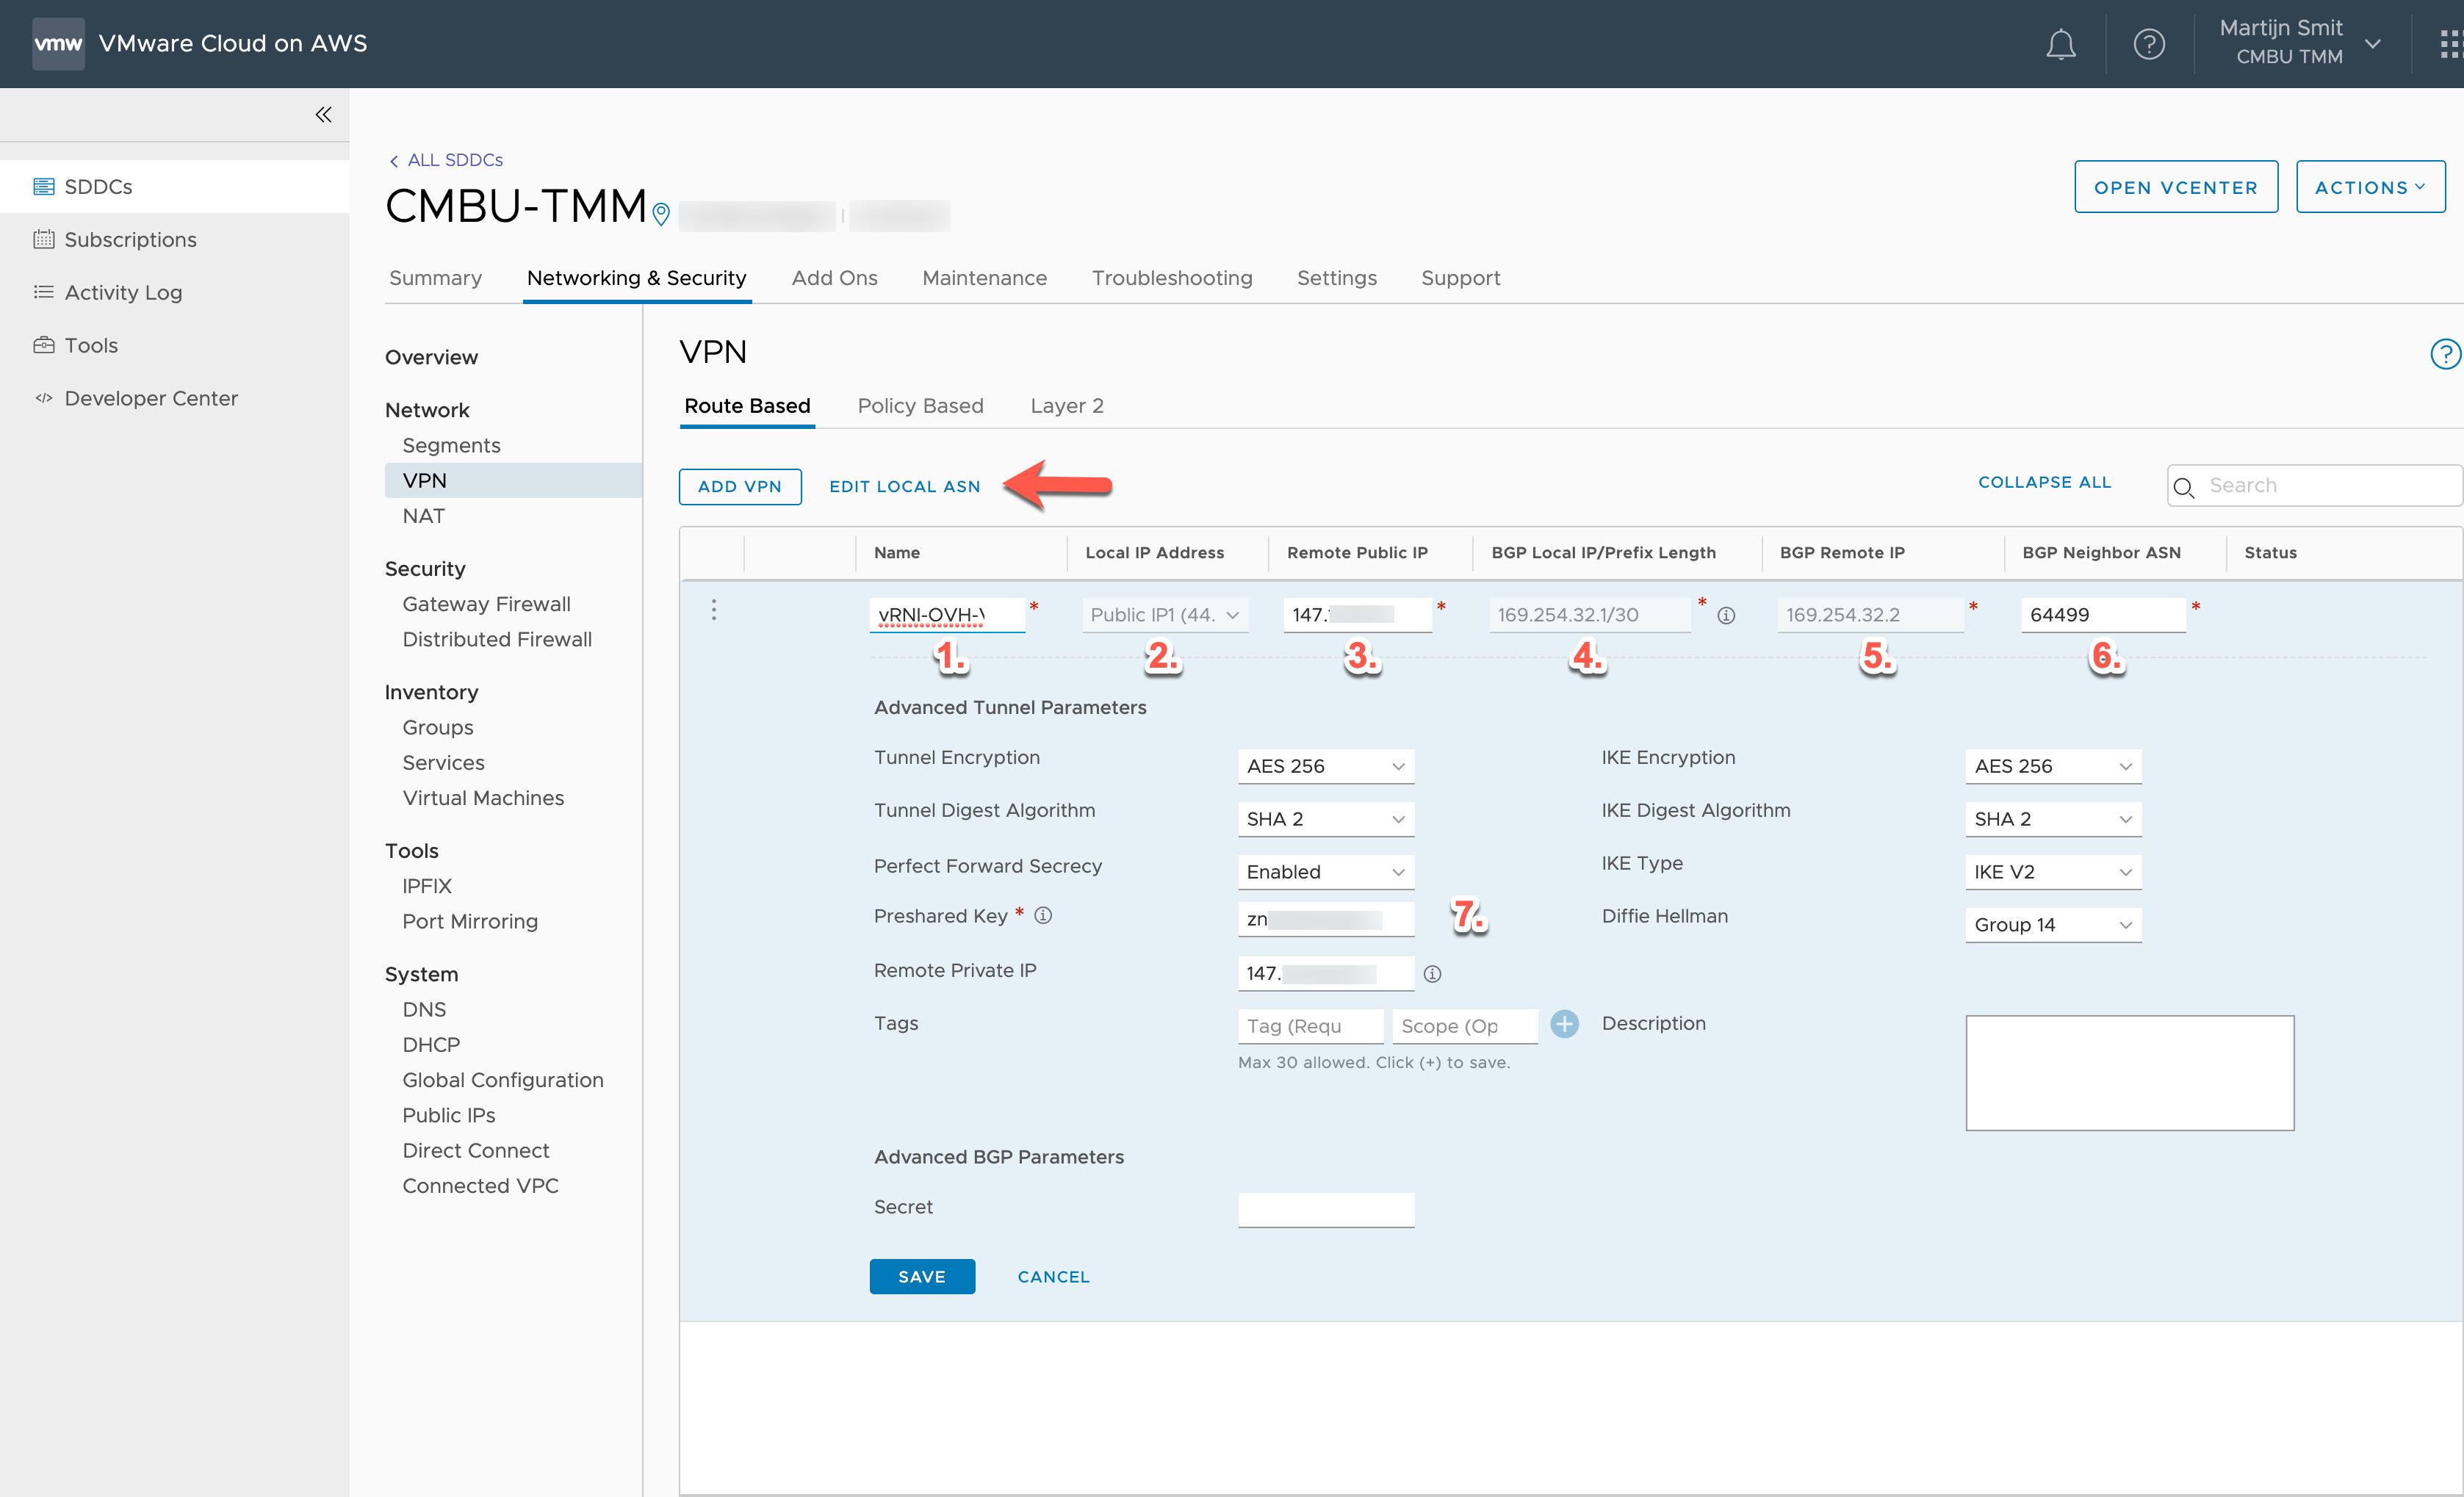
- A friendly name, something to recognize it by.
- Pick the VMC public IP address you’d like to use as an endpoint. If you want a dedicated IP, request a new from System -> Public IP page.
- The public IP of the VyOS router.
- The VPN tunnel will establish a point to point connection between the VyOS router and the NSX Edge on VMC. This setting is the VMC side IP address of that point to point. Include the subnet length; a /30 is best practice.
- This is the VyOS side of the point to point. NSX uses this to set up the BGP peering.
- The BGP AS Number of the VyOS side. Check out the EDIT LOCAL ASN link the arrow is pointing to if you’d like to change or see the VMC side AS Number
- Pre-shared Key. Generate something long and random.
All the other options are set to their default values. You can change these if you’d like, but be sure to change the VPN settings in VyOS also. Speaking of which…
VyOS VPN Configuration
Below are the VPN settings needed to make this work. Take notice of a couple of things:
- eth1 is the internet-facing interface, and it has a public IP address (147.xxx.xxx.xxx).
- 44.xxx.xxx.xxx is the public IP that you selected in the VMC VPN configuration as Local IP Address.
- Copy and paste the pre-shared-secret. Don’t try to type it, unless you want to spend an hour or two extra on debugging.
- vti1 is a virtual interface that’s bound to the VPN tunnel. It’ll come online once the VPN is established. It should have that /30 subnet you picked in the VMC VPN configuration, and make sure to use the BGP Remote IP from the VMC config.
configure
set vpn ipsec esp-group VMC compression 'disable'
set vpn ipsec esp-group VMC lifetime '3600'
set vpn ipsec esp-group VMC mode 'tunnel'
set vpn ipsec esp-group VMC pfs 'dh-group14'
set vpn ipsec esp-group VMC proposal 1 encryption 'aes256'
set vpn ipsec esp-group VMC proposal 1 hash 'sha256'
set vpn ipsec ike-group VMC dead-peer-detection action 'restart'
set vpn ipsec ike-group VMC dead-peer-detection interval '15'
set vpn ipsec ike-group VMC dead-peer-detection timeout '30'
set vpn ipsec ike-group VMC ikev2-reauth 'yes'
set vpn ipsec ike-group VMC key-exchange 'ikev2'
set vpn ipsec ike-group VMC lifetime '28800'
set vpn ipsec ike-group VMC proposal 1 dh-group '14'
set vpn ipsec ike-group VMC proposal 1 encryption 'aes256'
set vpn ipsec ike-group VMC proposal 1 hash 'sha256'

set vpn ipsec ipsec-interfaces interface 'eth1'
set vpn ipsec site-to-site peer 44.xxx.xxx.xxx authentication id '147.xxx.xxx.xxx'
set vpn ipsec site-to-site peer 44.xxx.xxx.xxx authentication mode 'pre-shared-secret'
set vpn ipsec site-to-site peer 44.xxx.xxx.xxx authentication pre-shared-secret 'yoursecretkey'
set vpn ipsec site-to-site peer 44.xxx.xxx.xxx authentication remote-id '44.xxx.xxx.xxx'
set vpn ipsec site-to-site peer 44.xxx.xxx.xxx connection-type 'respond'
set vpn ipsec site-to-site peer 44.xxx.xxx.xxx description 'VMC PRIMARY TUNNEL'
set vpn ipsec site-to-site peer 44.xxx.xxx.xxx ike-group 'VMC'
set vpn ipsec site-to-site peer 44.xxx.xxx.xxx ikev2-reauth 'inherit'
set vpn ipsec site-to-site peer 44.xxx.xxx.xxx local-address '147.xxx.xxx.xxx'
set vpn ipsec site-to-site peer 44.xxx.xxx.xxx vti bind 'vti1'
set vpn ipsec site-to-site peer 44.xxx.xxx.xxx vti esp-group 'VMC'

set interfaces vti vti1 address '169.254.32.2/30'
set interfaces vti vti1 description 'VMC Tunnel'
commit
save
Once the VPN configuration is there, the VPN tunnel should come up:

VyOS BGP Configuration
Now that the VPN tunnel is online, configure BGP to enable routing between VMC and VyOS. I’m always a bit conservative with BGP configurations and put in route-maps to make sure only the right subnets get into the routing table, so you’ll see that below. A few things to take note of:
- 10.52.42.0/24 is the VMC compute subnet. This VMC SDDC only has one. It could be more in your case.
- 10.53.84.0/23 is the VMC management subnet.
- 10.20.0.0/16 is the IP prefix that’s behind the VyOS. VyOS should have this prefix in its routing table.
configure
set policy prefix-list VMC-Incoming rule 10 action 'permit'
set policy prefix-list VMC-Incoming rule 10 le '32'
set policy prefix-list VMC-Incoming rule 10 prefix '10.52.42.0/24'
set policy prefix-list VMC-Incoming rule 11 action 'permit'
set policy prefix-list VMC-Incoming rule 11 le '32'
set policy prefix-list VMC-Incoming rule 11 prefix '10.53.84.0/23'

set policy route-map VMC-Incoming rule 10 action 'permit'
set policy route-map VMC-Incoming rule 10 match ip address prefix-list 'VMC-Incoming'
set policy route-map VMC-Incoming rule 20 action 'deny'

set protocols bgp 64499 address-family ipv4-unicast network 10.20.0.0/16
set protocols bgp 64499 neighbor 169.254.32.1 address-family ipv4-unicast route-map import 'VMC-Incoming'
set protocols bgp 64499 neighbor 169.254.32.1 address-family ipv4-unicast soft-reconfiguration inbound
set protocols bgp 64499 neighbor 169.254.32.1 disable-connected-check
set protocols bgp 64499 neighbor 169.254.32.1 remote-as '65000'
set protocols bgp 64499 neighbor 169.254.32.1 timers holdtime '30'
set protocols bgp 64499 neighbor 169.254.32.1 timers keepalive '10'
commit
save
If you don’t care about controlling the routing table, you could leave out the prefix-list, route-map, and route-map import. In any case, when you commit this configuration, the BGP peering should be established, and traffic should flow!

Leave a Reply