
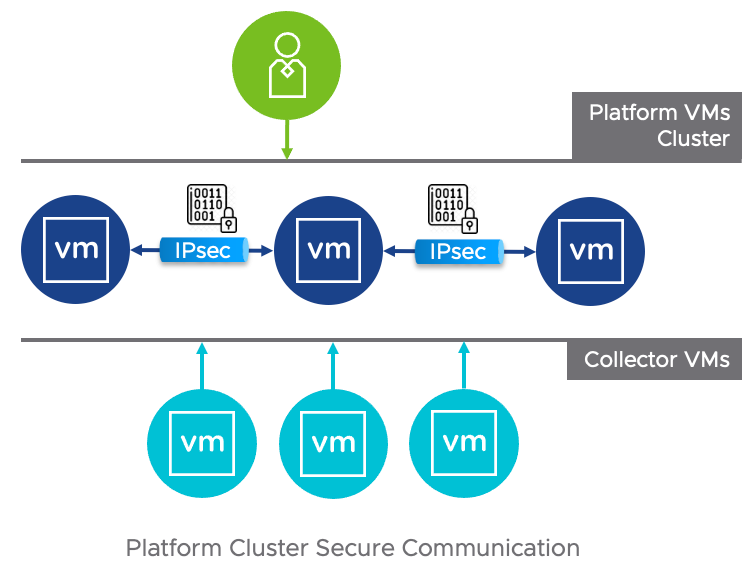
Hi there! It’s been a while. How are you doing? In the last release of vRealize Network Insight, version 6.3, there’s a new feature called Secure Cluster Communication. By default, the communication between Platform and Collectors is encrypted via TLS. A Platform cluster, has a few data replication services (FoundationDB, Kafka, running between them – which are not all encrypted by default. The Secure Cluster Communication feature allows you to set up VPN tunnels between the Platform nodes and encrypt all traffic going between them.
It’s not recommended to split Platform nodes between different locations. But, if you do have Platforms living in separate networks or locations, or if you simply can’t trust your management network, you can now make sure the traffic can’t be snooped upon.
Requirements
You’ll need version 6.3, and a free internal IP subnet. The subnet will be used for internal IP addressing on the Platform nodes and will not be exposed to the outside network interfaces. But, you’d still want to use a range that’s not used, because the Platform will use it locally. If you have users or services like SMTP, or SNMP, on the same subnet, they won’t be able to connect to the Platforms. By default, vRNI will use 192.168.10.0/24.
Configuring Secure Cluster Communication
Configuring the secure communication is possible via the consoleuser command-line. It’s a slightly disruptive operation, with the cluster services needing a restart to start using the VPN tunnels. It’ll also take 10-15 minutes of runtime. You only need to run this on the Platform 1 node in the cluster: it will reach out to the other Platform nodes on its own.
Start by launching the console of the Platform 1 node. Because it takes a while, you don’t want to chance getting disconnected from a SSH session. Then log in with the consoleuser and run the secure-tunnel command.
The secure-tunnel command only takes a few parameters:
(cli) secure-tunnel -h
usage: secure-tunnel [-h] [-e | -d | -s] [-sub SUBNET]

Enable/Disable Interplatform secure communication tunnel

optional arguments:
-h, --help show this help message and exit
-e, --enable Enable inter-platform secure communication tunnel
-d, --disable Disable inter-platform secure communication tunnel
-s, --status Get status of secure communication tunnel
-sub SUBNET, --subnet SUBNET
/24 subnet address to use as internal IPs of platforms
(cli)
Really straight-forward: show the current status by providing –status, enable it with –enable and disable it with –disable. The -sub parameter can be used to provide a custom IP subnet, if you don’t want to use the default 192.168.10.0/24.
Running secure-tunnel
Here’s an example of how to run the secure-tunnel command. I’m providing a custom IP subnet (172.16.9.0/24) that’s used for the IP connectivity over the VPN tunnels.

Validation
If you check any of the Platform nodes after the setup process, they’ll tell you the secure tunnels are enabled:
(cli) secure-tunnel -s
Status of Interplatform Secure Tunnel: Enabled
(cli)
If you sniff any of the traffic going between the Platform nodes, all you will see is this:
10:47:16.285660 IP 10.196.164.49 > 10.196.164.18: ESP(spi=0xc248d385,seq=0x1264ef), length 136
10:47:16.285701 IP 10.196.164.49 > 10.196.164.18: ESP(spi=0xc248d385,seq=0x1264f0), length 360
10:47:16.285813 IP 10.196.164.18 > 10.196.164.49: ESP(spi=0xc446dd92,seq=0xf6b94), length 264
10:47:16.286222 IP 10.196.164.49 > 10.196.164.18: ESP(spi=0xc248d385,seq=0x1264f1), length 328
10:47:16.286427 IP 10.196.164.18 > 10.196.164.49: ESP(spi=0xc446dd92,seq=0xf6b95), length 1464
10:47:16.287044 IP 10.196.164.18 > 10.196.164.49: ESP(spi=0xc446dd92,seq=0xf6b96), length 344
Good luck decyphering that. 😉
Leave a Reply