VCIX-NV Objective 1.1 – Deploy VMware NSX Components
This post is part of my VMware VCIX-NV Study Guide. Topics are taken from the blueprint and reordered a bit to make the installation flow make sense.
Documentation
Index
- Deploy the NSX Manager virtual appliance
- Integrate the NSX Manager with vCenter Server
- Implement and Configure NSX Controllers
- Prepare Host Clusters for Network Virtualisation
- Implement NSX Edge Services Gateway devices
- Implement Logical Routers
- Deploy vShield Endpoints
- Implement Data Security
- Create IP Pools
Content
Deploy the NSX Manager virtual appliance
Requirements:
- Working vSphere 5.5 environment (vCenter appliance, ESXi, Management VM network).
- NSX Manager appliance.
VMware Documentation: Install the NSX Manager Virtual Appliance
Download the latest 6.0 NSX for vSphere appliance from the VMware Downloads site.
Deploy the NSX Manager OVF
- In the vSphere Web client, right click your cluster and select “Deploy OVF Template”. Select the local file that you just downloaded.
- The “Review details” gives you an overview of the VM requirements and requires you to tick “Accept extra configuration options”.
- Accept the EULA (or not and continue to use legacy networking).
- Select the destination VM name, vCenter folder, datastore, management network portgroup.
- Customise the NSX Manager settings and enter a password, hostname, IP details, DNS servers and NTP servers.
- Review configuration and click “Finish”.
Integrate the NSX Manager with vCenter Server
Requirements:
- NSX Manager deployed and running.
VMware Documentation: Register vCenter Server with NSX Manager
Register NSX Manager to vCenter
- Connect to the NSX Manager web interface via https://your.nsxmanager
- Click on “Manage vCenter Registration”.
- Click on the “Edit” button of the Lookup Service.
- Fill out your SSO server details. Accept the certificate when asked.
- After registering with SSO, click the “Edit” button for the vCenter Server.
- Enter your vCenter server details. The tick “Modify plugin download location” is only required when the NSX Manager is behind a firewall type of masking device (don’t do that though). Also accept the SSL certificate when proceeding.
When that’s done, the Lookup Service and vCenter Server status should say “Connected” and you should have the “Networking & Security” plugin registered in your vCenter (the last one might require logging out and back in again).
![]()
Create IP Pools
Requirements:
- NSX Manager registered to vCenter server.
Documentation: Create an IP Pool
In order to deploy NSX Controllers, we need an IP pool where they get their IP addresses from. This IP Pool is created in the Networking & Security plugin under the NSX Manager we just registered.
Create an IP Pool
- Navigate to Networking & Security.
- Click on the “NSX Managers” menu.
- Double-click on the IP address or hostname of your NSX Manager.
- Select the “Manage” tab and select the “Grouping Objects” sub-tab.
- Select “IP Pools” and click the ”+” icon to begin adding a new IP Pool.
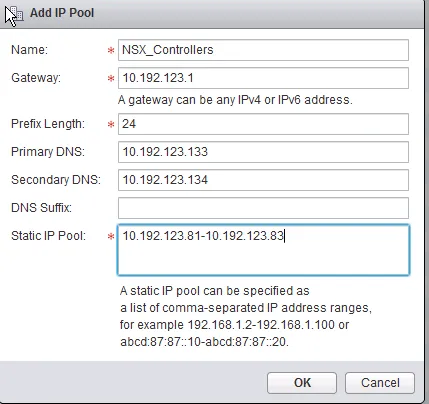
- Give the IP Pool a name and enter the IP details (default gateway, prefix length, DNS servers, IP Address pool) which the NSX Controllers will be using.
- Click “OK” to add the pool.
This might look a bit like this:
Implement and Configure NSX Controllers
Requirements:
- NSX Manager registered to vCenter server.
- NSX IP Pool for NSX Controllers created.
VMware Documentation: Set Up the Control Plane
Deploy the NSX Controllers always in an odd number to avoid split brain situations. Deploy either 1 (only in a lab!), 3 (recommended), 5, etc., based on scale. Current scaling of NSX can be handled by 3 NSX Controllers. After deploying manually set up DRS anti-affinity rules to keep the controllers running on different ESXi nodes.
Deploy NSX Controller(s)
- Navigate to Networking & Security and then the “Installation” menu.
- Click on the ”+” icon in the “NSX Controller Nodes” view to start the deployment procedure.
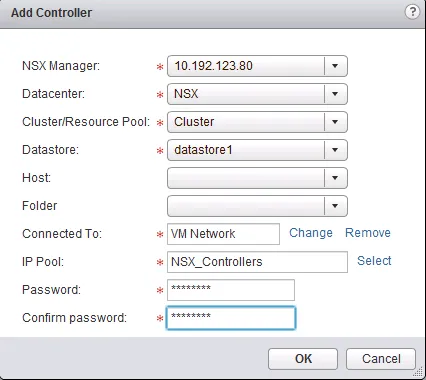
- Fill out the required details; which vCenter datacenter, cluster, datastore you want to deploy on. Select the VM management network portgroup, the IP Pool and the password of the controller.
- Click “OK” when satisfied with your settings to start deployment.
- Repeat step for the remaining NSX Controllers you would like to deploy.
The settings for deploying a NSX Controller might look like this:
When deployed successfully, your “NSX Controller nodes” view will look like this:

Prepare Host Clusters for Network Virtualisation
Requirements:
- NSX Manager registered to vCenter server.
- Available distributed vSwitch for the ESXi nodes.
- NSX Controller(s) deployed.
VMware Documentation: Prepare Clusters for Network Virtualization
NSX needs a bit of software (a VIB) on an ESXi node for it to be able to use the NSX features, like the logical switch or the distributed firewall. Before you can start using NSX, you need to install this on the ESXi nodes. Luckily, the NSX Manager does this for you (through vCenter).
Prepare ESXi nodes
- Navigate to Networking & Security and then the “Installation” menu.
- Select the “Host Preparation” tab.
- Select the cluster you want to use for NSX and click “Install” under “Installation Status”
After a minute or so the installation will be complete and you’ll see a green tick in front of your cluster. To enable the firewall module, reboot all your nodes. After installing the NSX VIBs onto your nodes, you’ll need to configure the ESXi nodes for VXLAN. VXLAN is the backend for all your NSX networking traffic, commonly called the “Transport Network”.
Preparing the ESXi nodes for VXLAN basically means adding a VMKernel adapter which will be used for VXLAN communication on each ESXi node. These VMKernel adapters require communication over IP, so they need an IP address. You can do that in two ways; using an IP Pool or using DHCP. Both are fine, I like to use IP Pools so that you don’t need a DHCP service and modify the network devices to relay DHCP.
Configure VXLAN
- Navigate to Networking & Security and then the “Installation” menu.
- Select the “Host Preparation” tab.
- Select the cluster you want to use for NSX and click “Configure” under “VXLAN”
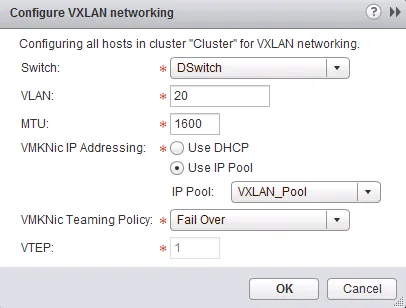
- Select your distributed vSwitch, VLAN for the Transport network, VMKNic IP Addressing method and the VMKNic Teaming Policy and click “OK”.
The VXLAN settings might look something like this:
After a minute or so, the VMKernel adapters will be created and there will be a green tick in the “VXLAN” column.
Implement NSX Edge Services Gateway devices
Requirements:
- NSX Manager registered to vCenter server.
- Prepared ESXi nodes.
VMware Documentation: Install an NSX Edge Services Gateway
VMware NSX Edge Services Gateway devices are virtual appliances that provide several different functions to the virtual network. They can provide Firewalling, VPN and SSL-VPN, Dynamic Routing, Load balancing and Layer 2 stretching. You can use it to define virtual network boundaries and separate certain resources (for example different tenants). There are two types of NSX Edges; the Edge Services Gateway and the Logical Distributed Router. The second is discussed in the next topic. Both type Edges can be deployed in a high availability mode, which would deploy two virtual appliances that can take over for one and other. NSX 6.1 brings ECMP (equal cost multipathing), where you can deploy up to 8 Edges for a very high available solution, but as mentioned, that is NSX 6.1 and currently not in the scope for VCIX-NV.
Deploying a NSX Edge
- Navigate to Networking & Security and then the “NSX Edges” menu.
- Click the ”+” icon to bring up the deployment window.
- Select “Edge Services Gateway” as the “Install Type”, give it a name and optional hostname, description or tenant name (used to group tenant Edges).
- Enter an username and password for the appliance(s), choose whether to enable SSH and high availability. “Enable auto rule generation” is recommended, as it automatically creates firewall rules when enabling services (DHCP, VPN, etc).
- Select the vCenter datacenter to deploy in, the size of your Edge (consult the documentation for guidance).
- Click the ”+” icon at the “NSX Edge Appliances” view to add the virtual appliance. Select the cluster or resource pool and the datastore to deploy it on. Optionally select the specific ESXi node and folder.
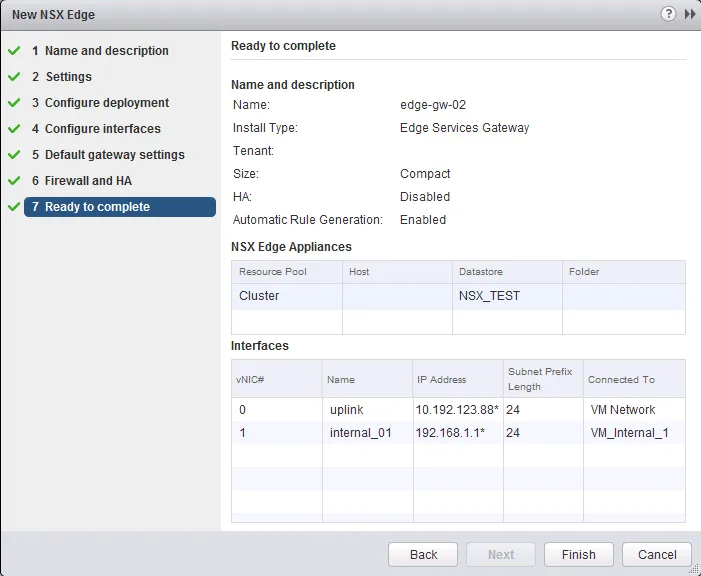
- Configure network interfaces by clicking the ”+” icon in the next window to add nics. There are two types; Internal and Uplink. Use Internal interfaces for VM to Edge traffic and Uplink interfaces for Edge to network traffic. Add the interfaces you want by giving it a name, selecting the type and where it is connected to (standard vSwitch port, dvSwitch port or Logical Switch). Add their IP addresses in the “Configure subnets” view.
- Next, configure the default gateway for the Edge.
- Then optionally configure the default firewall policy and high availability parameters.
- Review your configuration and click “Finish” to start deployment.
The finished configuration of a NSX Edge could like a bit like this:
Implement Logical Routers
Requirements:
- NSX Manager registered to vCenter server.
- Prepared ESXi nodes.
VMware Documentation: Install a Logical (Distributed) Router
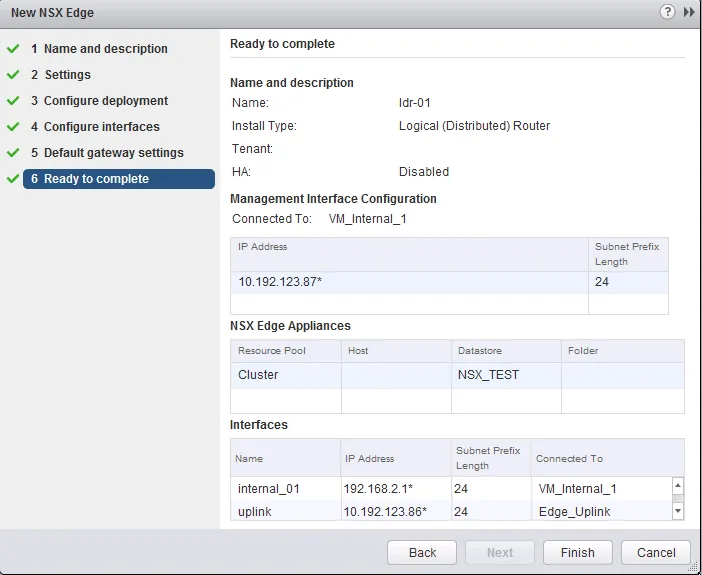
The second type of NSX Edge is the Logical Distributed Router, or LDR. The LDR is a virtual appliance that can act as a router. The difference between the Edge Services gateway is that the LDR uses the ESXi nodes as part of the router. The LDR embed the routing information into the ESXi kernel, allowing network traffic between two virtual machines to be routed locally inside the ESXi node. The Edge that you deploy when setting up a LDR, is the control machine which handles the configuration.
Deploying a Logical Distributed Router
- Navigate to Networking & Security and then the “NSX Edges” menu.
- Click the ”+” icon to bring up the deployment window.
- Select “Logical (Distributed) Router” as the “Install Type”, give it a name and optional hostname, description or tenant name (used to group tenant Edges).
- Enter an username and password for the appliance(s), choose whether to enable SSH and high availability.
- Select the datacenter to deploy in and add the actual virtual appliance by clicking the ”+” icon in the “NSX Edge Appliances” view.
- Select the cluster or resource pool and datastore to deploy in. Optionally select an ESXi node and folder.
- Select the port of the management interface of the LDR (dvSwitch port or Logical Switch) and give it a management IP address.
- Then create the interfaces used for routing. VM to LDR traffic and LDR to outside network interfaces should be added.
- Next, configure the default gateway for the Edge.
- Review your configuration and click “Finish” to start deployment.
The finished configuration of a Logical Distributed Edge could like a bit like this:
Deploy vShield Endpoints
Requirements:
- NSX Manager registered to vCenter server.
- Prepared ESXi nodes.
- IP Pool or DHCP.
VMware Documentation: Install vShield Endpoint
vShield Endpoints are service appliances which create the possibility for third-party vendors to deliver their services inside NSX. Examples are TrendMicro Deep Security for antivirus, Palo Alto firewalls, etc. Deploying the vShield Endpoints is a necessary evil, but doesn’t take a lot of effort. You will need a IP Pool specific for the vShield Endpoints before you continue, or you can give them IP addresses using DHCP.
Deploying the vShield Endpoints
- Navigate to Networking & Security and then the “Installation” menu.
- Select the “Service Deployments” tab.
- Click the ”+” icon to start the deployment procedure.
- Select “VMware Endpoint” (or “vShield Endpoint” depending on your NSX version. In NSX 6.1 it is “Guest Introspection”) and click “Next”.
- Then select the datacenter and tick the cluster to deploy in.
- Select the datastore to deploy in, management network and IP assignment method.
- Review your configuration and click “Finish” to start deployment.
As mentioned, not a lot of configuration. In the review stage your configuration could look like this:

Implement Data Security
Requirements:
- NSX Manager registered to vCenter server.
- Prepared ESXi nodes.
- IP Pool or DHCP.
VMware Documentation: Install Data Security
Deploying Data Security
- Navigate to Networking & Security and then the “Installation” menu.
- Select the “Service Deployments” tab.
- Click the ”+” icon to start the deployment procedure.
- Select “VMware Data Security” and click “Next”.
- Then select the datacenter and tick the cluster to deploy in.
- Select the datastore to deploy in, management network and IP assignment method.
- Review your configuration and click “Finish” to start deployment.
In the review stage your configuration could look like this:

