VCIX-NV Objective 2.2 – Configure VXLANs
This post is part of my VMware VCIX-NV Study Guide and covers VXLAN, the backbone of the NSX network. It’s not that much ground to cover, but you should have a very good understanding of how VXLAN is used, how it is built and most importantly, which requirements it has.
Documentation
Index
- Prepare a cluster for VXLAN
- Configure VXLAN transport zone parameters
- Configure the appropriate teaming policy for a given implementation
VXLAN VXLAN (or Virtual eXtensible LAN) is a widely support technology to create logically separated network inside an existing physical network. VXLAN has a logical limit of 16 million networks, where the modern physical network has a limit of around 4000 (VLANs). To read a lot more about VXLAN and how it is built, I’d like to refer you to the two part blog of Kamau Wanguhu; VXLAN Primer - Part 1 and VXLAN Primer - Part 2. Duncan Epping also elaborated here.
The physical network has a few requirements to support VXLAN;
- Larger MTU size; minimal 1572, 1600 is recommended.
- Multicast; IGMP snooping should be enabled on the layer-2 switches and if needed, PIM routing on the layer-3 routers.
When putting the different NSX components in perspective, the NSX Transport Zone is the VXLAN backbone network and a Logical Switch is a VXLAN network.
Prepare a cluster for VXLAN
Requirements:
- NSX Manager and NSX controller(s) deployed and active.
VMware Documentation: Prepare Clusters for Network Virtualization
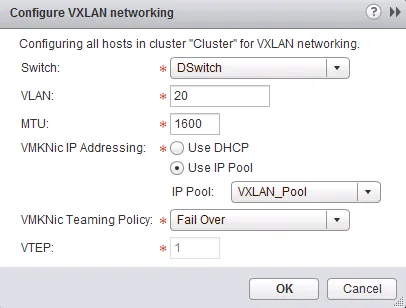
Preparing the ESXi nodes for VXLAN basically means adding a VMKernel adapter which will be used for VXLAN communication on each ESXi node. These VMKernel adapters require communication over IP, so they need an IP address. You can do that in two ways; using an IP Pool or using DHCP. Both are fine, I like to use IP Pools so that you don’t need a DHCP service and modify the network devices to relay DHCP.
Prepare VXLAN configuration
- Login to your vSphere Web Client.
- Navigate to Networking & Security and then the “Installation” menu. Select the “Host Preparation” tab.
- If you have not done so yet, install the required VIBs (VXLAN, DFW) on the ESXi hosts first by clicking “Install” at the cluster, under the “Installation Status” column.
- Select the cluster you want to use for NSX and click “Configure” under “VXLAN”.
- Select your distributed vSwitch, VLAN for the Transport network, VMKNic IP Addressing method and the VMKNic Teaming Policy and click “OK”.

Configure VXLAN transport zone parameters
Requirements:
- Prepared cluster for NSX.
- VXLAN configured for cluster.
VMware Documentation: Configure VXLAN Transport Parameters
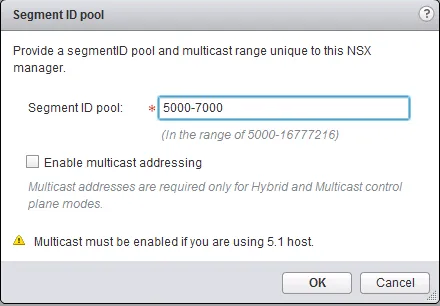
After having configured your cluster for VXLAN, you need to specify a Segment ID Pool. This pool of numbers is the pool where logical switches will get their VXLAN Identifiers from. Each number (between 5000 and 16777216) will represent an isolated network.
Setting the Segment ID Pool
- Login to your vSphere Web Client.
- Navigate to “Networking & Security” and select the “Installation” menu. Choose the “Logical Network Preparation” tab.
- Select the “Segment ID” sub-tab and click “Edit”.
- In the popup window, enter the range of IDs you want to use for your VXLAN networks and click “OK”.

Configure the appropriate teaming policy for a given implementation
VMware Documentation: Teaming Policy for Virtual Distributed Switches
The teaming policy of uplink NICs in the distributed vSwitch which is servicing the VXLAN backbone network should always be selected with keeping the physical network (dual homed? meshed?) and capabilities of the hardware of your ESXi host, so it differs per design. For instance, with UCS Blades you cannot use LACP bundling and you should use the “Failover” option.
Below is an overview of teaming policies. Important to note is that is Source MAC (MAC Hash) is selected, NSX will create multiple VMKNics which will serve as VXLAN Endpoint Termination Point (VTEP).

