VCIX-NV Objective 2.3 – Configure and Manage Layer 2 Bridging
This post is part of my VMware VCIX-NV Study Guide and is about the relation between a VXLAN and a VLAN and the bridge between the two.
Documentation
Index
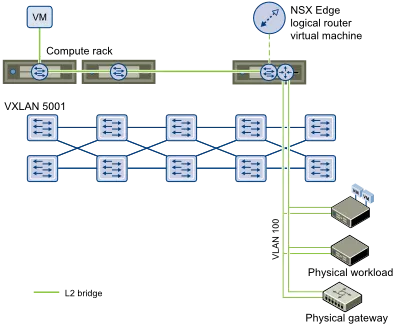
Layer-2 Bridging When you’re talking about Logical Switches, you’re talking about a VXLAN network. VXLAN packets and routing are handled by VTEPs, which are usually ESXi hosts or Top-of-Rack switches. The network packets are inherently different then regular VLAN network packets and need to be processed by a VTEP before it can be translated into a packet which a VM understands. This means there has to be a translation somewhere between VLAN boundaries and VXLAN boundaries, they don’t magically understand each other.
If you run into a case where a physical server needs to be in the same subnet as a VM running in a NSX logical switch, or if you need to use the physical network devices as the default gateway (either a physical loadbalancer, firewall or a router), or even in a migration scenario, you need to have a translation between the logical switch VXLAN network and the VLAN they need to be on. NSX does this with its Logical Distributed Router (LDR) appliance.

In this case, the LDR has two network interfaces; one inside the logical switch and one inside a distributed portgroup that is inside the VLAN where we need to be. The VLAN network traffic will have to go through the LDR control VM, which can be prone to disruptions (ESXi host crashes). This is why the LDR supports a high-availability deployment, where you basically deploy two LDR control VMs which can take over for one and other.
Below we will walkthrough the steps needed to create a Layer-2 bridge between a logical switch and a distributed portgroup.
Add Layer 2 Bridging
Requirements:
- NSX Manager and NSX controller(s) deployed and active.
- Existing Logical Switch and VMs attached to it.
VMware Documentation: Add L2 Bridge
To set up a layer-2 bridge between a logical switch and a distribute portgroup, we will create a Logical Distributed Router and configure it for layer-2 bridging. Here’s how.
Set up a Layer-2 Bridge
- Login to your vSphere Web Client.
- Navigate to Networking & Security and then the “NSX Edges” menu. Click the ”+” icon to add a NSX Edge.
- Select the “Logical (Distributed) Router” type, give it a name and optional hostname, description and tenant. Click “Next”.
- On the “Settings” tab, enter an username and password, determine whether to enable SSH and if you want to enable High Availability. Click “Next”.
- Click on the ”+” icon to add the details for the appliance. Select the cluster, datastore and optional ESXi host and folder for the appliance. Click “OK”. Click “Next” on the previous window.
- Configure the management interface of the LDR. Select a network where it should be connected and add the management IP addresses. Don’t add any other interfaces yet and click “Next”.
- Click through “Default gateway settings”, review your configuration and click “Finish” to start building the LDR.
After this, wait a moment while the LDR control VM is being deployed and configured. When it’s done being busy, continue with building the bridge.
- Double click the LDR you want to create a bridge on.
- Navigate to the “Bridging” tab and click the ”+” icon to create the bridge.
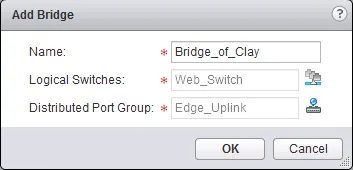
- In the popup window, give the bridge a name, select the logical switch and distributed portgroup and click “OK”.
- Lastly, press the button “Publish” on the top of the screen when you’re added the bridge to push the change to the LDR.

Connect Layer 2 Bridging to the appropriate distributed virtual port group
If you have gone through the previous task, you have successfully connected a layer-2 bridge to the appropriate distributed virtual portgroup. To make a change to the bridge afterwards (ie. if you’ve selected the wrong distributed portgroup), do the following:
- Login to your vSphere Web Client.
- Navigate to Networking & Security and then the “NSX Edges” menu.
- Double click the LDR you want to modify a bridge on.
- Navigate to the “Bridging” tab and select the bridge you want to modify.
- In the popup window, select the appropriate distributed portgroup and click “OK”.
- Lastly, press the button “Publish” on the top of the screen when you’re added the bridge to push the change to the LDR.
