VCIX-NV Objective 6.1 – Configure and Administer Firewall Services
This post is part of my VMware VCIX-NV Study Guide and covers managing the different firewall options that NSX has.
Documentation
Index
- Create/Modify/Delete an Edge Firewall rule
- Create/Modify/Delete a Distributed Firewall rule
- Configure Source/Destination/Service/Action rule components
- Modify the order/priority of Firewall rules
- Create/Modify/Delete Firewall rule sections
- Create/Modify/Delete Source and Destination Network Address Translation rules
- Create/Modify/Delete SpoofGuard policies
NSX Firewalls There are several security measures inside the NSX platform. When it comes to firewalls, you have two options; the Edge Services Gateway Firewall or the Distributed Firewall.
The first one can act like any border gateway with a firewall, allowing and blocking network traffic that goes through the border of a network (or logical switch). The Distributed Firewall is another beast and is what makes NSX unique in the security aspect of virtual machines. The Distributed Firewall is similar to the Distributed Router, as firewall policies can be centrally managed and are then pushed down to the ESXi hosts. The ESXi hosts use these firewall rules inside the ESXi kernel to check the network traffic on a per virtual NIC basis. This means that you can isolate virtual machines (to the vNIC level) from their peer VMs in the same subnet, which usually is unfiltered communication on any other platform. They usually call this micro segmentation.
NSX also makes creating the firewall policies a lot easier then other products as you can use vSphere objects to select sources and destinations. Examples are a Cluster, Datacenter, Distributed Port Group, IP Sets, Legacy (standard) Port Group, Logical Switch, Resource Pool, NSX Security Group, vApp, Virtual Machine or vNIC.
If you mix it up, it means that you can create a firewall policy where you allow vNIC-0 from VM-A to only communicate with a specific Resource Pool, where membership of that resource pool can be dynamic; add another VM and that VM will be allowed as well.
Another important feature which you should be diving in to, are the Security Groups. Security Groups dynamically filled groups of virtual machines. As mentioned before, you can use security groups in firewall policies. Combine that with Security Group Membership criteria and the sky is the limit. Inside the Membership criteria, you can choose what goes in the security group. Criteria objects can be: Computer OS Name, Computer Name, VM Name, Security Tag and (vSphere) Entity. These objects can be matched in several ways, you can enter text that the object should contain (“Contains”), what the object should end with (“Ends with”), or the object should completely equal (“Equals”), or the object should not equal to (“Not Equals To”), or what it should start with (“Starts With”).
Using these criteria, you for example can build groups where you can simply tag a specific virtual machine with the tag “webserver” and that virtual machine will get all the required firewall policies to actually act as a web server (connect to the database server, have users connect to port 80, etc, etc). I have to mention that the functionality for a security group does not stop with the firewall policies, they are also used inside the Service Composer to link third party vendor services (F5, Palo Alto, etc) to the virtual machines inside these groups. For instance, you can force certain virtual machines through the Palo Alto advanced firewall services for deeper protection of those VMs. More on that in the Service Composer chapter.
I hope you can see how powerful these security groups are now, and I really should emphasis that you have to go and play with them to understand just how powerful they are. But for now, lets dive into the tasks for this objective.
Create/Modify/Delete an Edge Firewall rule
Requirements:
- NSX Environment, including a NSX Edge.
VMware Documentation: Working with Edge Firewall Rules
The Edge Services Gateway firewall is the border firewall of your local network (Logical Switch to Logical Switch or the physical network), treat the firewall policies like any other border firewall.
Add a Firewall Policy to an ESG
- Login to your vSphere Web Client.
- Navigate to “Networking & Security” and select the “NSX Edges” menu.
- Choose the NSX Edge you want to modify and select the “Manage” tab.
- Then select the “Firewall” sub-tab and first check if the firewall is enabled. If it’s disabled, click the “Enable” button and “Publish Changes” when it appears to enable the firewall. Do this only with new ESGs or when you’re sure the firewall policies are correct (or if there’s an “Default Rule” that allows any), to prevent cutting off network communication.
- To start adding a policy, click the ”+” icon at the top of the policy table. You can also click the ”+” icon at the rule number to get a menu where you can select to create a rule below or above another one.
- This adds a row in the policy table and you need to edit the policy inside the table. This is a bit unnatural to the rest of NSX (wizard based), but you’ll get used to it.
- To edit a policy, click the ”+” icon in the column you’re hovering your mouse over.
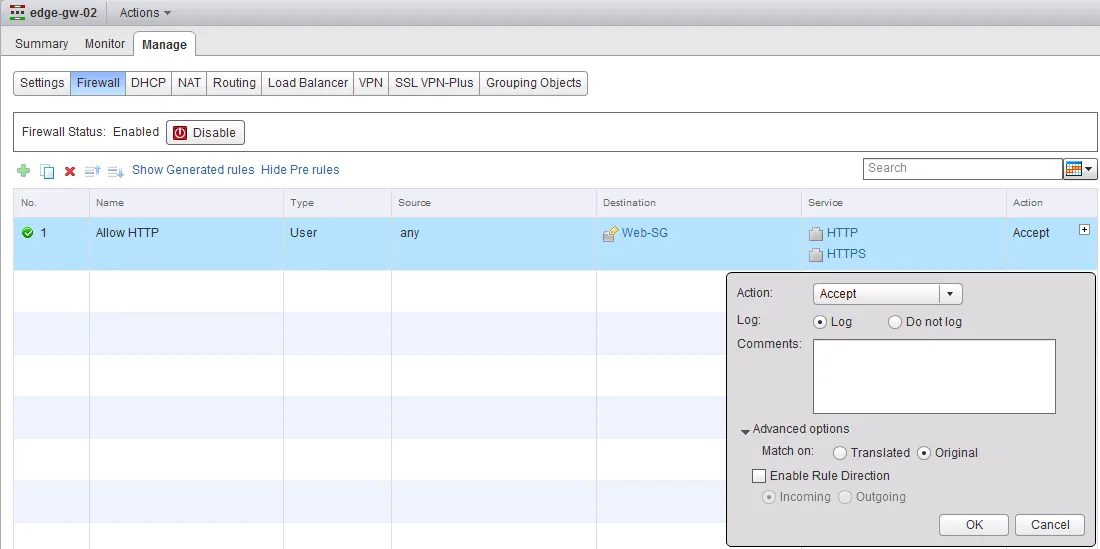
- Give the policy a name you recognise (such as “Allow HTTP”), then select the source object (remember the vSphere objects you can use here?) or leave it as any, select a destination object or leave it as any, then select the service (the predefined services cover a lot, but you can also create your own service inside the Service popup, if needed) and finally, select the Action that should be taken. On Action you can select Deny, Accept or Reject, opt to log the policy hits and under “Advanced options” you can select the traffic direction this policy should be applied on.
- You can also base the policy on IP (single, subnet or range), instead of an object. Click the “IP” icon in the source or destination column to do so.
- For the service, you can also use a protocol or source port. Click the “Port” icon in the service column to do so.
- Repeat this process for any other policies you would like to add. When you’re done, click “Publish Changes” at the top of the page to push the policies down to the ESG.
In the example below, I created a policy called “Allow HTTP” which allows traffic from anywhere to the “Web-SG” Security Group (housing VMs starting with “Web”) over HTTP and HTTPS.
Create/Modify/Delete a Distributed Firewall rule
Requirements:
- NSX Environment with prepared ESXi hosts
VMware Documentation: Working with Firewall Rules
Distributed Firewall policies are the policies that get pushed down to the ESXi hosts, so that they can police network traffic inside the kernel before it even enters the virtual switch. Before expecting the Distributed Firewall to work, make sure that your ESXi clusters are prepared and have the firewall enabled (check “Networking & Security” - “Installation” - “Host Preparation” - “Firewall” column, this should be “Enabled”). We are going to create distributed firewall policies in the next bit.
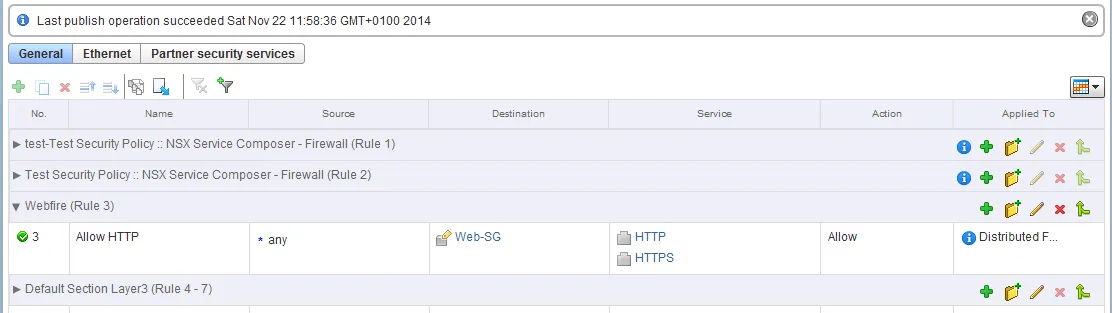
Adding a Distributed Firewall policy works pretty much the same as adding a firewall policy to the ESG. You add a policy, select the source, destination, service and action and publish it. There are a few extra options though, such as Sections to group policies together (we’ll go into those later on), Layer-2 policies (instead of just Layer-3) and management over the Service Composer policies (separate sections).
Add a Distributed Firewall policy
- Login to your vSphere Web Client.
- Navigate to “Networking & Security” and select the “Firewall” menu, then the “Configuration” tab.
- Click the ”+” icon on a specific section or at the top of the table to add a policy.
- In the new policy, hover over the columns to click the ”+” icon in there.
- Select a source, destination, service and action for this policy.
- Click “Publish Changes” when you’re done.
In the example below, I have added the same policy as we did in the previous task on the ESG.
Configure Source/Destination/Service/Action rule components
I’m not entirely sure what they mean here, but I’m pretty sure they mean that you should be able to create or select custom destinations, sources and services for use in the firewall policies.
The custom source and destinations that you can create are the Security Groups, which will be covered later on. When it comes to selecting sources and destinations, well, you did that in the previous sections. ;-)
That leaves custom services. Services can be added in two different places. You can do it from the NSX Managers grouping objects or directly from the service window. The added value of doing it through the NSX Manager is that you can use the custom service on every firewall service (ESG and DFW).
Add a custom service from the Distributed Firewall
- Login to your vSphere Web Client.
- Navigate to “Networking & Security” and select the “Firewall” menu, then the “Configuration” tab.
- Hover over the policy you want to create the service for and click the ”+” icon in the Service column.
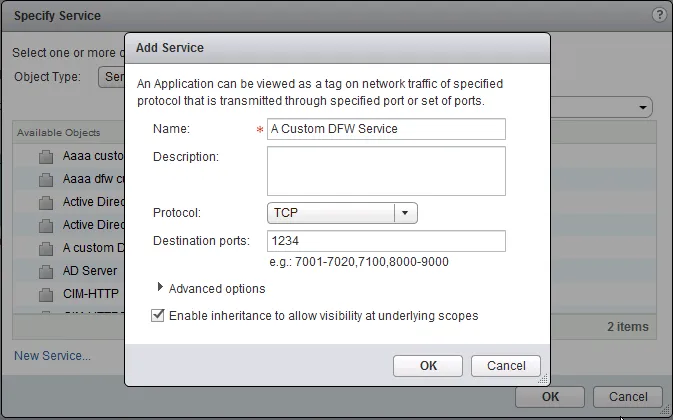
- In the popup window, click the “New Service…” link to create a custom service.
- In the “Add Service” window, give the new service a name, select the protocol (TCP, UDP, ICMP, etc) and enter the Destination ports when required. Click “OK” when you’re done.
- Your new service will automatically be selected in the “Selected Objects” table. Click “OK” to confirm. Click “Publish Changes” when it appears to take the policies into effect.
Add a custom service on the NSX Manager
- Login to your vSphere Web Client.
- Navigate to “Networking & Security” and select the “NSX Managers” menu.
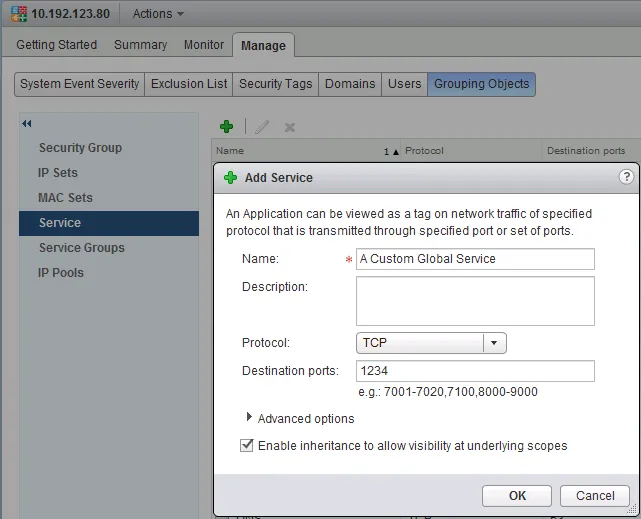
- Select your NSX Manager and select the “Manage” tab and then the “Grouping Objects” sub-tab.
- Then select the “Service” tab and click the ”+” icon to add a new service.
- In the “Add Service” window, give the new service a name, select the protocol (TCP, UDP, ICMP, etc) and enter the Destination ports when required. Click “OK” when you’re done.
Modify the order/priority of Firewall rules
Requirements:
- NSX Environment.
- Existing firewall rules to re-order.
VMware Documentation: Change the Order of a Rule
As any existing firewall solution, NSX processes the firewall policies in a first-come first-serve basis. Meaning if you have a “deny all” policy at the top and an “allow service” underneath the deny policy, all your traffic will get denied. To fix that, you’ll need to put the “deny all” policy at the bottom. Here’s how:
Re-ordering a Distributed Firewall rule
- Login to your vSphere Web Client.
- Navigate to “Networking & Security” and select the “Firewall” menu.
- Select the rule you want to move and click the “Move rule down” or “Move rule up” icons:


- Click “Publish Changes” to activate your changes.
Create/Modify/Delete Firewall rule sections
Requirements:
- NSX Environment.
VMware Documentation: Working with Distributed Firewall Rule Sections
Inside the Distributed Firewall, you have the ability to create Sections, which allow you to group certain firewall policies together to keep them organised. They also help to keep overview in the configuration view, as the policies inside the distributed firewall are for your entire virtual environment. With this, I mean that the amount of policies that are configured in a real environment could be humongous.
Adding a Section to the Distributed Firewall
- Login to your vSphere Web Client.
- Navigate to “Networking & Security” and select the “Firewall” menu.
- To add a Section, click the folder icon with a ”+” attached
 . Do this on the existing section you want the new section to be near to (remember the first-come first-serve rule).
 - In the popup window, give the new section a name and select whether to place it above or below the section you used to create this new one. Keep in mind that sections cannot be re-ordered in NSX 6.0.x.
- Click “OK” to create the section and “Publish Changes” to activate.

Create/Modify/Delete Source and Destination Network Address Translation rules
Requirements:
- NSX Environment, including a deployed NSX Edge.
VMware Documentation: Managing NAT Rules
If you’ve reached this point, you should already know (and use) what NAT is, but just to be complete: Network Address Translation (NAT) rules are a way to make your border firewall to hide internal subnets from the outside world. For example, every consumer internet connection will have an internal network (your computers, phones, tablets, etc) which is in the globally determined internal IP subnet range. Your border device will hide that internal network to prevent overlap, create a security border between the outside and inside and simply because the internal ranges are not routed on the internet. NAT is also used in server environments where different server pods use the same internal IP subnets, for instance in a development and Q&A environment where the developers have individual pods but using the same internal IP subnets in each pod. To read more about NAT, check this wiki article.
Important to know is that to use NAT on a NSX Edge, you need to have the firewall service enabled. If you do not enable the firewall service, NAT will not work.
The NSX Edge Services Gateway can perform source NAT (hiding internal networks) and destination NAT (opening ports on the outside and translating them to an internal server) rules, we’ll add one of each below.
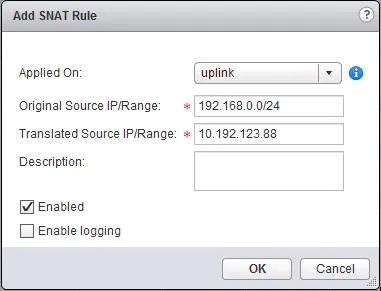
Adding a Source NAT rule
- Login to your vSphere Web Client.
- Navigate to “Networking & Security” and select the “NSX Edges” menu.
- Choose the NSX Edge you want to modify and select the “Manage” tab.
- Then select the “NAT” sub-tab. Click the ”+” icon to add a NAT rule and select “Add SNAT Rule” in the menu.
- In the popup window, select which interface to apply this rule on (the external interface), enter the source IP details (single IP, range or subnet), enter the translated IP details (single, range or subnet), give it an optional description and tick “Enabled” to enable the rule. Optionally tick “Enable logging” to log connections hitting this rule.
- Click “OK” when you’re done and “Publish Changes” when it appears to activate the changes.
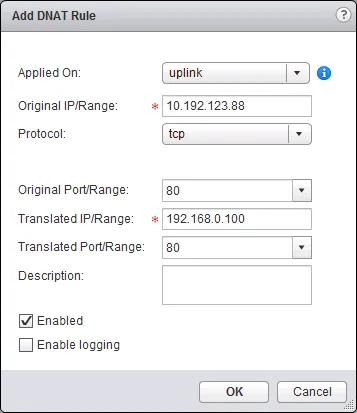
For destination NAT, you can do a few things: Map an external IP address completely to an internal IP address (so every port that gets connected to will be translated to that internal IP), do a single IP and network port translation (external IP on port 80 translated to internal IP on port 80), map a single external IP address to multiple internal IP addresses (poor mans load balancing) and map a range of external IP addresses to a range of internal IP addresses. The most common is the single IP address translation (single port or any port). In the following example, a single external IP address and single port will be mapped to a single internal IP address with the same single port.
Adding a Destination NAT rule
- Login to your vSphere Web Client.
- Navigate to “Networking & Security” and select the “NSX Edges” menu.
- Choose the NSX Edge you want to modify and select the “Manage” tab.
- Then select the “NAT” sub-tab. Click the ”+” icon to add a NAT rule and select “Add DNAT Rule” in the menu.
- In the popup window, select which interface to apply this rule on (the external interface), enter the original IP address (where the user connects, can be a single IP, range or subnet), enter the network protocol to translate, enter the original (outside) port, enter the translated (internal) IP address (can be a single IP, range or subnet) and translated port, add an optional description and tick “Enabled” to enable the rule. Optionally tick “Enable logging” to log connections hitting this rule.
- Click “OK” when you’re done and “Publish Changes” when it appears to activate the changes.
Create/Modify/Delete SpoofGuard policies
Requirements:
- NSX Environment.
VMware Documentation: Using SpoofGuard
SpoofGuard is a security feature known to the networking world for ages. It is a method to stop hosts in a network to spoof IP addresses and potentially cause trouble for other hosts. If a host sends a lot of spoofed traffic to another host, the recipient will be busy setting up sessions to the spoofed (non-existing) IP address, which need to time out. When the recipient has too many sessions open (waiting to timeout), the recipient starts having problems with processing real network traffic.
In physical networks, SpoofGuard is usually implemented using a DHCP Snooping service to detect which IP addresses are given to hosts and to deny all other IP addresses that would come out of that host. In NSX, it is implemented through the VMware tools. The tools read out the IP address(es) and use those to apply a SpoofGuard policy. There are two types of operating modes for a SpoofGuard policy: Trust initial IP addresses, trust no IP addresses before manual approval.
The “Trust Initial” mode grabs the IP address through the VMware tools when the VM gets its first IP address. All IP changes after the initial IP address, have to be approved (trusted) manually. In the “Trust none” mode, you will need to manually approve all IP addresses, even the initial IPs that the VMware tools discover.
By default SpoofGuard is disabled in NSX. SpoofGuard is activated in the ESXi kernel, just as the Distributed Firewall is. You can activate SpoofGuard on a per network (Standard Port Group, Distributed Port Group and Logical Switch) basis and select different operation modes per network. This is done by adding policies for SpoofGuard.
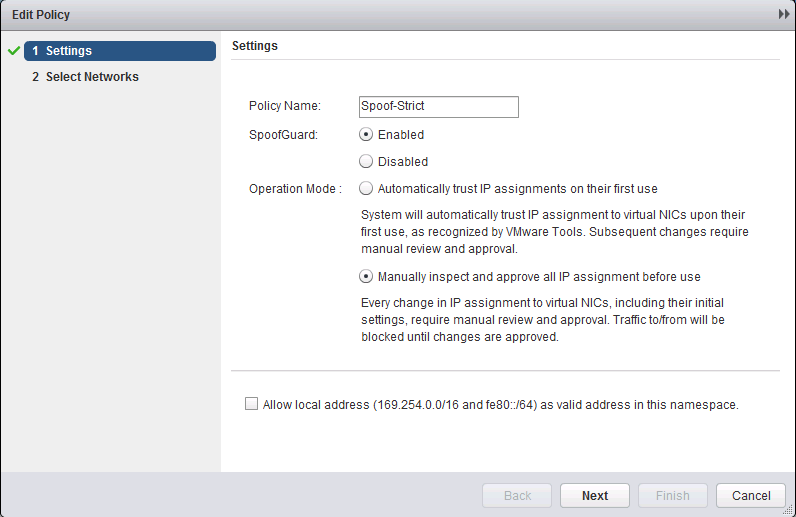
Adding a SpoofGuard policy
- Login to your vSphere Web Client.
- Navigate to “Networking & Security” and select the “SpoofGuard” menu.
- In the SpoofGuard Policies table, click the ”+” icon to add a policy.
- In the popup window, give the new policy a name, select whether to enable SpoofGuard, select the Operation Mode and optionally select “Allow local address” to allow APIPA addresses to take part in SpoofGuard (usually don’t enable this). Click “Next” to continue.
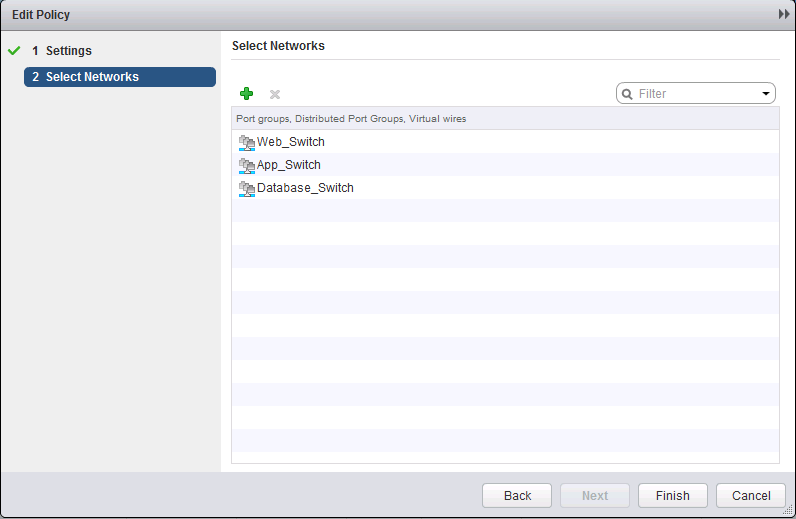
- Now select the networks you want to enable this policy one by clicking the ”+” icon and selecting the proper port groups.
- Click “Finish” when you’re done adding port groups and want to activate this policy.
 |  |
After creating the right SpoofGuard policies, you need to approve IP addresses when they are detected or changed. You can do this on the same page as where the policies are created.
Approving IP addresses on SpoofGuard
- Login to your vSphere Web Client.
- Navigate to “Networking & Security” and select the “SpoofGuard” menu.
- Select the SpoofGuard policy where you want to approve IPs.
- At the bottom of the page, the virtual machine vNICs will appear with their detected IP addresses. There are a few “Views” you can select:
- Active Virtual NICs: All vNICs that are currently on running VMs.
- Active Virtual NICs Since Last Published: All vNICs on running VMs that are new (since the last SpoofGuard update).
- Virtual NICs IP Required Approval: All IPs on vNICs that require manual approval.
- Virtual NICs With Duplicate IP: All duplicate IPs on different VMs (can happen with overlapping networks).
- Inactive Virtual NICs: All vNICs on VMs that have not been turned on.
- Unpublished Virtual NICs IP: All pending changes to IP approvals
- To approve an IP address on a VM that has not been turned on yet, select the “Inactive Virtual NICs” view.
- In the “Approved IP” column, click the pencil icon and enter a pre-approved IP address.
- To approve a detected (by VMware tools) IP address, tick the checkbox in front of the vNIC and click the “Approve Detected IP(s)” button.
- After finishing approvals or pre-approvals, click the “Publish Changes” to activate the changes.
