Using Azure DevOps Pipelines with Qt
This post goes into building an Azure DevOps Pipeline, which builds an Qt application. I recently moved to Azure, and found this combination not documented very well. I stepped in a lot of pitfalls and want to spare you the same.
First, some backstory; I’ve created this application, called WhatPulse (personal computer & productivity stats), which is built in C++ and the Qt framework. I’ve been using GitLab to host the code, and have been using their CI/CD pipelines to do automated compiling and testing of WhatPulse. The workers (the machines that execute the pipeline) were VMs, running locally in my home lab. But, these VMs need maintenance (OS & application upgrades), and I couldn’t share them with anyone else because they were running in my home.
To improve on that situation, I had a few requirements:
-
The workers need to be able to run Qt, C++ compilers and run Windows, macOS, and Linux,
-
The workers shouldn’t need maintenance,
-
The setup needs to be public so that I can share access,
-
It needs to integrate with GitLab to initiate when commits get pushed.
Pretty straightforward, right?
Azure DevOps
Before I got to Azure, I did look at other options like AppVeyor, DeployHQ, AWS CodePipeline, and even just sticking with VMs (but putting them in the cloud and have them automatically rebuilt every week).
There are a few reasons why I chose Azure; it was the easiest to get started with because it’s pretty simple. It had the most integration options, and it support Windows, macOS, and Linux (one of the very few hosted pipelines that support macOS).
It’s also relatively cheap (it helps if you’re a Microsoft Partner). In any case, it’s pretty cool to see how Microsoft has evolved Azure into the cloud it is.
The only problem was that their workers do not have Qt installed by default.
AQtInstall
Enter aqtinstall, which can dynamically install Qt on the workers, when needed. You can pick the Qt version and give it a list of Qt modules to download and installs that specific version and modules to a local temporary directory.
GitLab
Now for the second problem; Azure does not integrate directly with GitLab. It integrates with GitHub, Bitbucket, Azure Repos, and generic Git repositories. The last one should mean you can integrate GitLab, but there seem to be some limitations there. One limitation appears to be that you cannot use a YAML file stored in your repo to describe the pipeline; you would need to use the visual editor on Azure.
But, considering GitHub does free private repositories these days, I decided to solve that in a simple way; just have the GitLab repo mirror to a private GitHub repo and then use GitHub as the source for Azure.
Workflow
I ended up with this workflow:

I’m hoping that either I’m mistaken, and it is somehow possible to use the YAML files with generic Git repos or that Azure will start supporting GitLab as some point so that I can take out the mirror step.
Azure DevOps Prerequisites
Head to https://dev.azure.com, and you’ll be greeted as a new user. Go through the motions and create an organization and project to host the pipeline. A wizard guides that process; it should be self-explanatory.
Creating the Pipeline
There are two steps to creating the pipeline: 1) create it on Azure, and 2) create (and mostly tweak) the azure-pipelines.yml file, which contains the steps to be executed.
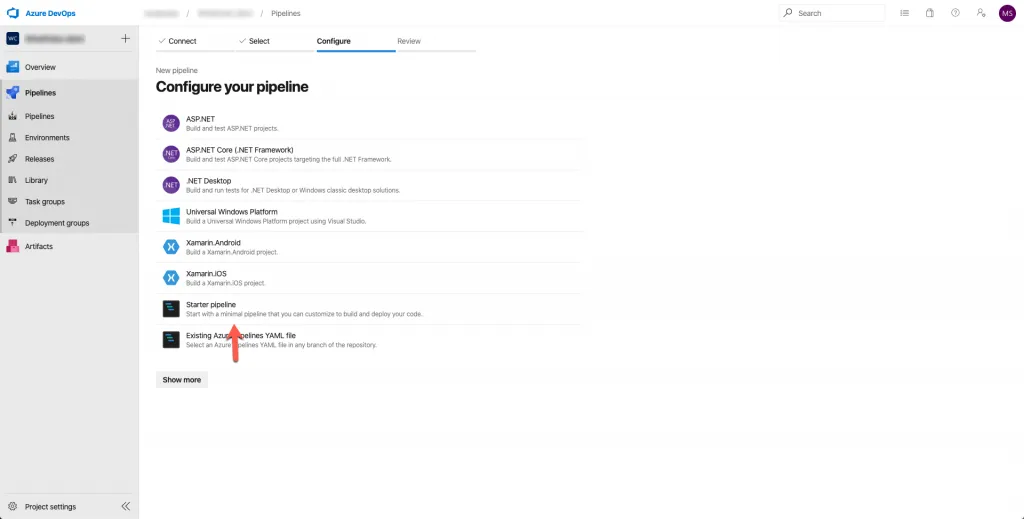
Creating the pipeline will look for an existing azure-pipelines.yml file, or you can create one (and push it to your repo) from a template. A template will have build steps for things like Go, .NET, NodeJS, PHP, etc. They have around 45 different templates.
I started with an empty template to customize later. Select the Starter pipeline option:
After selecting the Starter pipeline option, you’ll be presented with a bare minimum azure-pipelines.yml that will be pushed to your repository, when you continue:
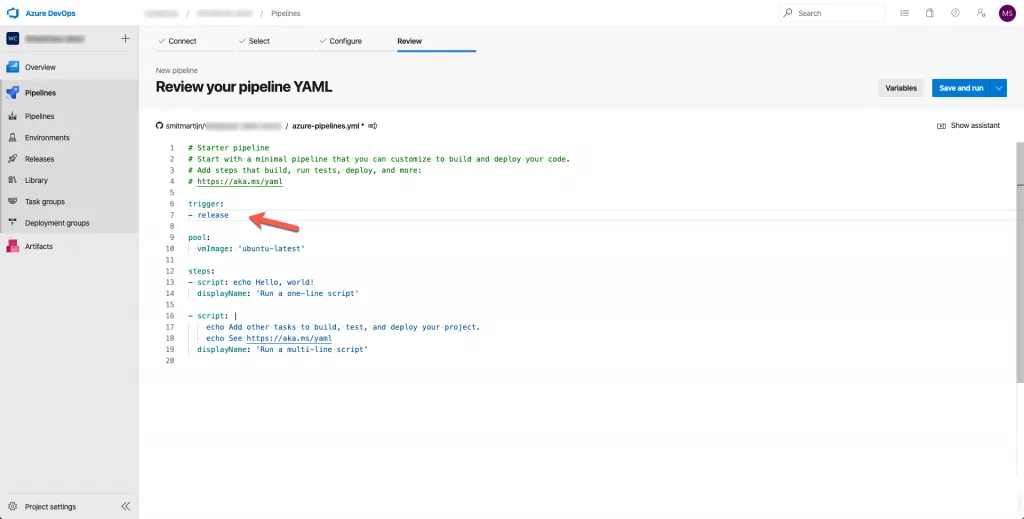
Leave this file as-is. I selected the release branch, as I use that branch when the WhatPulse client starts to get ready for a release, and I don’t want pipelines to run all the time (budgetary reasons). If you don’t mind spending a bit, put it on the master branch to have continuous building.
The funny thing here is that Microsoft uses Ubuntu Linux here as the default worker. ;-)
Available Software for Workers
A good thing to bookmark is the pages that list the available software on the workers. Microsoft maintains a list of all installed software on GitHub, and it tells you what you can use during the build process.
If there’s software that’s not listed, but you need it (like Qt), you can install it during the pipeline execution.
Qt Pipeline
I’ve split up the pipeline config over multiple files to have each platform have its own file. My primary azures-pipelines.yml looks like this:
jobs:
- job: MacOS
  strategy:
    matrix:
      mac:
        imageName: 'macOS-10.14'
  pool:
    vmImage: $(imageName)
  steps:
    - template: ci/macos.yml
- job: Windows
  strategy:
    matrix:
      windows:
        imageName: 'vs2017-win2016'
  pool:
    vmImage: $(imageName)
  steps:
    - template: ci/windows.yml
- job: Linux
  strategy:
    matrix:
      mac:
        imageName: 'ubuntu-18.04'
  pool:
    vmImage: $(imageName)
  steps:
    - template: ci/linux.yml
This creates a separate job for each platform, and indicates which vmImage (refers to imageName) to use for the worker. Make sure to refer to the platform version you want.
Steps are the executing steps that will be executed. I’m referring to another YAML file here, so I can have the platform-specific steps separated.
ci/macos.yml
Next up, the platform-specific file for macOS, which contains the steps to build this Qt application for macOS. There is a lot in here, I’ll explain below:
# macOS-specific:
steps:
  - checkout: self
    # 1
    submodules: true
  # 2
  - script: brew install p7zip
    displayName: 'Install 7-zip'
  - script: brew install create-dmg
    displayName: 'Install create-dmg'
  # 3
  - task: UsePythonVersion@0
    inputs:
      versionSpec: '3.x'
  # 4
  - script: |
      /bin/bash -c "sudo xcode-select -s /Applications/Xcode_10.app/Contents/Developer"
    displayName: 'Select Xcode 10'
  # 5
  - script: |
      cd $(Build.SourcesDirectory)
      python -m pip install aqtinstall
    displayName: 'Install aqtinstall'
  # 6
  - script: |
      python -m aqt install --outputdir $(Build.BinariesDirectory)/Qt 5.14.0 mac desktop -m qtcore qtgui qtxml qtwidgets
    displayName: 'Install Qt 5.14.0'
  # 7
  - script: |
      cd $(Build.SourcesDirectory)
      $(Build.BinariesDirectory)/Qt/5.14.0/clang_64/bin/qmake
    displayName: 'Run qmake'
  # 8
  - script: |
      cd $(Build.SourcesDirectory)
      make
    displayName: 'Build!'
  # 9
  - script: $(Build.SourcesDirectory)/create-dmg.sh
    displayName: 'Building DMG'
  # 10
  - task: CopyFiles@2
    inputs:
      contents: app.dmg
      targetFolder: $(Build.ArtifactStagingDirectory)
  # 11
  - task: PublishBuildArtifacts@1
    inputs:
      pathToPublish: $(Build.ArtifactStagingDirectory)
artifactName: MacOS_release- This makes sure all submodules are checked out and downloaded. By default, the worker does not do this; meaning builds will fail if submodules are compiled in.
- Brew the package manager is available! Using it to install 7-Zip, which aqtinstall needs, and create-dmg, which is used later to package the compiled app to a redistributable dmg format.
- Make sure Python 3.x is used for all next steps. You can be specific as well; the available versions are documented in the worker software lists.
- If you need to use a specific Xcode version, here’s how to select it. The macOS worker has a lot of different versions available.
- Now we’re getting to the Qt specific parts. This installs aqtinstall using pip.
- Use aqtinstall to install Qt 5.14.0 to the so-called BinariesDirectory directory. Also include some Qt modules. Check the aqtinstall docs for available options.
- Use the newly downloaded Qt and run qmake.
- Build sources. You can expect the same thing to happen as when you compile locally.
- This uses ‘create-dmg’ to package the newly built .app into a .dmg.
- Copy the built client.dmg to the artifact staging directory.
- Lastly, publish the artifact staging directory to permanent storage so you can retrieve it.
When the pipeline runs successfully, the artifacts (dmg) can be found attached to the job:
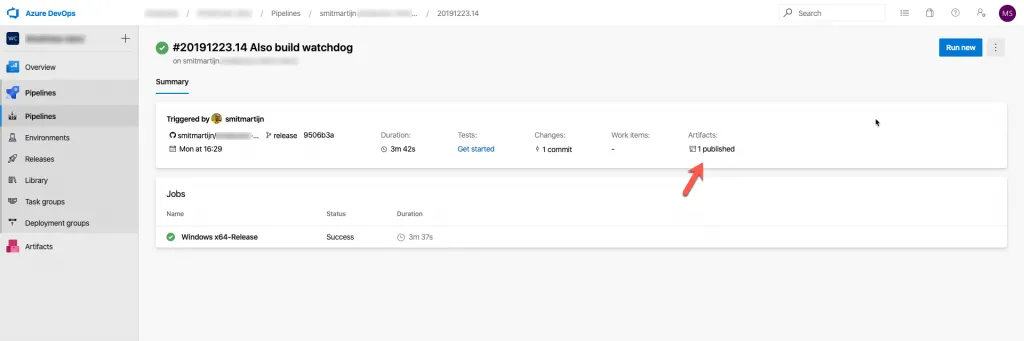
Honestly, this process still blows my mind. You commit a small change to your application code, a pipeline picks it up and starts compiling it in a strictly controlled environment with pre-defined software versions, and if all goes well, a ready to be distributed application comes out. Want to use a different OS version? Just change imageName, and the pipeline will use that version. :mindblown:
ci/windows.yml
Let’s also have a look at the Windows versions of the above pipeline, including installing Qt. Same deal, I’ll explain the new steps below:
# Windows-specific:
steps:
  - checkout: self
    submodules: true
  - task: UsePythonVersion@0
    inputs:
      versionSpec: '3.x'
  - script: |
      cd $(Build.SourcesDirectory)
      python -m pip install aqtinstall
    displayName: 'Install aqtinstall'
  # 1
  - script: |
      cd $(Build.SourcesDirectory)
      python -m aqt install --outputdir $(Build.BinariesDirectory)\\Qt 5.14.0 windows desktop win_msvc2017 -m qtcore qtgui qtxml qtwidgets
    displayName: 'Install Qt 5.14.0'
  # 2
  - script: |
      cd $(Build.SourcesDirectory)
      call "C:\\Program Files (x86)\\Microsoft Visual Studio\\2017\\Enterprise\\VC\\Auxiliary\\Build\\vcvars64.bat"
      $(Build.BinariesDirectory)\\Qt\\5.14.0\\msvc2017\\bin\\qmake.exe
    displayName: 'Run qmake'
  # 3
  - script: |
      cd $(Build.SourcesDirectory)
      call "C:\\Program Files (x86)\\Microsoft Visual Studio\\2017\\Enterprise\\VC\\Auxiliary\\Build\\vcvars64.bat"
      nmake release
    displayName: 'Build!'
  # 4
  - task: CopyFiles@2
    inputs:
      contents: |
        $(Build.SourcesDirectory)\\release\\app.exe
      targetFolder: $(Build.ArtifactStagingDirectory)
  - task: PublishBuildArtifacts@1
    inputs:
      pathToPublish: $(Build.ArtifactStagingDirectory)
artifactName: Windows_release- Installing Qt with aqtinstall on Windows is a bit different; all available syntax options are on the aqtinstall GitHub page.
- First, set the right environment variables using the vcvars64.bat script, in order to make sure Visual Studio 2017 is used. Then use the newly installed Qt version to run qmake on the project.
- Build the application!
- Same thing as in the MacOS pipeline; copy the compiled executable to the artifacts staging directory, and then publish the artifacts staging directory so you can get it.
ci/linux.yml
I’m not going to go into the Linux pipeline, as it’s really boring and exactly the same as the above ones. ;-)
Conclusion
Qt applications can definitely be built using the Azure Pipelines. There are a lot more possibilities then I showcased in this post; I’m learning as I go and looking forward to optimizing this build process more and more.
If you got this far, thanks! I hope you found it useful.