Using Tailscale for Home Lab VPN Connectivity
I’m always looking to simplify connectivity between my networks’ different connections. With a home lab, colocated servers, and a few clouds that host projects, it’s a web.
This was all connected with VPNs in the past, but everyone hates VPNs.
I moved to SD-WAN when VMware acquired VeloCloud, and I had the fortune to get a few SD-WAN edges. But I handed them back when I left VMware, so I also needed to update the connectivity.
Enter Tailscale.
Note: this is not a sponsored post. I just really, really like the product. 😃
Tailscale?
The Cloudcast introduced me to Tailscale, a Zero Config VPN product that uses WireGuard under the hood. WireGuard is interesting because it’s more performant than OpenVPN, easier to set up, and cross-platform (Windows, Linux, macOS, etc.).
Tailscale adds functionality to WireGuard by acting as the control plane and implementing the proper configuration. It’s designed to work in organizations, with options for SSO, access-control lists based on identity, and granular authorizations. There’s also MagicDNS that automatically enrolls DNS records for clients and things like subnet routers and exit nodes - more on those nodes later.
Not to mention the NAT traversal feature; no opening ports or creating port mappings, even if the Tailscale node is behind NAT.
To reiterate, Tailscale is the control plane of the VPN network, and data does not pass through the cloud and always goes between clients directly.
To set some context before I go on, here’s a conceptual network diagram:
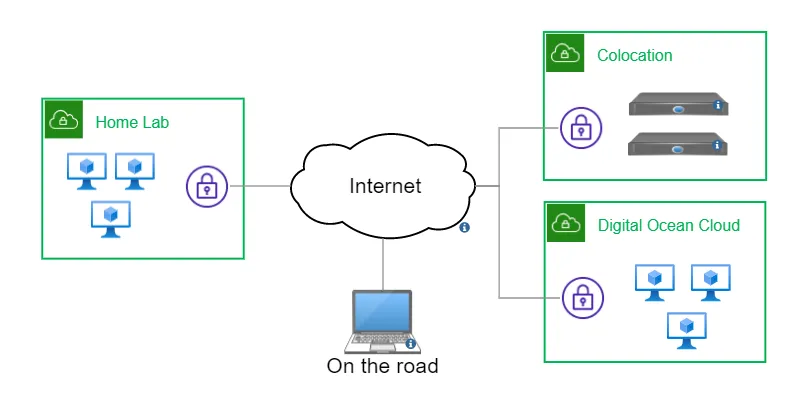
The Home Lab is my home network, including my regular computers that need to connect to the Colocation and the Digital Ocean (DO) cloud. There are a few required connections between the colo and DO cloud. Fixed locations (home and colo) have VMs that handle the traffic, and the cloud VMs all have the Tailscale client installed. There’s also a client on my laptop, making my connectivity the same where ever I go.
Subnet Router
One of the features that attracted me to Tailscale is the ability to mark a client as a subnet router. Subnet routers allow you to make a client as the location for a specific subnet. It’s an easy way to connect an entire network to the VPN.
Configuring a subnet router is simple: advertise subnets from the client, approve and mark it as a subnet router via the Tailscale console: done. Here’s the official documentation.
If you want bi-directional connectivity (i.e., home ↔ colo and colo ↔ home), set a static route on the local router for the VPN networks, pointing to the subnet router client.
I needed bi-directional communication in all directions, so I installed Tailscale on the VyOS router in the colocation and on my Ubiquity EdgeRouter at home.
Conclusion & Free Plan
Tailscale has a generous free plan for 20 devices and one subnet router for a single user. When you only want to connect to your home lab on the road, that’s enough. If you need more, there’s a Personal Plan with 100 devices and two subnet routers for only $48 a year, which is what I’m using.
There are different solutions for home lab access, like setting up an OpenVPN server in the cloud, but none have been as easy and quick as Tailscale. If you want remote access to your home lab from anywhere, do yourself a favor and check them out.