Connecting a VPN between AWS and VMware NSX
Amazon Web Services has a few ways of giving you connectivity: internet, Direct Connect (a physical line) and VPN. While AWS has a ton of examples for firewall/VPN vendors, there is none for connecting with NSX. I needed to connect a NSX network with AWS for a proof of concept and had to figure out how to configure AWS and what settings to use on the NSX Edge VPN. Behold, the fruits of my labor!
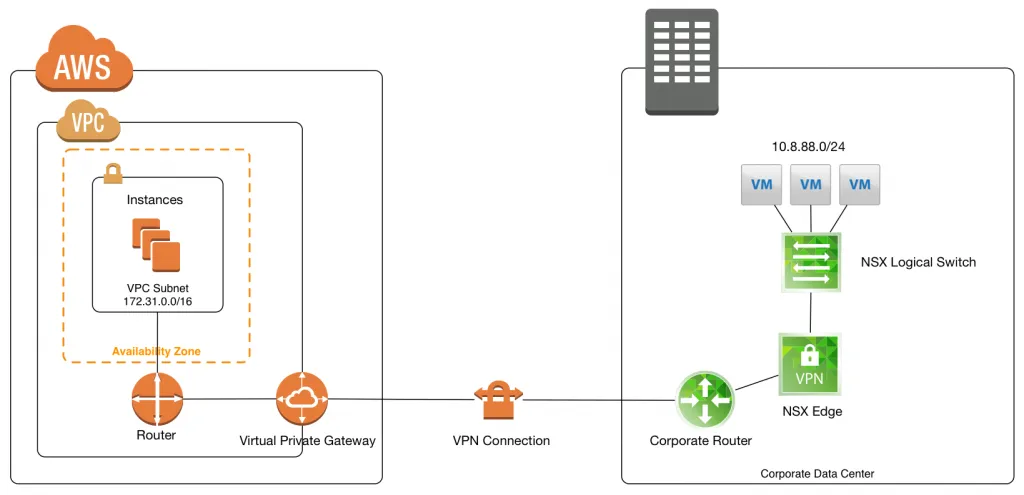
This is what we are going to be building in this post. Compute resources inside AWS connected with a VPN towards VMware NSX for corporate connectivity.
Configuration Details
For this exercise, we are going to use the following details, which you will see appear through the post:
- AWS Internal Subnet: 172.31.0.0/16
- AWS External IP: 52.41.82.190 (auto provisioned by AWS)
- Corporate External IP: 77.249.x.x (last 2 are blurred out)
- Corporate Internal Subnet: 10.8.88.0/24
Amazon Web Services Configuration
Amazon actually has two options to set up a VPN: Software VPN and Hardware VPN. The difference between those two is that a software VPN is just a dedicated instance inside AWS with software like pfSense, OpenVPN or any of the available vendors on the marketplace (such as Cisco, Fortinet, etc). A Hardware VPN is an actual physical VPN concentrator service AWS has running, on which you will get a virtual instance. I’m going to focus on the Hardware VPN option.
On AWS you need a bunch of things to get this running. Obviously you need a Virtual Private Cloud (VPC) to host your instances, but also the following components:
- Customer Gateway: The identifier for the endpoint where the corporate environment is connecting from. Basically just the external IP address.
- Virtual Private Gateway: A virtual gateway device which allows connectivity from a VPC to external networks (Internet & Direct Connect). This is the device through which the VPN connection will be established.
- VPN Connection: Duh. ;-) This is a configuration profile which contains the VPN settings.
This list is also the order of creating them inside the AWS Console.
Inside the VMware NSX environment, we only need a NSX Edge, connectivity to the VMs you want to have communicate with instances in AWS and a network connection towards the internet. The “Corporate Router” in the topology is a standard internet router. This corporate router is not allowing any communication through from the internet to the inside, to the NSX Edge. This setup only allows the NSX Edge to talk IPsec to AWS and nothing else. This was one of the requirements of this PoC and it is not a problem!
Getting Started
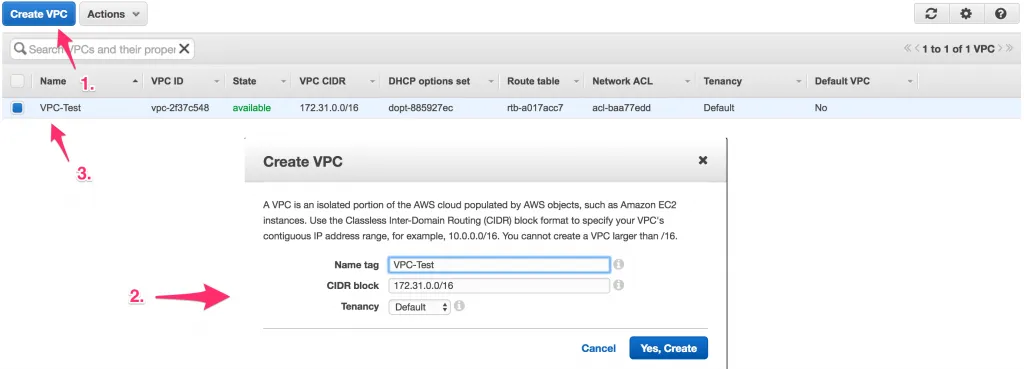
First, we need to have a VPC inside AWS. This is simply a container of resources with a specific IP subnet and can be created on the fly (and unlimited). When rolling out instances (VMs), you’ll be able to select a VPC to host them in. Inside the AWS Console - VPC Dashboard, there’s a menu for VPCs and just to show what I created, here’s the settings for this exercise:
When you have the VPC all setup, we can continue with setting up the networking for your newly created VPC.
Create a Customer Gateway
The first step is to create a Customer Gateway and make the external IP address of the corporate internet known. This Customer Gateway is referenced later on when you create the VPN, as the endpoint from where AWS is expecting the VPN to be instantiated.
As mentioned, it’s simply a reference to an external IP address, which makes the creation process a quick thing. In the VPC Dashboard there’s a menu for Customer Gateways and there’s a create button on there. Here’s the settings I used:
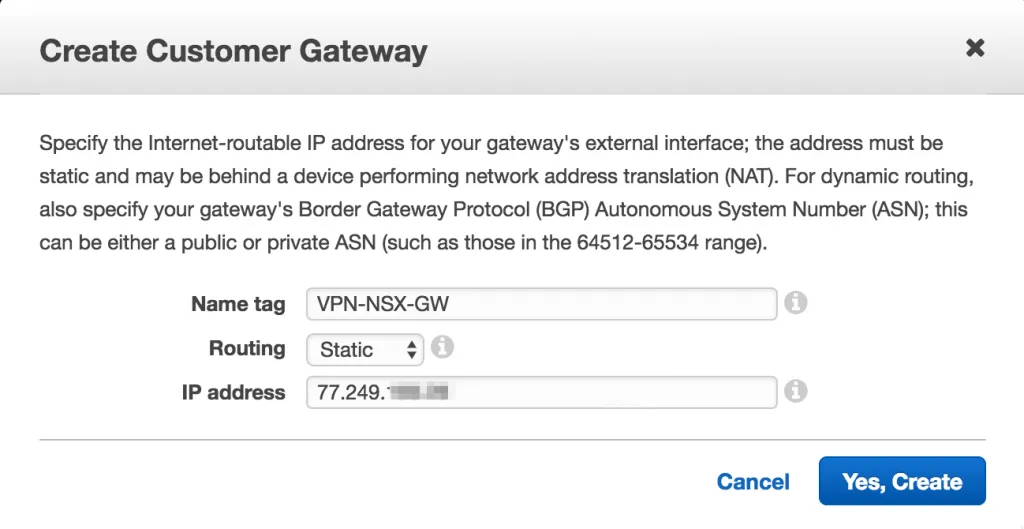
The Name tag is a description which you can make up. It’ll be referenced throughout the AWS Console, but that’s it.
Create a Virtual Private Gateway
The Virtual Private Gateway (VPG) is a bit (just a bit) more involved, as you need to create one and attach it to a VPC. There’s a 1-to-1 relationship between the VPG and VPC, so you’ll have one per VPC.
Alright, navigate to the Virtual Private Gateways menu in the VPC Dashboard and create a new one. The only thing you need to do here is to give the VPG a name.

After creating the VPG, it needs to be attached to your VPC. Simply select the line item in the VPG overview and use the Attach to VPC button. A window will pop up asking you which VPC you want to attach to this VPG to. Select the proper VPC and click attach.

When that’s done, the VPG overview list should look like this:

Create the VPN Connection
So, now we’ve got a component that references the external IP address of the corporate network and an AWS Gateway connected to your VPC. Now what we need to do, is link them together in a VPN configuration. Navigate to the VPN Connections menu in the VPC Dashboard and click the button to create a new VPN Connection.
You’ll be presented with a window to create a VPN Connection and you’ll need to fill out the details. Give the VPN a name, select the previously created VPG, select the Customer Gateway and choose between Dynamic or Static routing. The Dynamic routing option will allow you to talk BGP between the corporate network and the AWS network, so that you can connect multiple IP subnets and do some routing magic. If you only have a single or a few IP subnets, it’s best to select Static routing to keep it a bit simpler. I’ll go for static routing in this example and use the local IP subnet of the corporate network.
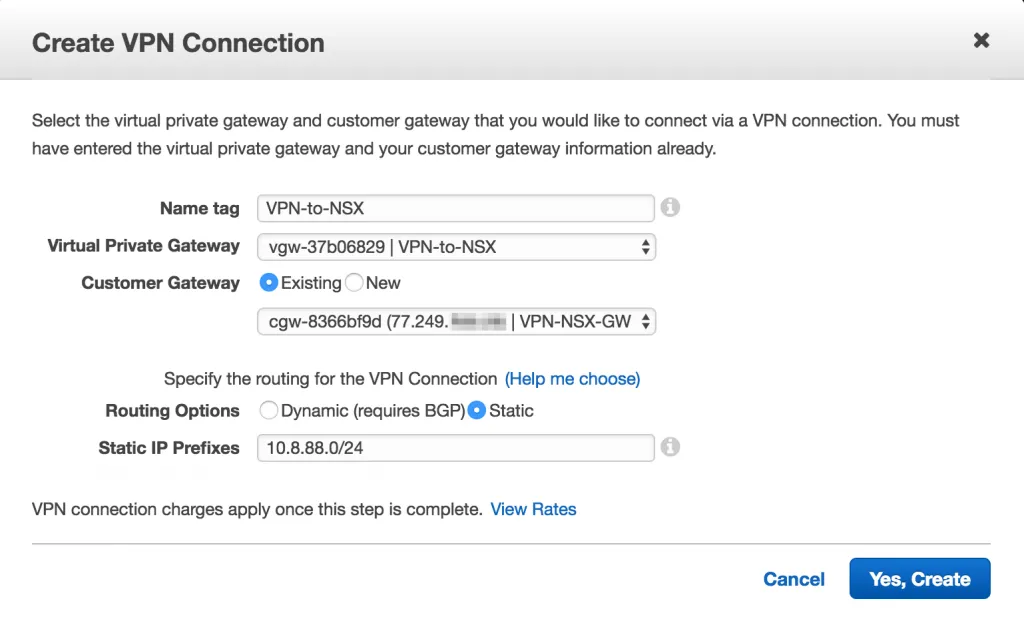
After creating the VPN Connection, it will appear in the list as available:

Download the VPN Configuration
To make the connection between AWS and NSX possible, you also need to configure a VPN on the NSX side. You might have noticed that there were no possibilities to adjust any VPN options (authentication, pre-shared-key, encryption, lifetime, etc) when creating the VPN components inside the AWS Console. This is because AWS has a standard set of VPN options which they use for all VPNs. These options are very universal and can be applied to pretty much any firewall vendor.
Use the Download Configuration button to get a list of example configurations for a bunch of different VPN vendors/services. We only need the configuration options, so go ahead and download the configuration for the default option (Checkpoint).
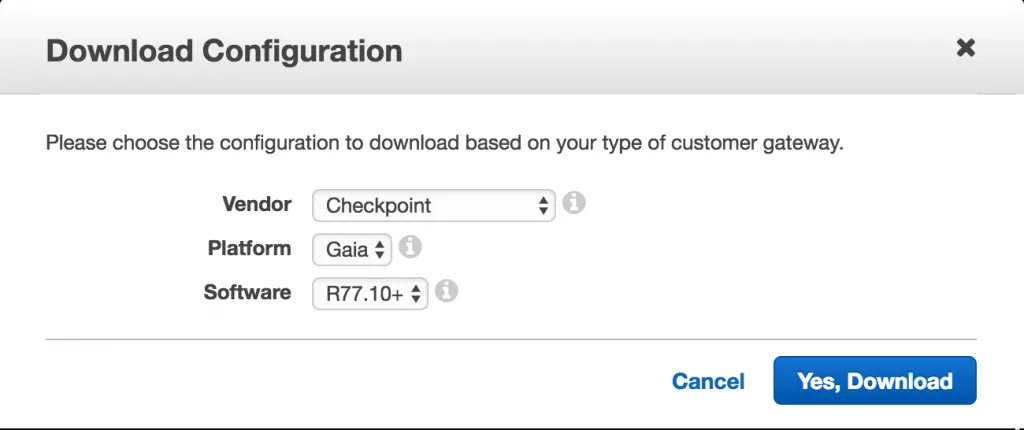
You will get a text file with a few interesting lines.
- Line 67: “3. For “IPv4 Address”, IP address: 52.41.82.190” - That’s the IP address of the VPN endpoint we are going to use within NSX,
- Line 104: ” a. Perform key exchange encryption with: aes128” - This means we’re going to use AES for the encryption,
- Line 113: “10. Expand “Advanced Settings”. For “Shared Secret”: w.NDqqKV9Px_cy5UKq09qVsJPro6Xbwr” - The pre-shared-key (PSK) authentication string,
- Line 116: ” a. Use Diffie-Hellman group: 2” - Diffie-Hellman Group 2,
- Line 118: ” IPSEC (Phase 2) a. Use Perfect Forward Secrecy: Checked b. IPSEC SA Lifetime: 3600 sec” - Perfect Forward Secrecy (PFS) enabled.
That’s it, with this information we are able to configure the VPN within NSX.
Enabling Route Propagation
The last thing we have to do within AWS is to enable route propagation, so that the VPG can announce the routes it has (dynamic or static, in this case static) configured for the incoming VPNs, into the VPC. Without this step, your AWS instances will not have a route towards the corporate network and connectivity will fail.
In the VPC Dashboard, browse to “Route Tables” - select the route table connected to the proper VPC and browse to the “Route Propagation” tab. Click the Edit button so that you get this view:

All you have to do is to check the “Propagate” checkbox next to the VPG and click Save. After a few seconds you should be able to see the corporate IP subnet appear in the “Routes” tab:

Alright, so now we are done with the VPN configuration inside AWS. On to NSX!
VMware NSX Configuration
Within NSX, create a NSX Edge and the required topology. I’m not going into details of those steps, you can check out my VCIX-NV Study Guide for step-by-step guidance.
If you have the NSX Edge in place which will connect to AWS, create a VPN configuration and use the following configuration options:
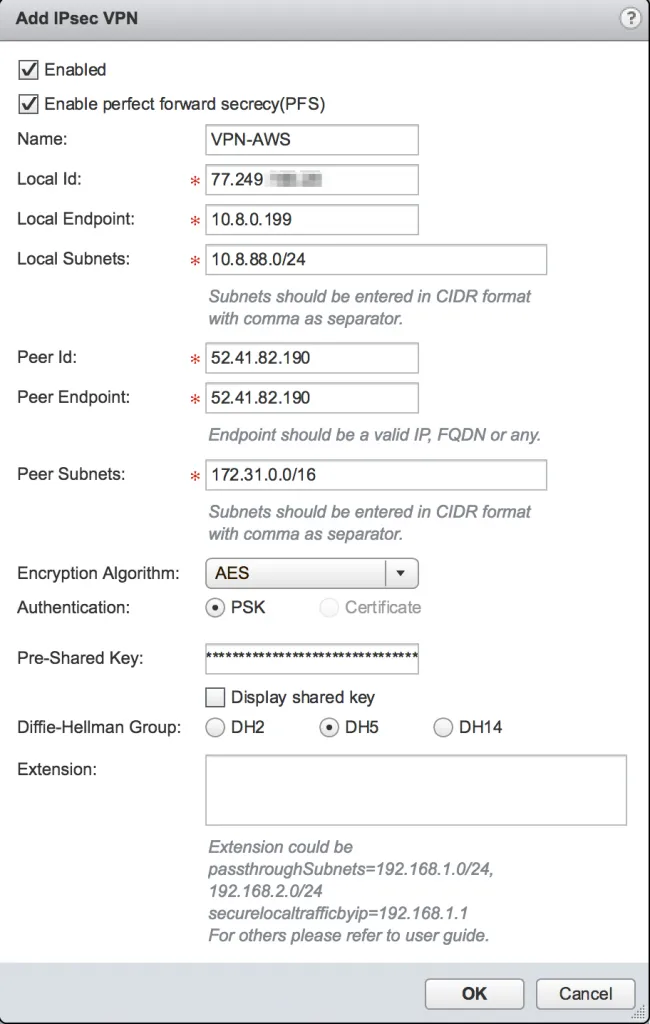
All these options were in the example VPN Configuration file that you downloaded from the AWS Console and a few should already be known (local IP subnet, local endpoint). After adding the VPN configuration, don’t forgot to publish the changes to the running configuration of the NSX Edge.
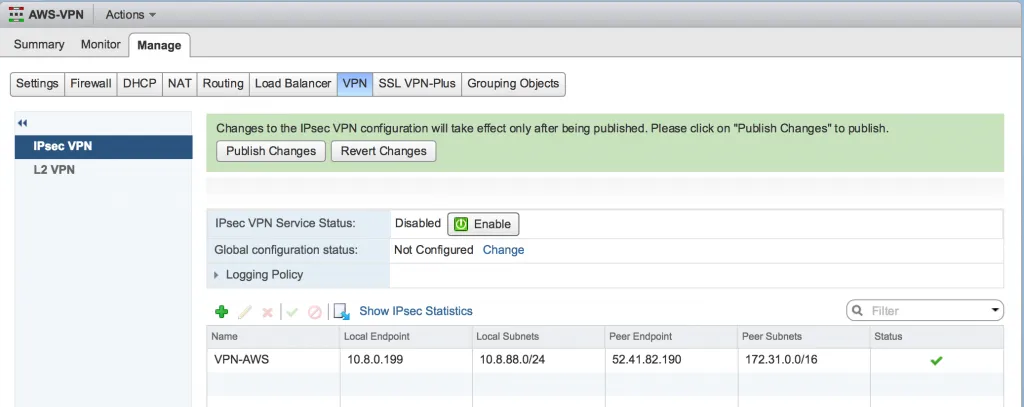
That should be it, you’re done! The VPN tunnel should activate and connectivity should be established. To check, you can use the VPN Connections page in AWS Console, by selecting the VPN Connection and having a look at the Tunnel Details tab. You should see that the VPN Tunnel has the status “UP”.
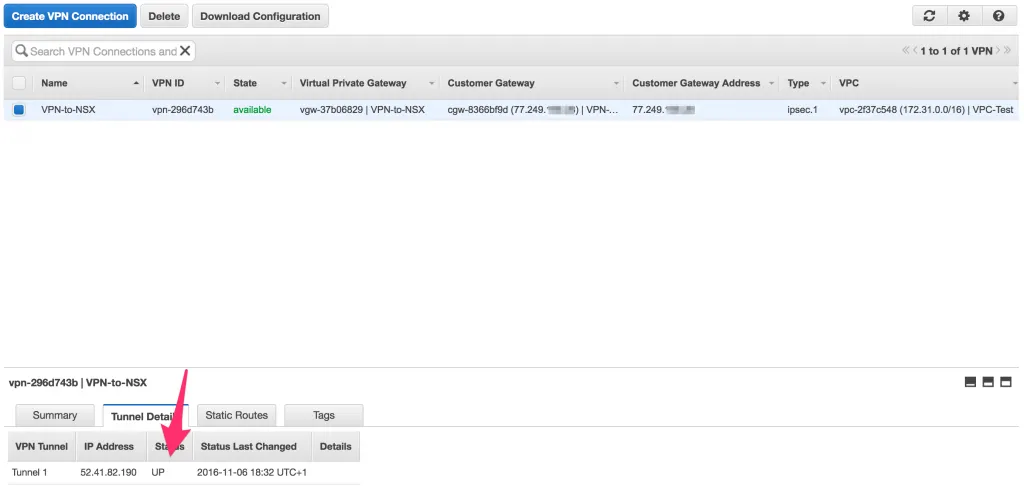
Also, if you see more than one VPN Tunnel in that overview, AWS has configured a redundant pair for you and you could connect to both endpoints to introduce redundancy. I had different results when setting this up a few times, where some had a single VPN Tunnel and some had two. Not sure why that was. ¯\_(ツ)_/¯
To check the status within NSX, you can either look in the GUI in the VPN overview and click Show IPsec Statistics and you will get this window:

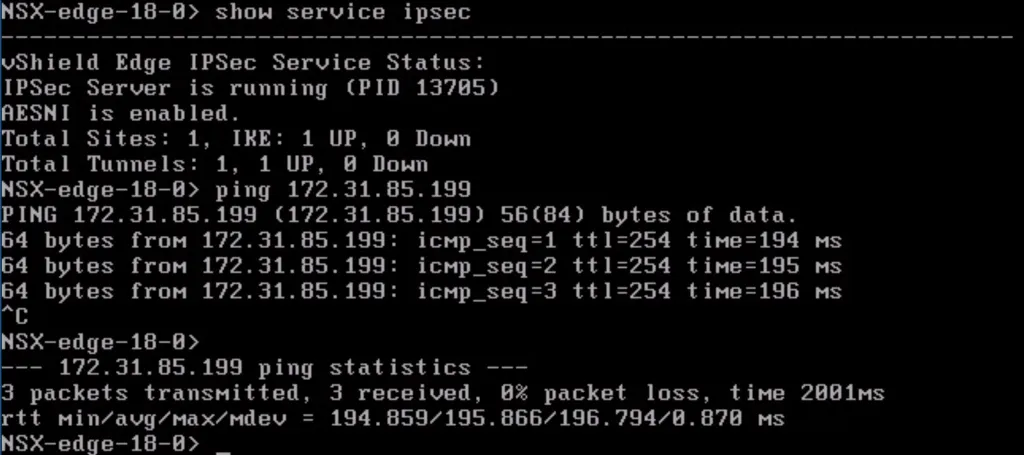
..Or you can connect to the NSX Edge (either SSH or console) and execute “show service ipsec” - It will show the amount of tunnels that are online. You can also execute a ping from the NSX Edge towards one of the AWS instances you have running.
