Using PowervRNI to Quickly Add Data Sources
This is the first post in a series on how to use PowervRNI to manage your vRealize Network Insight environment. Starting with Data Sources.
Data Sources
Brief background; data sources in vRNI are endpoints from which vRNI retrieves information from. Examples are: vCenter, NSX, Switches, Routers, Firewalls, an AWS account or converged infrastructure systems like Cisco UCS or HP OneView.
Adding data sources is usually only performed when vRNI is installed into the environment and every time a new endpoint is added to your environment (for example a new vCenter environment, or when a new switch is plugged in).
Why would you want to automate adding data sources? First off, adding all your data sources upon installation can be tedious and repetitive work. And if you are one of those companies who have automated the deployment of a new top-of-rack switch (like some of my customers), you would also want that switch to automatically appear in vRNI.
Using New-vRNIDataSource
One of the beauties of PowerShell, is that the cmdlet naming convention is structured in a way that it tells you exactly what it’s going to do. Same goes for New-vRNIDataSource. :-)
PS C:\> Get-Help New-vRNIDataSource

NAME
    New-vRNIDataSource

SYNOPSIS
    Create new datasources within vRealize Network Insight to retrieve data from.
There are a few parameters with the New-vRNIDataSource cmdlet available. Mostly for providing details on the data source. Let’s go through them:
-DataSourceTypeA data source type can be one of the following values:
- vcenter
- nsxv *
- ciscoswitch *
- aristaswitch
- dellswitch *
- brocadeswitch
- juniperswitch
- ciscoucs
- hponeview
- hpvcmanager
- checkpointfirewall
- panfirewall
If you provide either nsxv, ciscoswitch or dellswitch as the type, you need to supply specific options for those types.
-Username -PasswordCredentials to use to log into the data source.
[-IP ] [-FDQN ]Supply either the IP address or the FDQN (hostname) of the data source, don’t supply both.
-CollectorVMIdThis needs to be the entity ID of the vRNI collector appliance that will collect data from this source. This entity ID can be retrieved using the cmdlet Get-vRNINodes (example below).
-NicknameWithin vRNI, this data source will be identified with its nickname. It’s usually a good idea to configure this with the hostname of the data source.
[-Enabled ]By default, the data source will be enabled for collecting. You can disable it by providing $False on this parameter.
[-Notes ]Optional internal notes about the data source. This won’t show up anywhere but at the data source management within vRNI.
[-Connection ]With every PowervRNI cmdlet, you can supply an optional parameter identifying the vRNI connection you want to work with. This is useful when working with multiple vRNI instances at once. If you just have a single instance, you don’t need to use this parameter.
NSXv, Cisco & Dell Switches Specific Options
With NSX, Cisco and Dell switches there are specific data source options you need to supply.
NSX
-NSXEnableCentralCLIDo you want to enable collecting NSX Edge information via the NSX Central CLI, or do you want vRNI to directly connect to the NSX Edges: $True to use the Central CLI and $False to directly connect.
-NSXEnableIPFIXWith $True provided, this will enable IPFIX traffic monitoring data coming from NSX to vRNI. Note: this is different than the Netflow data vCenter can send via the VDS.
-NSXvCenterIDThe entity ID of the vCenter that is connected to this NSX Manager. This entity ID can be retrieved using the cmdlet Get-vRNINodes (example below).
Cisco Switches
-CiscoSwitchTypeBecause some Cisco switches have different features, CLIs and different commands to retrieve information, you need to specify what type of Cisco switch you are adding. Here’s a list of options:
- CATALYST_3000
- CATALYST_4500
- CATALYST_6500
- NEXUS_5K
- NEXUS_7K
- NEXUS_9K
Dell Switches
-DellSwitchTypeDell switches also have differences in features, CLIs and commands to retrieve information, so you also need to specify what type of Dell switch you are adding. Here’s a list of options:
- FORCE_10_MXL_10
- POWERCONNECT_8024
- S4048
- Z9100
- S6000
Example
Below is a screenshot of a call to New-vRNIDataSource to add a new vCenter server.
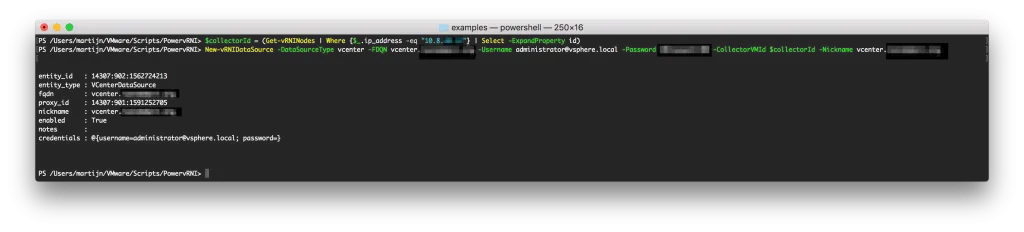
This first looks up the collector entity ID of the collector with the IP address “10.8.x.x” and then uses that entity ID to add a vCenter data source type with.
Adding in Bulk
If adding one by one isn’t quick enough (or if you have a couple dozen devices to go through), you can also use an example script that I put in the examples/ directory of PowervRNI: datasource-bulk-import.ps1
This script takes a CSV file as input and runs through that CSV to add multiple data sources. It contains all available parameters as a column and is formatted as follows:
DatasourceType;IP;Username;Password;Nickname;NSX_ENABLE_CENTRAL_CLI;NSX_ENABLE_IPFIX;NSX_VCENTER_NICKNAME;CISCO_SWITCHTYPE;DELL_SWITCHTYPE
vcenter;172.16.0.11;administrator@vsphere.local;MyPassword;vcenter.lab.local;onlyusedforNSX;onlyusedforNSX;onlyusedforNSX;onlyusedforCisco;onlyusedforDell
* Yes, it’s technically not a CSV as I used ’;’ for the separations. But this way Excel can read it into columns. ;-)
The column names represent the cmdlet parameters. This also means that for some data source types, not all columns are used. Hence the “onlyusedforNSX”, “onlyusedforCisco” and “onlyusedforDell” values in the line for a vCenter data source.
Usage
Once you have the CSV in order, you can run the script as follows:
PS C:\> ./datasource-bulk-import.ps1 -DatasourcesCSV ./datasource-bulk-import.csv
[01/15/2018 17:28:04] Adding a vcenter Data Source with IP 172.16.0.11..
[01/15/2018 17:28:04] Adding a nsxv Data Source with IP 172.16.0.12..
[01/15/2018 17:28:05] Adding a ciscoswitch Data Source with IP 172.16.0.13..
That’s it! Let me know if you have any questions. PowervRNI can be found on GitHub and on twitter for the latest news.