Using PowervRNI to Quickly Add Applications
This is the second post in a series on how to use PowervRNI to manage Applications within your vRealize Network Insight environment. If you’d like to learn about managing Data Sources with PowervRNI, check here.
Applications
Introduced in vRealize Network Insight 3.2 in the begin of 2017, Applications are logical containers which can contain the structure of applications (including tiering). You can use these application containers to better visualize what network flows are going between specific applications or even application tiers. Next to insights into your applications, you can also use it to take a per-application approach to micro-segmentation, using the planner feature in Network Insight.
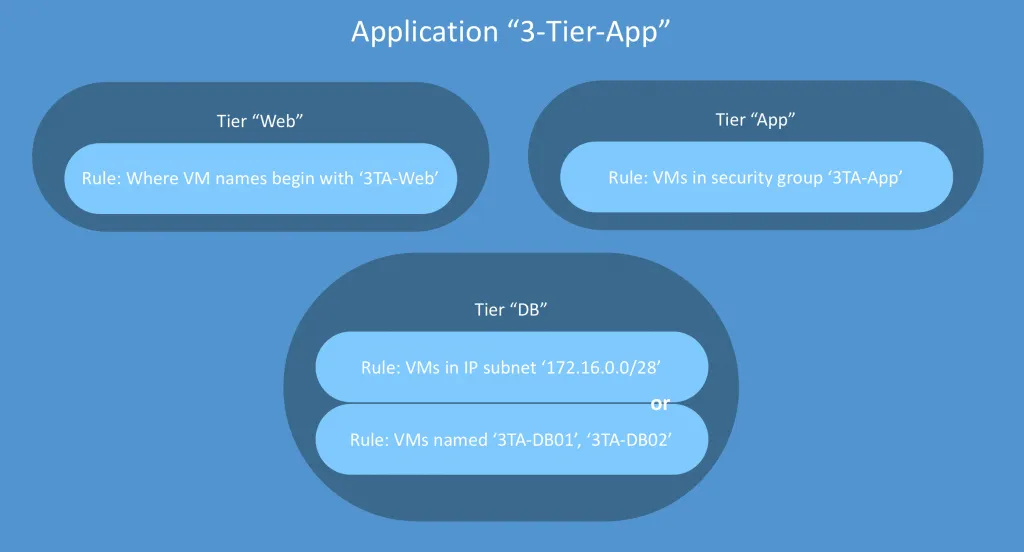
The first thing you should know is that the application container has a few concepts to it. The application itself, then tiers that make up the application (for instance, the easy 3 tier app: Web, App and Database tiers) and inside the tiers there are rules that determine what VMs will be placed in that tier. These rules can be based on the same criteria as you can use in the search engine, so you can get really creative. Below is a visual explanation of the different concepts:
Creating Applications with PowervRNI
So, to automate the creation of the application you need to be able to create applications, then the tier and the rules that will place VMs into the tiers. Here are the cmdlets in PowervRNI which will help:
- Get-vRNIApplication
- Get-vRNIApplicationTier
- New-vRNIApplication
- New-vRNIApplicationTier
- Remove-vRNIApplication
- Remove-vRNIApplicationTier
To create a new application, first use New-vRNIApplication to create the container and then New-vRNIApplicationTier to fill that container.
Using New-vRNIApplication
An application is just an empty container, so creating it is easy and straightforward:
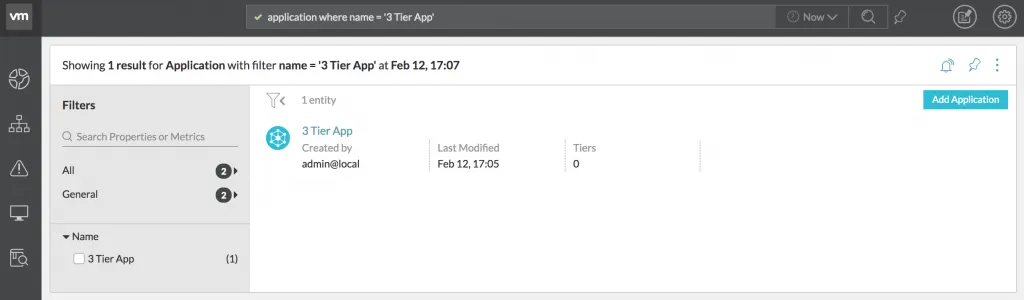
PS ~/PowervRNI> New-vRNIApplication -Name "3 Tier App"

entity_id          : 14307:561:939980817
name               : 3 Tier App
entity_type        : Application
create_time        : 1518451535762
created_by         : admin@local
last_modified_time : 0
last_modified_by   :
That’s it. The return value is the Application object, which contains the newly created entity id and a few other details. After running this, you can verify using the interface:
Using New-vRNIApplicationTier
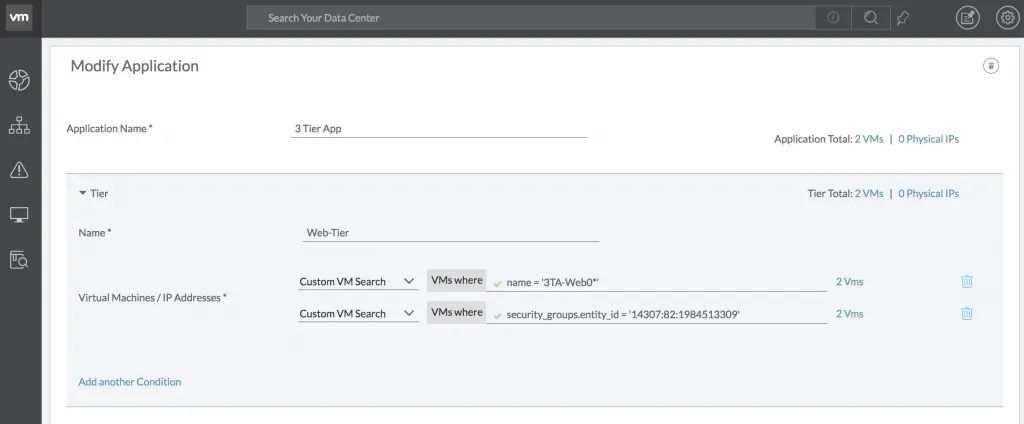
Once you have an application container, you can define the tiers. Due to some limitations of the current vRNI API, you can currently only use VM names and NSX Security Groups to define the tier membership. Below is an example that uses both VM names and security groups:
PS ~/PowervRNI> $security_group_id = (Get-vRNISecurityGroup SG-3Tier-Web).entity_id
PS ~/PowervRNI> Get-vRNIApplication "3 Tier App" | New-vRNIApplicationTier -Name Web-Tier -Filters ("name = '3TA-Web0*'", "security_groups.entity_id = '$security_group_id'")

entity_id                 : 14307:562:323469247
name                      : Web-Tier
entity_type               : Tier
group_membership_criteria : {@{membership_type=SearchMembershipCriteria; search_membership_criteria=}, @{membership_type=SearchMembershipCriteria; search_membership_criteria=}}
application               : @{entity_id=14307:561:788532360; entity_type=Application}
I’ll go through what happened here step by step:
- First, we find the entity ID of the security group called SG-3Tier-Web and store it in $security_group_id
- Then we use New-vRNIApplicationTier to create a new tier called Web-Tier with 2 rules:
- Put in all VMs where the name begins with 3TA-Web0
- Put in all VMs that are in the security group called SG-3Tier-Web
If you then validate this in the interface, you’ll see a newly added Web-Tier with the provides rules in it. You’ll also notice that there’s a “2 Vms” behind the rule. This is because I have 2 VMs called 3TA-Web01 and 3TA-Web02. Both are also in the security group ST-3Tier-Web.
Adding in Bulk
Using the cmdlets described above is pretty quick, but imagine doing that a couple 100-times in a greenfield environment. Not fun.
With that in mind, I’ve put up an example on how to import a lot of applications at once in the examples/ directory called: application-bulk-import.ps1
Similar to the data source bulk import script, the application bulk import script uses a CSV file as input. The CSV file has the applications, tiers and security groups and/or VM names in it. Here’s an example of how it should be formatted.
Application;Tier;Security Group;VM Names
App01;Web;;App01-VM1-Web,App01-VM2-Web
App01;App;ST-App01-App;App01-VM*-App
App01;DB;ST-App01-DB;
App02;NoTier;ST-App02;
App03;Web;;App03-Web*
App03;DB;;App03-DB*
* Yes, it’s technically not a CSV as I used ‘;’ for the separations. But this way Excel can read it into columns. ;-)
As you might notice, the same Application can contain multiple lines. This is because each line represents an application tier and you can have multiple tiers in 1 single application. You can use either the Security Group or VM Names column to create the filters, or you can use both columns if the VMs need to have a certain name and be a member of a specific security group.
Usage
Once you have the CSV filled with data, you can run the script as follows:
PS ~/PowervRNI/examples> ./application-bulk-import.ps1 -ApplicationsCSV ./application-bulk-import.csv
[02/12/2018 20:06:21] Processing application App01..
[02/12/2018 20:06:21] Application App01 not found, so creating it..
[02/12/2018 20:06:21] Added Tier 'Web' to application 'App01' with filters: name = 'App01-VM1-Web' or name = 'App01-VM2-Web'
[02/12/2018 20:06:22] Processing application App01..
[02/12/2018 20:06:24] Added Tier 'App' to application 'App01' with filters: security_groups.entity_id = '14307:82:1984513309' name = 'App01-VM*-App'
[02/12/2018 20:06:25] Processing application App01..
[02/12/2018 20:06:27] Wanted to use Security Group SG-App01-DB, but it doesn't exist - so skipping this rule!
[02/12/2018 20:06:27] Skipping Tier 'DB' in application 'App01' because filters are empty!
[02/12/2018 20:06:27] Processing application App02..
[02/12/2018 20:06:27] Application App02 not found, so creating it..
[02/12/2018 20:06:29] Wanted to use Security Group SG-App02, but it doesn't exist - so skipping this rule!
[02/12/2018 20:06:29] Skipping Tier 'NoTier' in application 'App02' because filters are empty!
[02/12/2018 20:06:29] Processing application App03..
[02/12/2018 20:06:29] Application App03 not found, so creating it..
[02/12/2018 20:06:29] Added Tier 'Web' to application 'App03' with filters: name = 'App03-Web*'
[02/12/2018 20:06:30] Processing application App03..
[02/12/2018 20:06:30] Added Tier 'DB' to application 'App03' with filters: name = 'App03-DB*'
That’s it! Let me know if you have any questions. PowervRNI can be found on GitHub and on twitter for the latest news.