I use CrashPlan Home for all my off-site backups of my client devices. It's a pretty neat and usable backup client which works on Mac OS, Linux and Windows. From the client you can restore individual files and it runs as a service for continuous backups. It's a set and forget application, which is nice.
Bye Bye CrashPlan for Home
Recently, Code42 announced they’d be shutting down CrashPlan for Home to focus on their business customers. Meaning every consumer has to transfer their backups to another solution. I had the family plan, which allows you to backup multiple computers (I have a 'few') for $150 a year. Which is doable. Unfortunately, the alternatives like BackBlaze, Carbonite or Mozy don’t have similar family plans, which make them roughly 2 to 3 times more expensive than CrashPlan for Home was.
On top of that, I have non-technical users which are used to the CrashPlan client and can work with it just fine. Switching means I need to do education on the new client. I wanted to stick with the client.
Backing up to other computers
The CrashPlan client has the ability to send your backups to another computer instead of the CrashPlan cloud. That would be an easy way to get around the fact that were is not going to be a CrashPlan cloud pretty soon. I just needed an off-site backup target.
Microsoft Action Pack and its Azure credits
There's this Action Pack membership which Microsoft has for partners to get Windows, Office, Visual Studio, Office365 licenses (and a lot more), but it also includes monthly Azure credits. Basically anything you need to run a SMB.
OK, the title of this post might be a little misleading because the Action Pack itself is not cheap; $475 a year (plus you need to do a couple of quizzes before they let you register). Significantly more than the $150 a year for CrashPlan. However, there's a whole lot more in the Action Pack that you can use. Personally, I use the Office365 licenses and basically all other licenses (Windows/Office/Visual Studio) that are included.
It’s especially interesting when knowing you get $100 per month on Azure credits. So put it $475, get out $1200 alone in Azure credits, not too bad.
Using Azure as a Backup Target
We can use the free Azure credits perfectly fine to host a Virtual Machine to put CrashPlan on and send the backups to Azure. As usual per a public cloud, sending data to Azure is free but if you have to do a restore and send data from Azure to your restore target, will cost you. It will come off from your $100 of credits, but restoring 1TB will deduct around $85. If you're looking to restore more than 1TB, it might cost you. Keep that in mind. My restores won't get that big in one go, so I'll be fine on the credits. https://azure.microsoft.com/en-us/pricing/details/bandwidth/
Creating the Azure VM
They've made creating a VM on Azure pretty easy and there are templates available. Just to make it easy on myself I chose to create a Window VM (the CrashPlan client is easier & quicker on Windows). Go to the Azure Portal: https://portal.azure.com/ and login with the same email address as you’ve registered the Action Pack.
After logging in, do the following;
- Browse to "Virtual Machines" in the left navigation menu
- Click the "+ Add" button at the top left
- In the new window;
- Give your new VM a name
- Change the VM disk type from SSD to HDD
- Enter a username & password you'll use to login
- Create a new Resource group, give it a name
- Check yes on the "Already have a Windows Server license?" question and tick the confirm checkbox
- Click OK
- Step 2 is to select a sizing of the VM. Go small; I used the "A1 Basic" with 1 vCPU and 1.75GB vRAM.
- Step 3 is to configure some final settings;
- Set High Availability to "None" (it's only backups)
- And set "Use managed disks" to Yes, so it creates the new disk automatically (saves you some trouble).
- The rest can be left set standard
- Step 4 is just a confirmation, click OK when you've checked everything
Expand the storage
The VM will now be deployed, which takes a couple of minutes. After it's done, you have a ready to use Windows server with a standard OS disk. This is not going to be enough if you're using it for backups, so we need to add another disk for data.
Add a data disk:
- Browse to "Virtual Machines" in the left navigation menu
- Select the VM you've just added
- Select "Disks" in the VM sub-menu
- Under "Data disks" click "+ Add data disk"
- Under the newly created row, select "Create disk"
- In the new window;
- Give the new disk a name
- Tick "Use existing" on the Resource group
- Select a size, I wanted 1TB so I left it at the default of 1023GiB.
- Click OK
- Don’t forgot to click "Save" when the second window closes and you’ve added the data disk.
Install CrashPlan Client on the Azure VM
After deploying the VM, you need to install the CrashPlan client (download here https://github.com/smitmartijn/crashplan-clients if you can't find it anymore), login with your previous credentials and prepare the client for incoming backups.
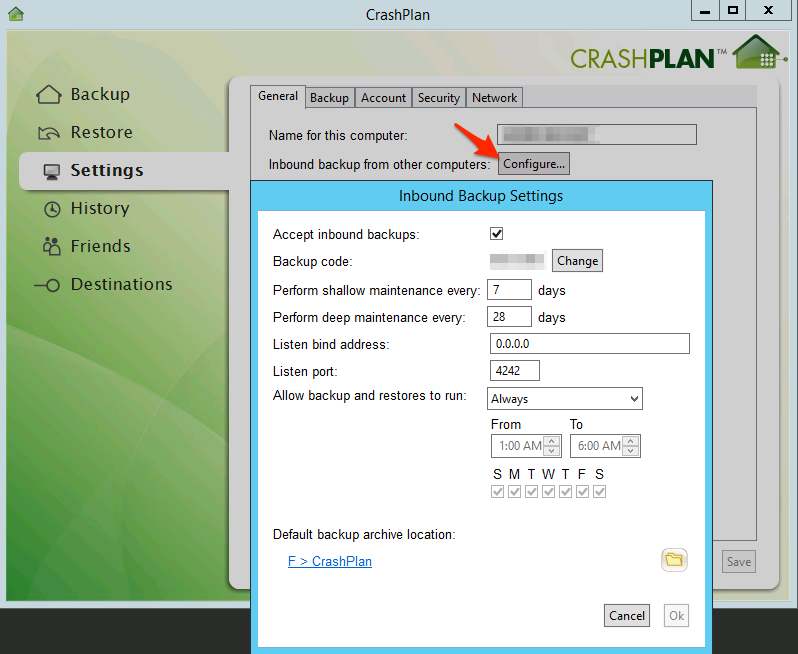
In the client settings, click the "Configure" button next to "Inbound backup from other computers:" option. Make sure to enable "Accept inbound backups" and point the "Default backup archive location" to the data disk.
Configure the CrashPlan Clients
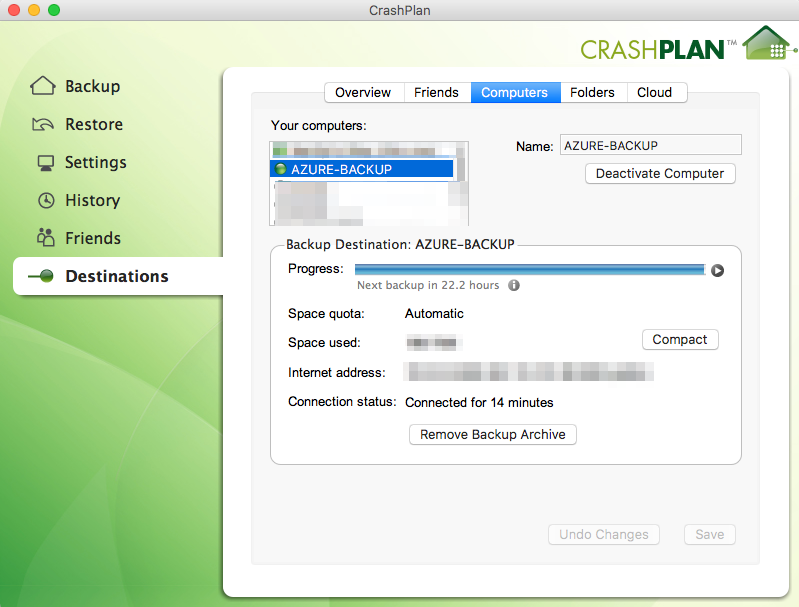
All that remains now is to have your computers use the new backup target. This is as simple as choosing the VM in Azure as a destination. You can do this in the "Destinations" page under the "Computers" tab. Once you've selected the Azure VM as your destination, the client will start sending the data to Azure.
Leave a Reply