This post is a part of my NSX SD-WAN by VeloCloud series to dive deeper into the acquisition of VeloCloud by VMware, late last year. In an earlier post, I explained the concepts behind the architecture of NSX SD-WAN and with this post, I will dive into the VeloCloud Orchestrator (VCO) to see what you need to configure to generate an SD-WAN network. Please note that the Orchestrator can be used to monitor and troubleshoot the SD-WAN as well, I will cover those topics in a future post.
VeloCloud Orchestrator (VCO) - What is it?
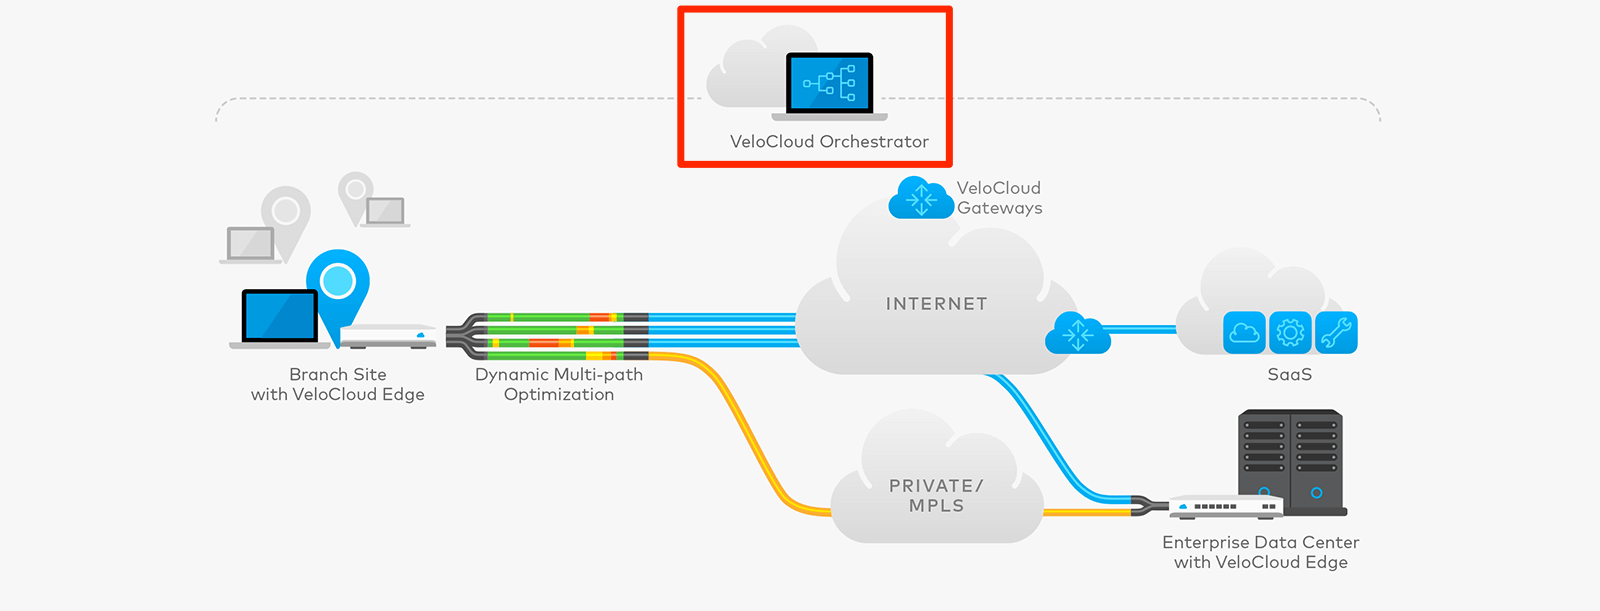
The VCO is the management plane of the NSX SD-WAN solution. It's a centralized configuration, real-time monitoring and troubleshooting portal. You use it to create a configuration that gets effected at the VeloCloud Edges and Gateways. Essentially it is a web interface and an API (more on that later!), mostly delivered as SaaS - but also available as a virtual appliance to run yourself. Not having to worry about updating the VCO and keeping the platform stable and reachable, should be someone else's burden - not yours. If you have to run it yourself for compliance reasons, you can.
Here's what the web interface looks like:
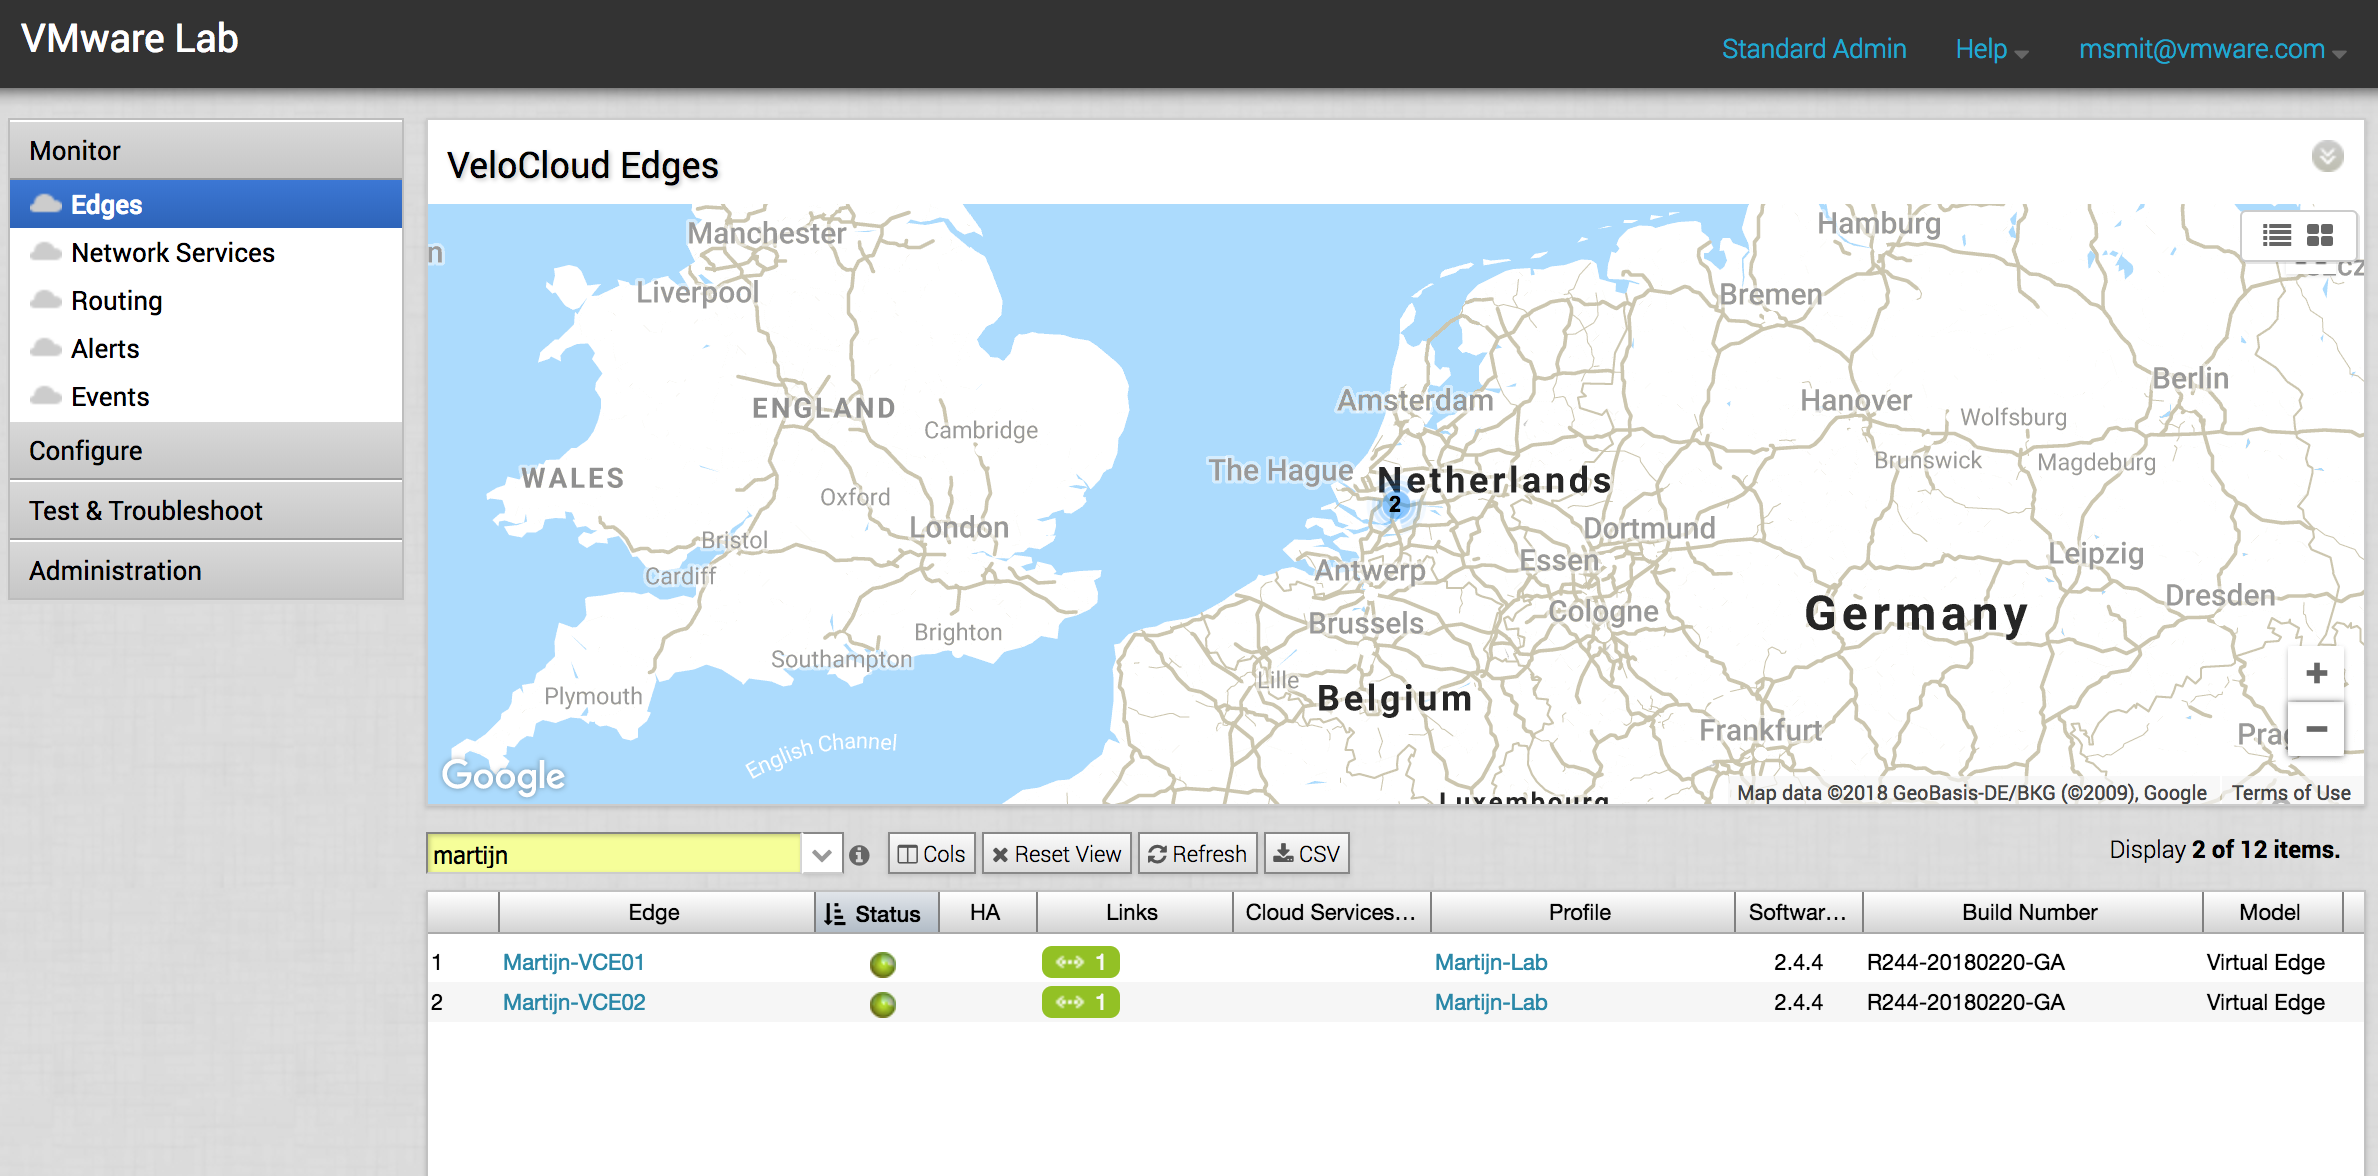
The VCO is divided up into 3 pieces: the web interface (pictured above), an API and the Orchestrator Application. The web interface and API can be consumed by administrators and the Orchestrator Application is the workhorse that executes everything. This is also the part that talks to the VeloCloud Edges.
APIs are one of my favorite subjects, but I'm going to dive into the VCO API in a next post and focus on the configuration options inside the VCO for now.
Configuration Objects
Getting a basic SD-WAN up and running inside the VCO is really simple. It requires you to configure 3 objects, which have a specific order of configuration. The following list contains those objects, in order of configuration:
Let's unpack these to see what's needed.
Network
A network represents the IP space that will live inside your SD-WAN. There are two options here: Overlapping IP Addresses or Non-Overlapping IP Addresses.
Overlapping IP Addresses
When you choose overlapping IP addresses, all Edges receive the same exact IP ranges on each branch. Basically, don't choose this when you want a meshed network and every client on the SD-WAN should be able to connect to every other client on the SD-WAN. However, there is an option to allow communication over the SD-WAN by using NAT. Not perfect, as your clients will be masked.
Here's an overlapping network:
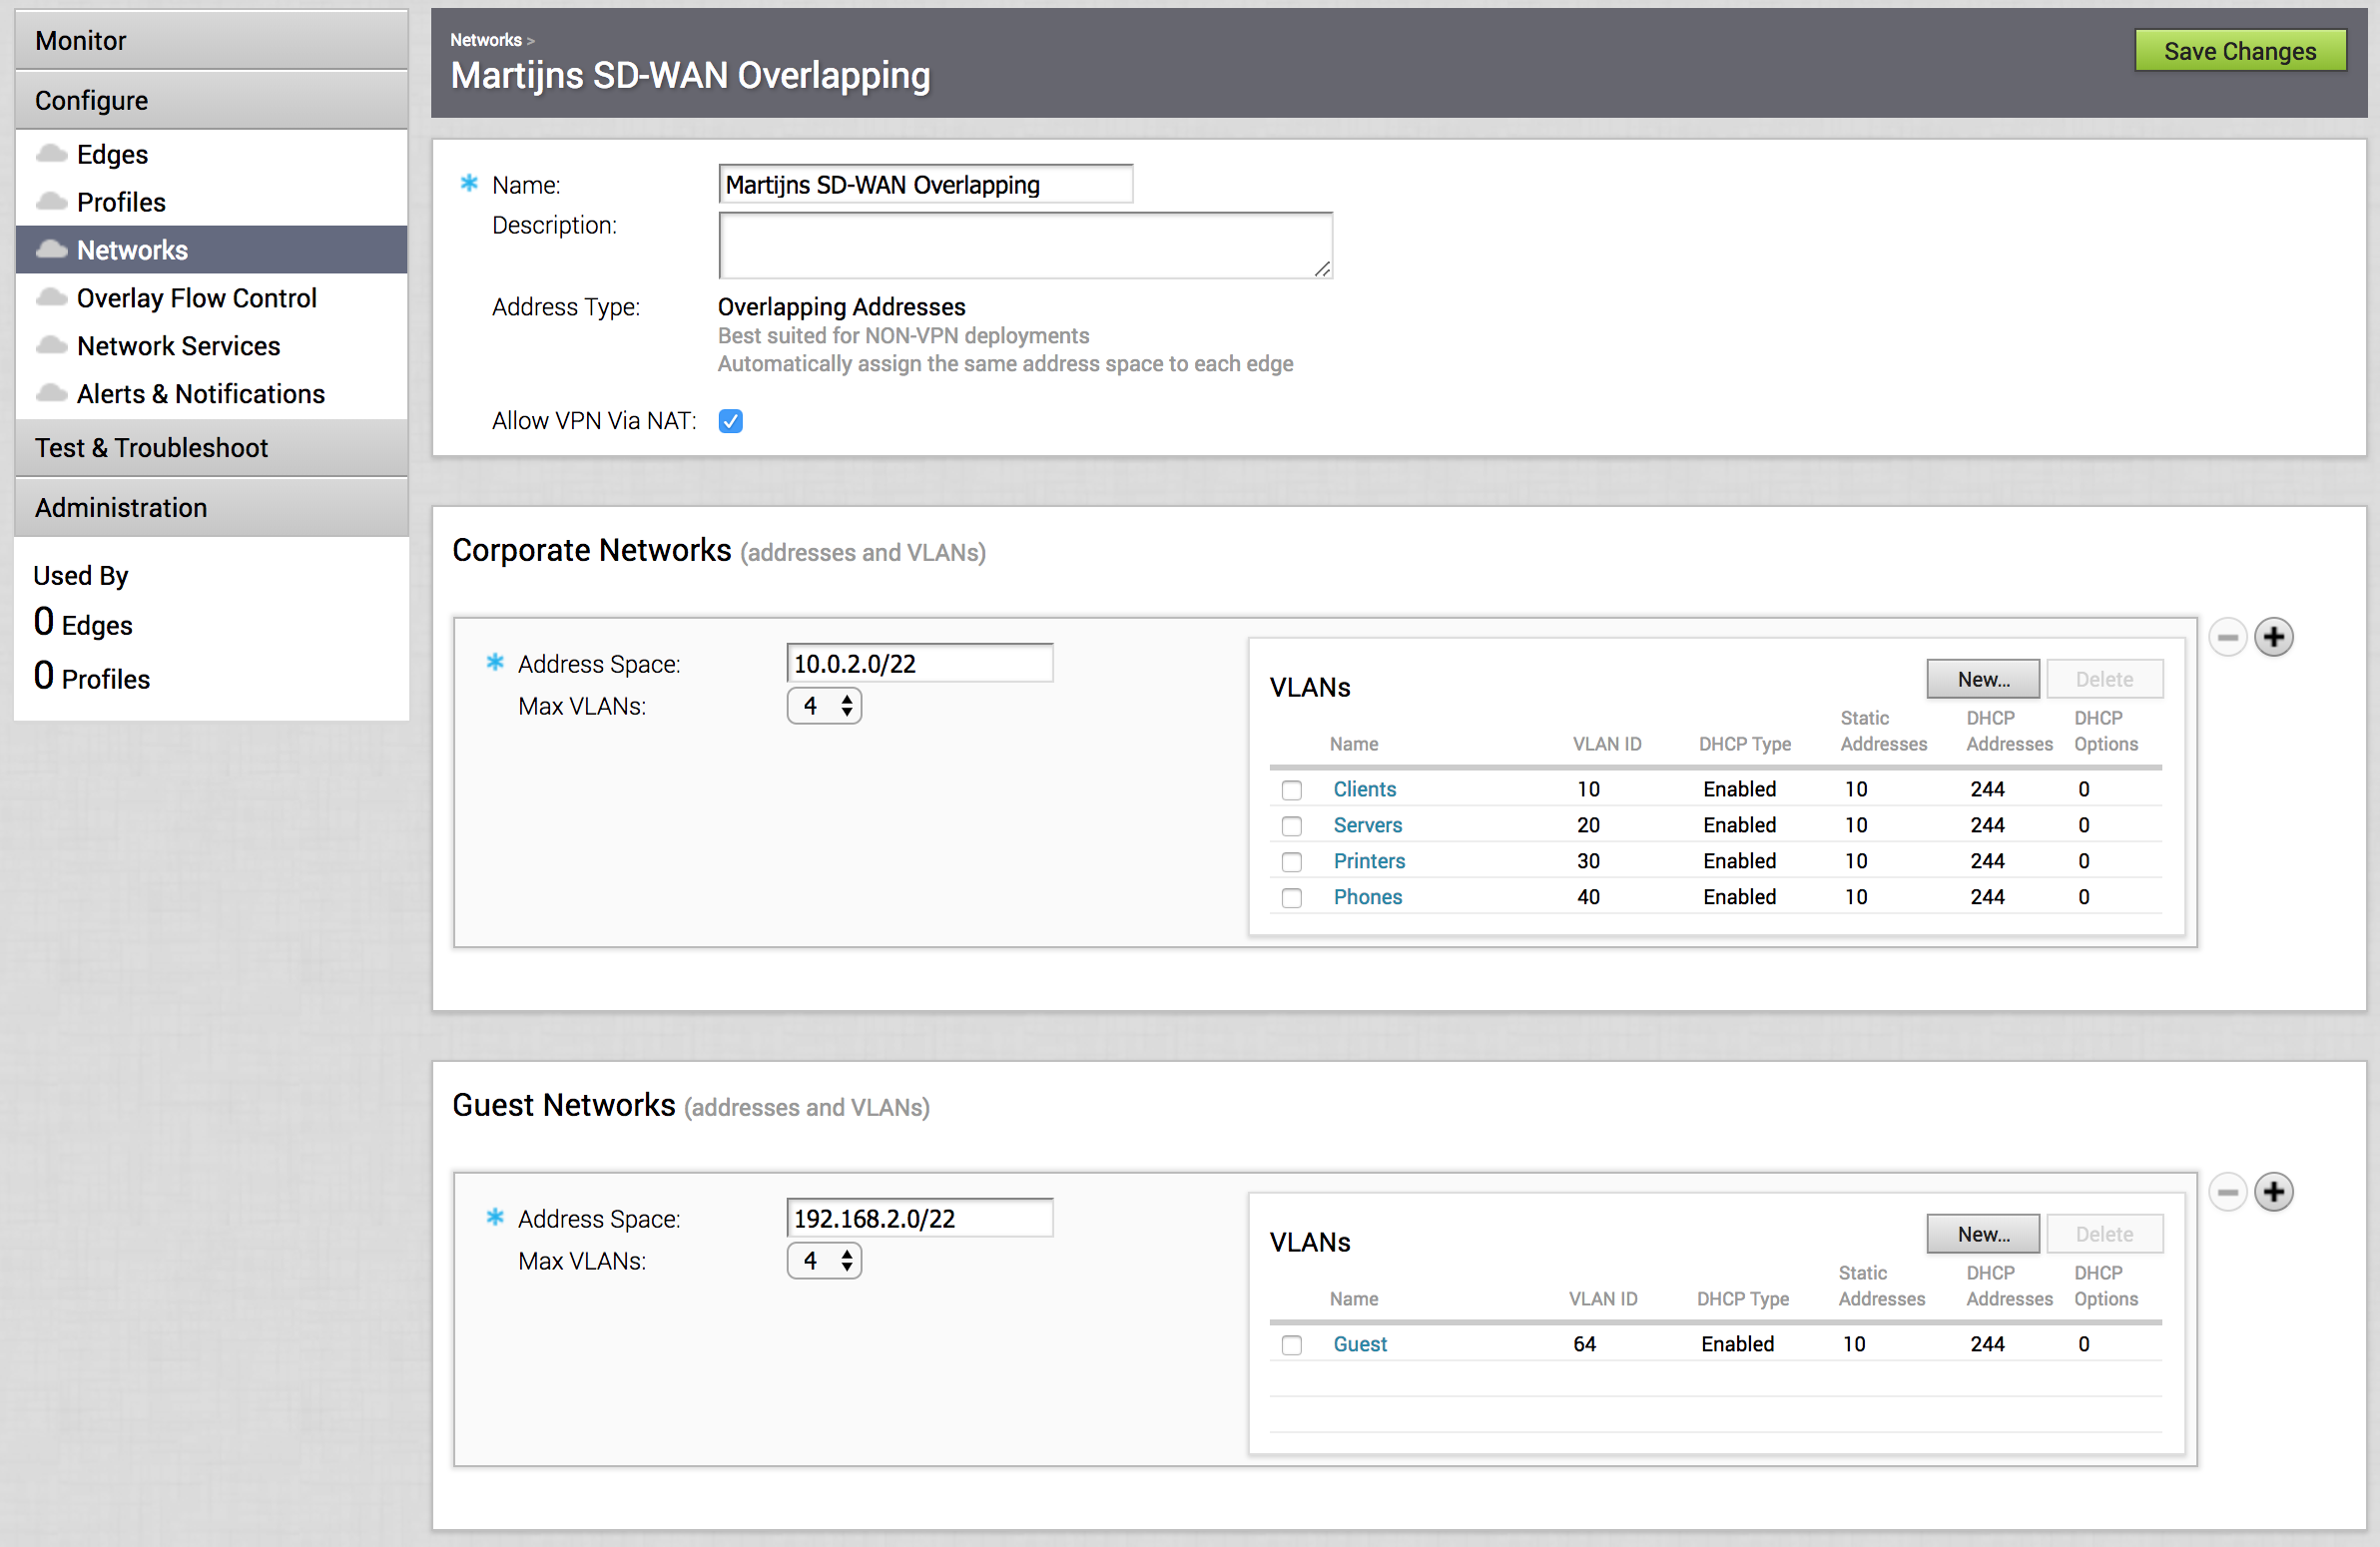
This shows the available networks on each branch. There's a 10.0.2.0/22 supernet defined and that is divided up to a max of 4 VLANs, which means every network gets a /24. I've added 4 networks here (by default you get 1 network called 'Corporate' with VLAN ID 1) as an example.
Non-Overlapping IP Addresses
When you choose Non-Overlapping IP Addresses, you define a supernet that spans the entire SD-WAN (so it'll be a bit bigger than an overlapping network) and Edges will get IP ranges from that supernet. You don't have to manually fill all the branch IP ranges details per Edge, this is distributed automatically by carving up this supernet and handing out the IP ranges that are needed according to the profile.
To visualize that, here's a non-overlapping network:
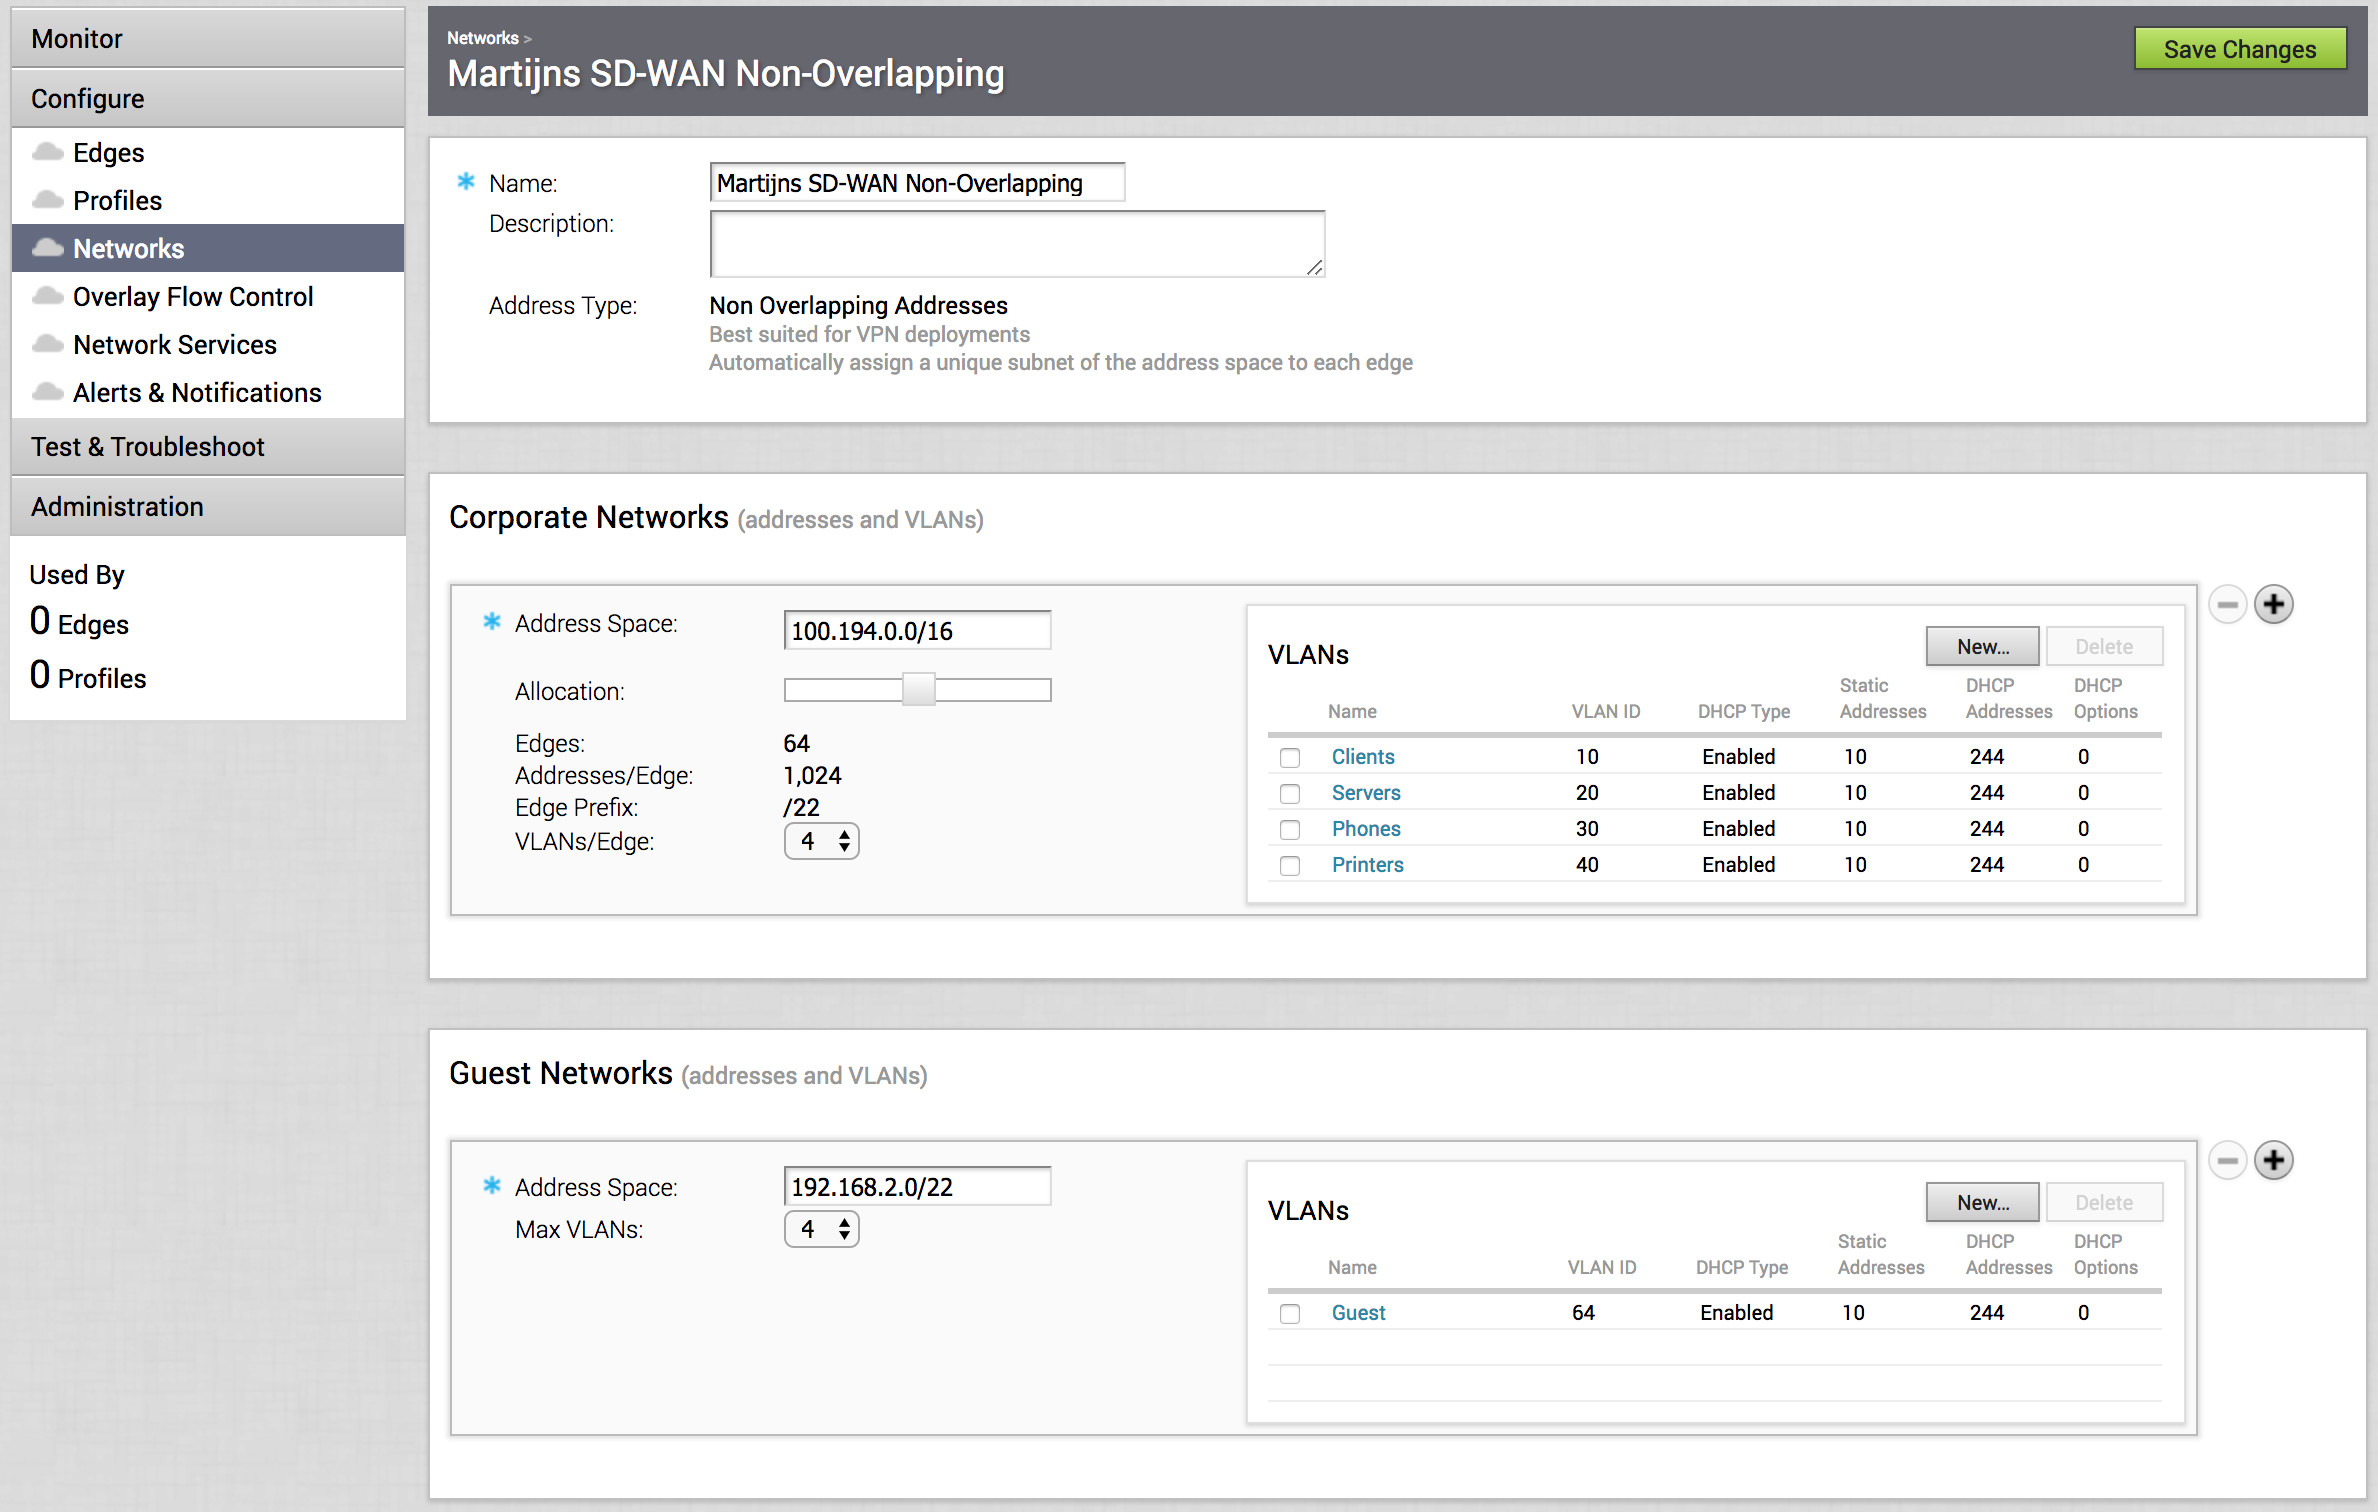
In the Corporate Networks, I've defined 100.194.0.0/16 as the supernet. Then moved the slider underneath to where I can roll out a maximum of 64 Edges on this network, which means every Edge will get a /22 assignment. That also means that the 4 VLANs I've created will get a /24 each. You can play around with the maximum VLANs per Edge and the Allocation to get the right division of your supernet. Important to know is that this network profile will be the same for every Edge, so the same VLANs on each branch, same subnets. You can make a manual exception within a specific Edge, but more on that later.
Also, notice that the Guest Networks is always local to the branch itself and does not propagate onto the SD-WAN - meaning your guests can connect to the internet and that's it.
Profile
Alright, now that we've defined a network that defined the IP ranges of your SD-WAN, let's move on to the Profile that defined the configuration of your Edges. The Profile defines the configuration of your Edge interfaces, Wi-Fi, DNS, SNMP, Firewall, all that good stuff. It is still an abstraction, as you can create a single Profile for a multitude of Edges. This is what makes VeloCloud so simple, as you can create a massive SD-WAN using a single Network, a single Profile and 1000s of Edges. Change 1 thing in the Profile and all those Edges are changed.

When creating a Profile, you first select the Network it should operate in. Then you move on to which Edge types can be used with this Profile and configure that Edge types' interface settings. I've expanded an Edge 500 here, which has 4 LAN interfaces and 3 WAN interfaces. I had defined 4 VLANs in the Network, so I assigned each LAN interface an untagged VLAN. The WAN interfaces I've left at their default, to get IP details (address & default gateway) via DHCP. You can also set it as a static IP address, which you can define on a per-Edge basis. I've also defined 2 wireless networks: one for the branch clients and one for any guests.
The rest of the options are pretty straightforward router networking options:
- Wi-Fi Radio Settings: enable or disable it, which frequency to use.
- DNS Settings: you can define a private (internal DNS) and a public DNS server set here.
- Authentication Settings: you can use WPA2 / Enterprise authentication on the wireless networks and authenticate the users via radius.
- SNMP: v2c & v3 SNMP for hooking the Edges up to a separate monitoring system.
- Netflow Settings: monitor the traffic flows by capturing the network flow metadata to a netflow collector (version 10 only).
- NTP Servers: your private NTP servers. Otherwise, the Edge will sync with the VCO.
After going through all that, it's time for one of the best parts of the VeloCloud configuration: the Business Policy.
Business Policy
The VeloCloud solution is application aware and you can make sure certain applications get the right kind of performance by getting priority over other traffic, selecting a specific WAN link for it, or allowing it to multi-path over all WAN links.
It is composed as a firewall rule list and works the same way: first come, first serve. Every rule holds a source, destination, application and an action. The action is just a little bit more elaborate as a deny or allow. ?
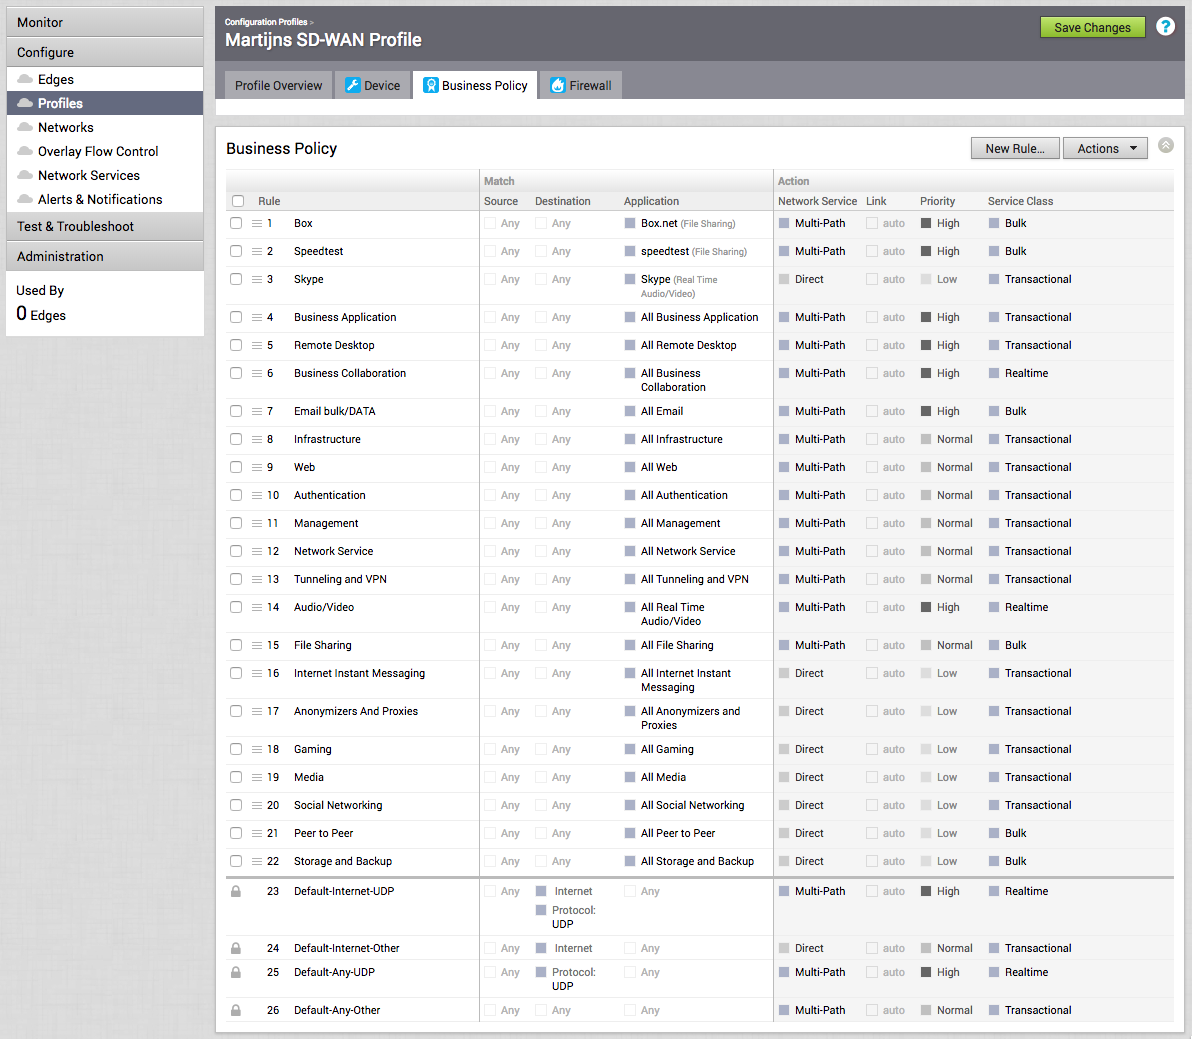
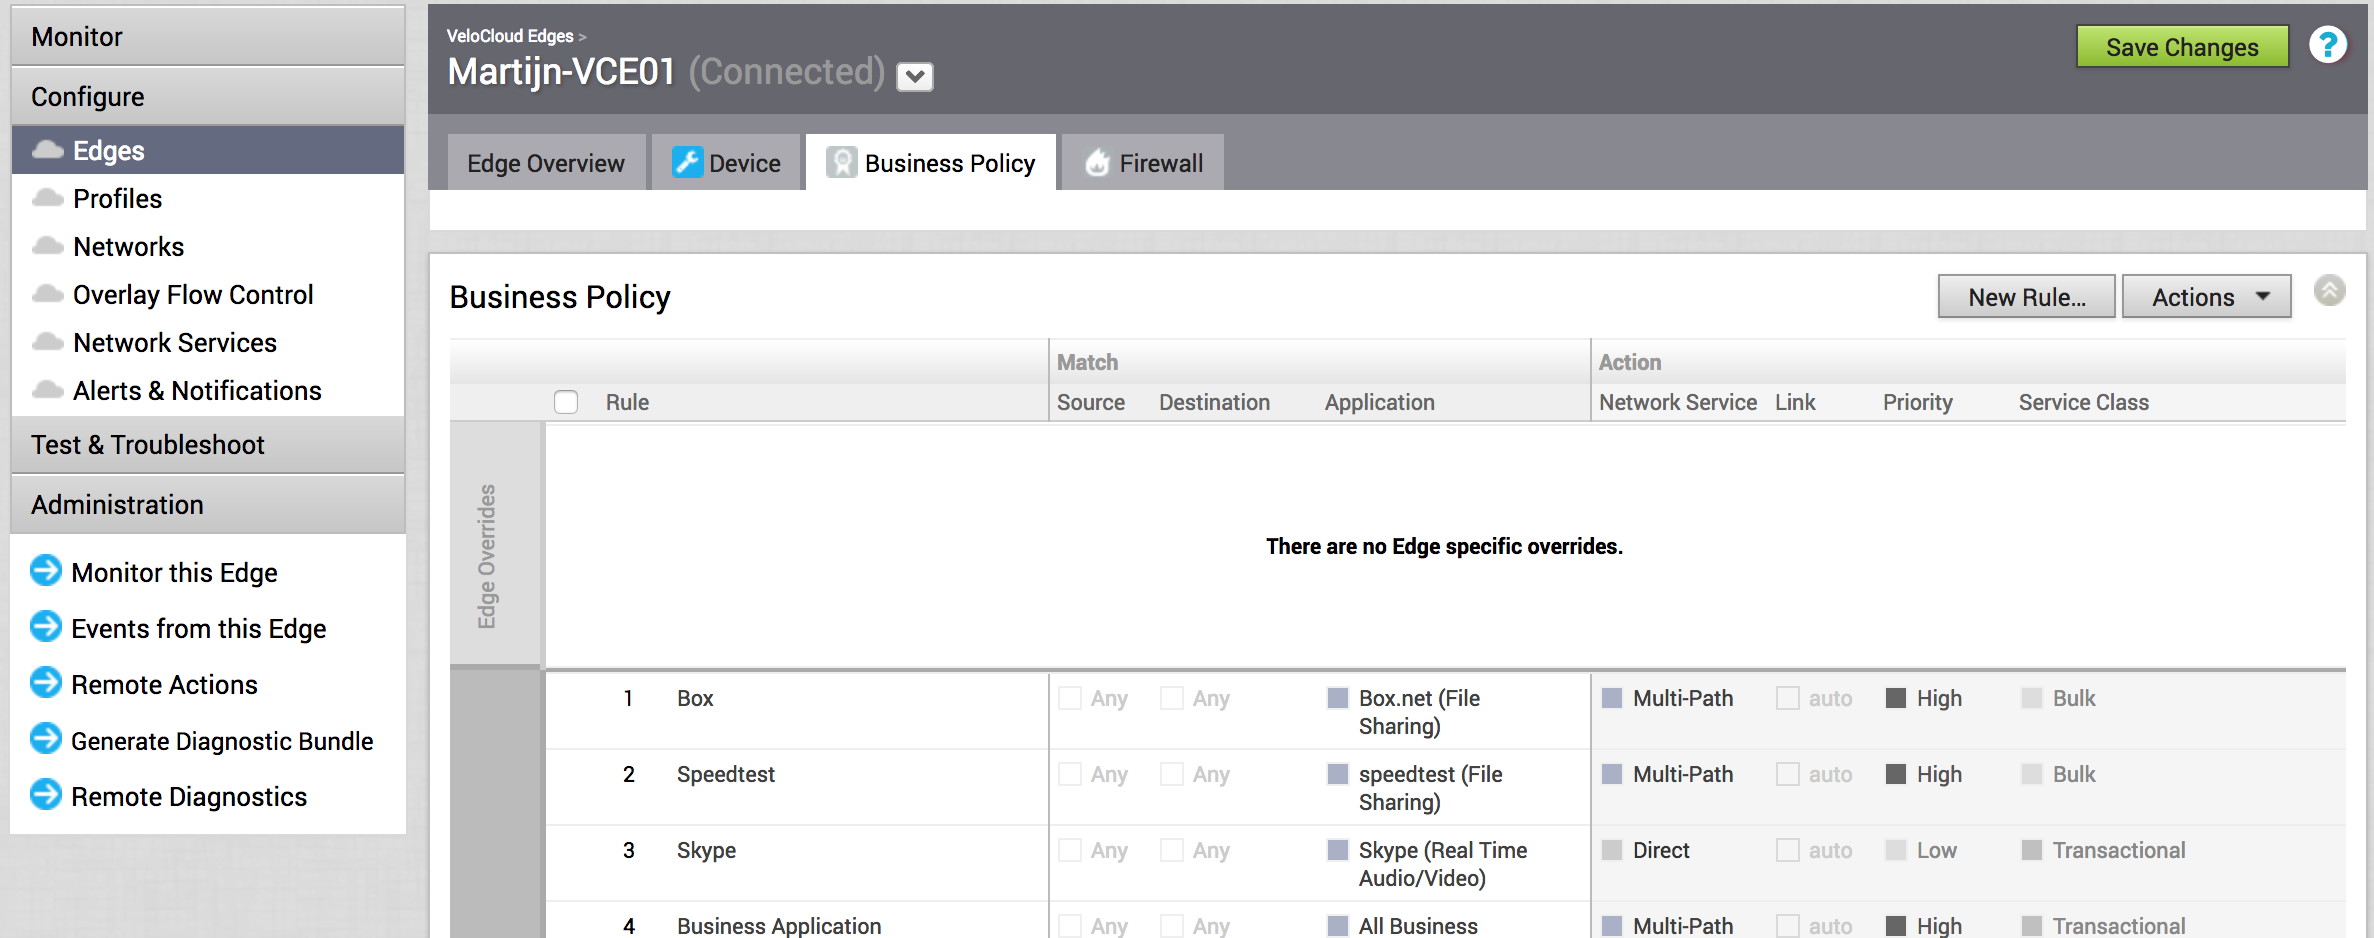
This list shows a couple of examples. For instance, Box filesharing is defined as a high priority and makes sure it uses multiple WAN links to load balance traffic. Skype is defined to bypass any Cloud Gateways and go directly to the client that's calling. The entire social media networking group (Facebook, Twitter, Snapchat, etc.) is marked with a low priority and also bypass the Cloud Gateways (no use in wasting Gateway bandwidth with social media).
You can define the order of rules by drag and drop and add and delete rules as you please. Also, note the default rules at the bottom, this is a template you can define on a higher level so you can make sure certain policies are on all profiles.
Let's look at a rule more closely:
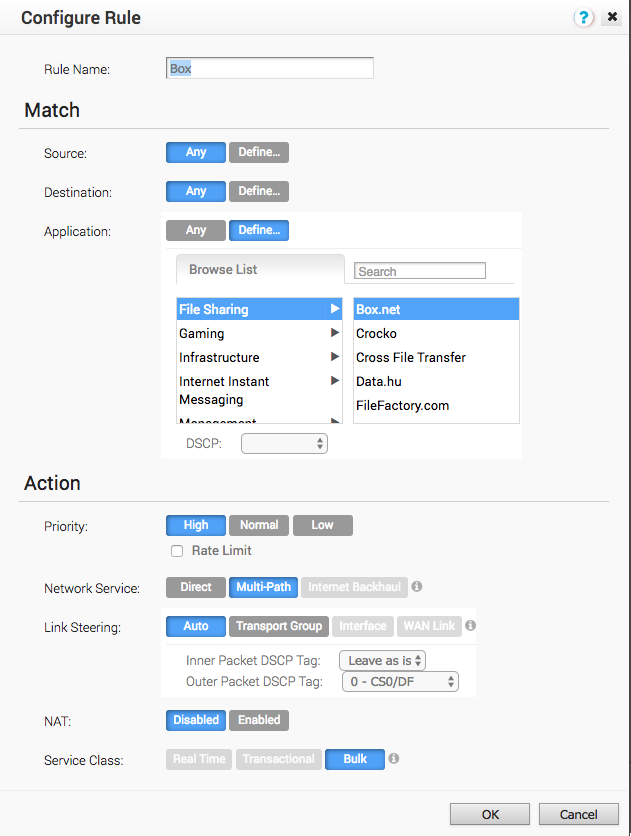
Again, it's pretty similar to a firewall rule where you can define a source (being a VLAN, IP range/address, source ports or even Operating Systems) and a destination (IP range/address, hostname, protocol or destination ports), an application (and 1000s of them to choose from) and an action. In the above screenshot, I've been rather generic by simply referring to all Box.net filesharing traffic.
In the action, it's been marked with a high priority and no rate limit (you can limit traffic to a certain percentage of your WAN links). I'd like it to load balance over multiple WAN links (Multi-Path) and not bypass the Cloud Gateways (Direct) and not be backhauled through a HUB (Internet Backhaul). I've also kept it simple when it comes to the traffic load balancing and left Link Steering at automatic, instead of steering the Box.net traffic to a specific WAN link or a set of WAN links.
You can also play around with the QoS DSCP tags to hand prioritization tags over to your WAN. If you enable NAT, you'll be asked for the Source & Destination NAT IP. The Service Class is a simple way of determining the difference between real-time (i.e. SIP), transactional (i.e. web) and bulk (i.e. backups) traffic. It's greyed out here because the Box.net definition already has defined that it is bulk type traffic.
That's it, one of the most powerful features in VeloCloud, but stripped down to be completely simple and allowing admins to focus on what's important.
Firewall
There's one tab left in the Profile configuration; the firewall that will be applied to the Edges. I'm not going to spend too much time here, but it is good to know that you can use the same application database as in the Business Policy rules in the firewall rules. That means you can be really granular when it comes to blocking and allowing traffic coming from your clients.
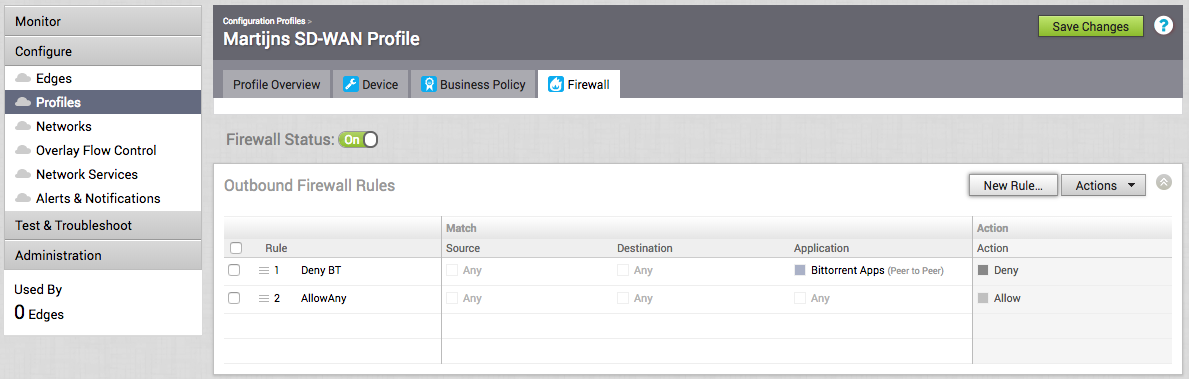
The above example only blocks BitTorrent traffic and allows the rest. After creating a profile, only one thing remains...
Edge
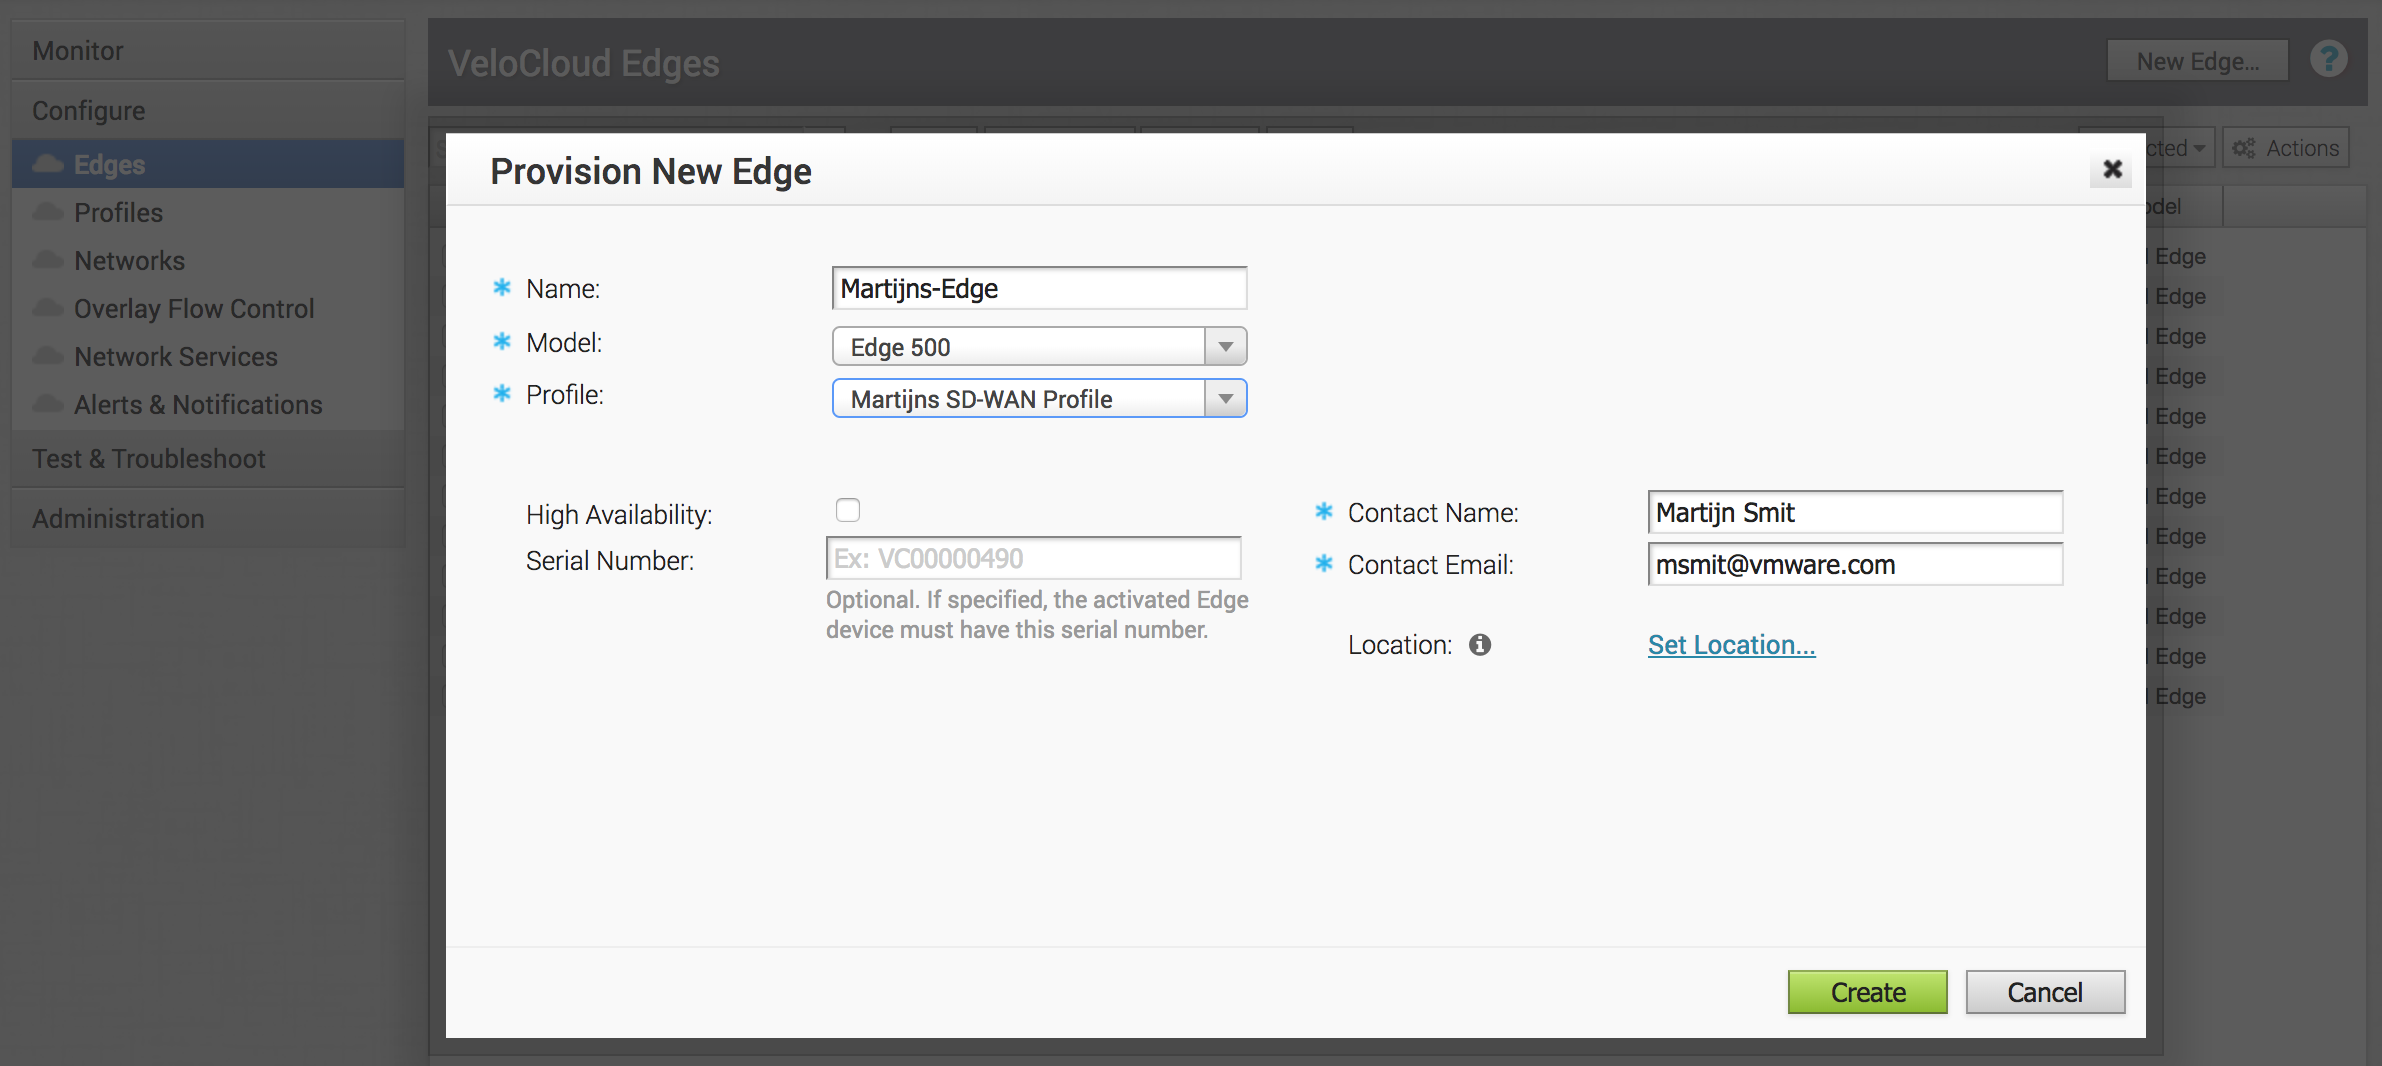
We've come to the last part of the minimal configuration for an NSX powered SD-WAN; the Edge. The Edge is a physical or virtual appliance that handles the network traffic and becomes a termination point of the SD-WAN. Per Edge device you have, you'll need to create an Edge record in the VCO.
To create a new Edge, hit New Edge under Configure -> Edges and you'll be presented with a brief form where you can give the new Edge a name, determine the model and attach the previously created profile. You can also enter metadata about the contact details and the location. Edges can also be clustered together for high availability, which you can also enable here.
Activation
After the Edge has been created, it's waiting for activation. You can send an activation email from the VCO to anyone that will receive and unbox the Edge if it's a physical appliance. This (2 minute) YouTube video has a pretty decent way of showing how simple it is. If you're deploying a virtual appliance, I have the steps outlined here (link to own blog).
Once it's activated, you'll see it in your inventory with the configuration you specified in the Profile. If you specified a static IP address for any of its interfaces, you'll need to provide it, along with any static routes. If you have no Edge specific configuration, then this is it. The Edge is online and a part of your SD-WAN according to the configuration in the Profile and it should forward traffic.
Override the Profile
Good to know, is that you can override almost all configuration on an Edge, to make an exception to the attached profile. You don't have to create a whole new profile, but you can simply override it for that one specific Edge. For regular settings, look for a checkbox that mentions 'override' (there are a few variations: 'Override interface', 'Enable Edge Override'), which will open up the Profile settings when enabled.
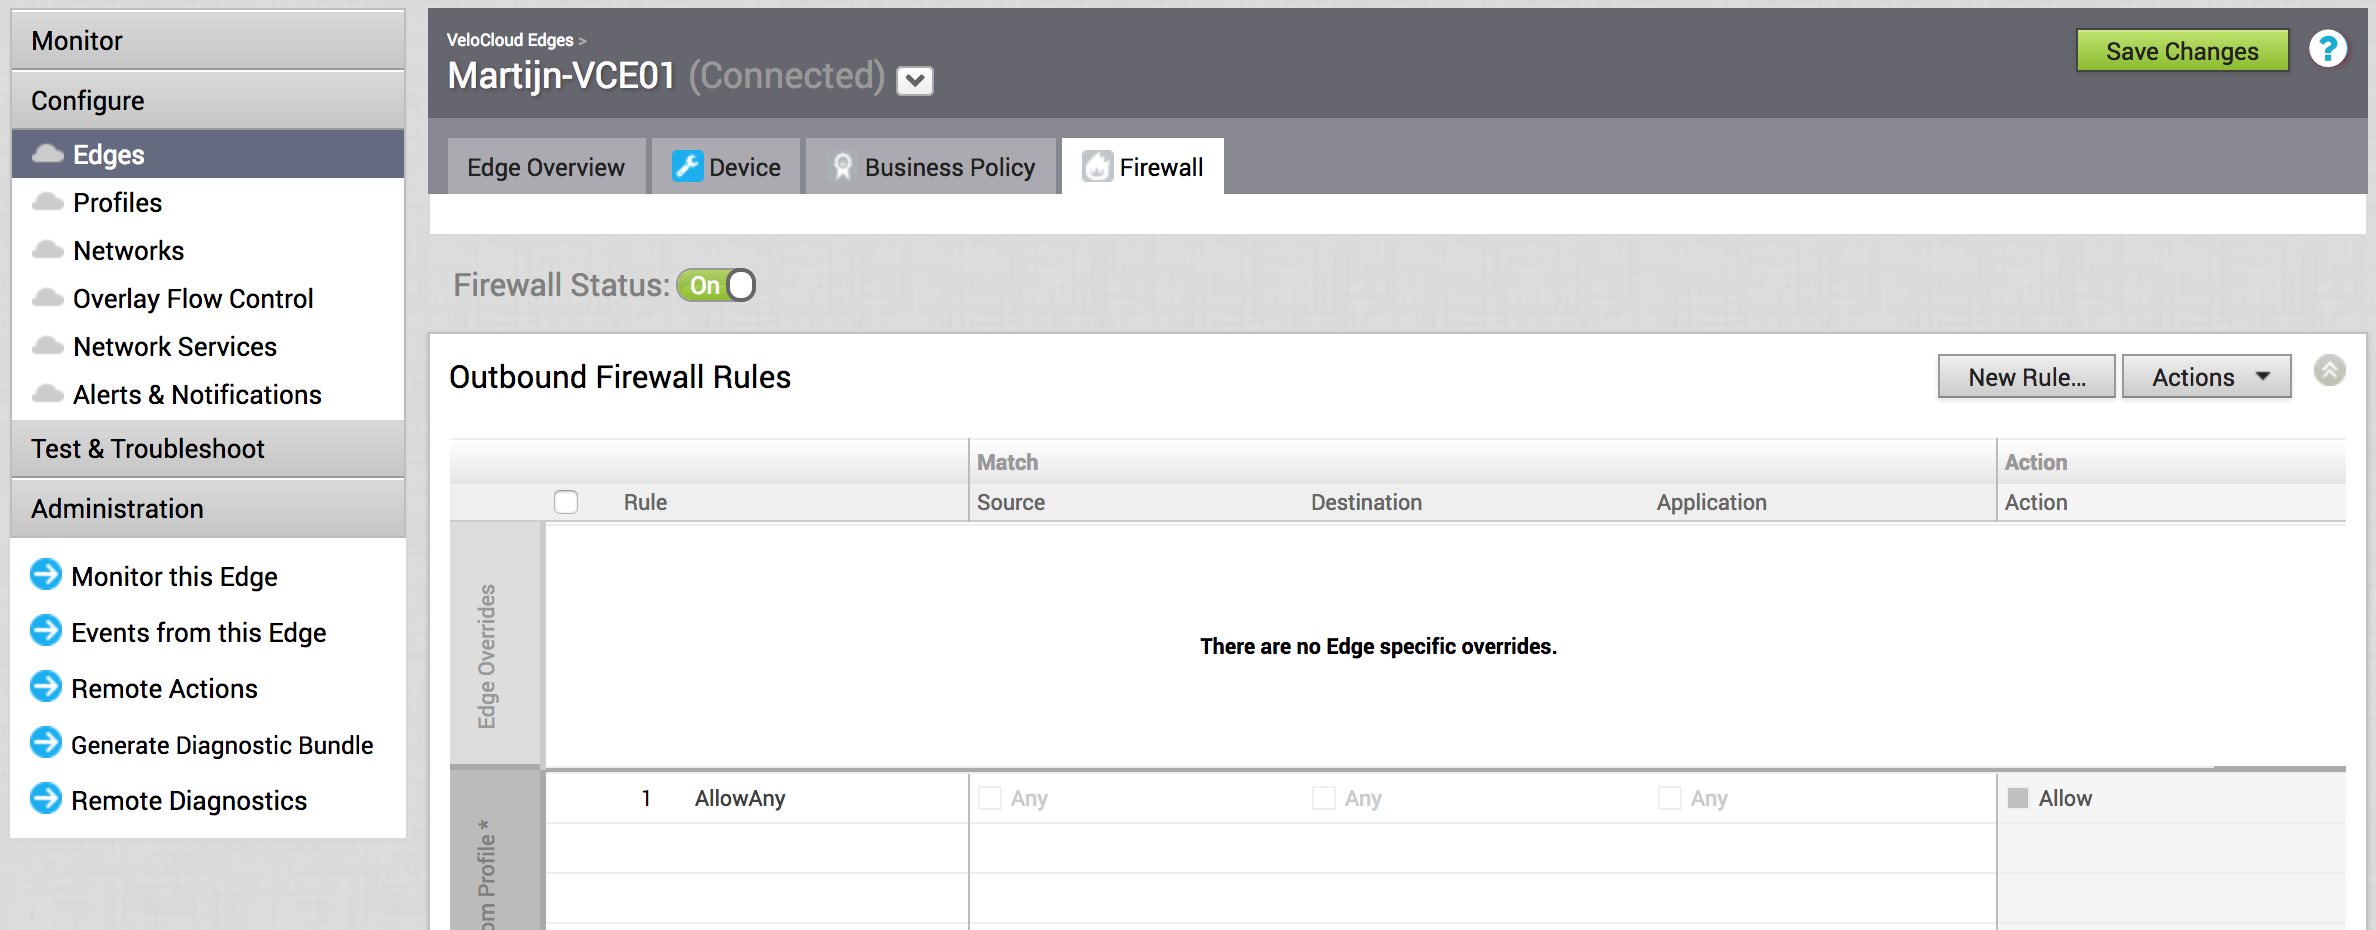
Also, the Business Policy and Firewall configuration is open by default for Edge specific rules. You simply add rules from the Edge point of view and they become Edge Overrides.
|
|
Conclusion
That's it. This is what it takes to create a minimal SD-WAN configuration on the Orchestrator. If you hurry up and have all the details, you can go from 0 to SD-WAN in about 10-15 minutes.
Next in this series, I'll dive into the advanced configuration and monitoring & troubleshooting. Thanks for sticking to the end!
Leave a Reply